Last Updated on October 10, 2026
A paint sprayer does not wear out. It seizes up. Almost every machine that gets thrown away after two summers was killed by dried paint in the pump, not by use, and the whole of that damage happens in the hour after you stop spraying.
So any useful answer to how to clean a paint sprayer starts with the clock, then splits by what you sprayed and what you sprayed it with — because the fluid that cleans latex paint will do nothing to shellac. And if you are reading this because you already left it too long, there is a rescue section further down that is worth trying before you buy a new machine.
How to clean a paint sprayer: the short version
To clean a paint sprayer, return the leftover paint to the can, move the intake into your flushing fluid — warm soapy water for water-based paint, mineral spirits for oil-based — and run the machine until the liquid coming out runs clear. Then relieve the pressure, strip off the tip, guard and filters, and scrub those by hand. Finish by running storage fluid through the pump if it will sit for more than a few days.
- Pour the leftover paint back into the can.
- Feed the machine flushing fluid instead of paint, with the drain tube in an empty bucket.
- Run on low until the drain runs clear.
- Switch to spray, trigger into the waste bucket until that runs clear too.
- Turn it off and pull the trigger once more to relieve the pressure.
- Remove the tip, guard and every filter. Scrub them by hand.
- Wipe the machine down and dry everything.
- Anything longer than a few days on the shelf wants a protective film left behind it, not water.
20 to 40 minutes, every time. That is the trade for owning a sprayer, and it is the part our guide to using a paint sprayer warns you to budget for.
First: how long have you actually got?
This is the question nobody answers, and it is the one that decides whether you are doing a clean or a rescue.
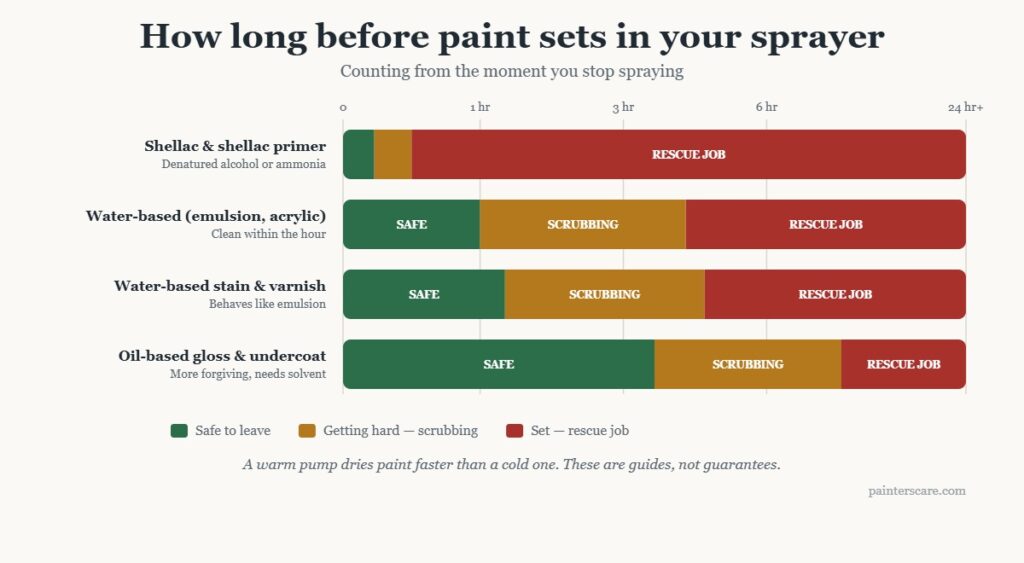
Water-based paint is the unforgiving one, which surprises people who assume solvent paints are the difficult ones. Latex paint dries by evaporation, and the film it forms is not water-soluble again once it has gone off. Inside a warm pump with a thin film of paint on every surface, that can start within the hour.
- Water-based (latex paint, acrylic, latex): clean within 60 minutes. By 3 hours you are scrubbing. By the next day it is a rescue job.
- Oil-based (gloss, eggshell, oil undercoat): more forgiving — several hours is usually survivable — but it needs solvent, and solvent left sitting attacks seals.
- Shellac and shellac-based primers: minutes, not hours. Shellac sets fast and hard, and it needs denatured alcohol or ammonia rather than water or mineral spirits.
- Stains and thin finishes: follow whichever base they are. A water-based stain behaves like latex paint. How you thinned it matters too — see mixing paint for a spray gun and, for solvent paints, thinning oil-based paint.
If you are pausing between coats rather than finishing, you do not need a full clean. On an airless, leave the system full of paint, wrap the tip and gun in a damp cloth inside a plastic bag, and it will be fine for about 2 hours. Overnight, submerge the intake in water and relieve the pressure first.
What to flush with
Match the fluid to the paint, not to the machine. Getting this wrong wastes an hour and can leave you worse off — water on oil-based paint simply beads off it, and mineral spirits on latex paint can curdle it into a mess inside the pump.
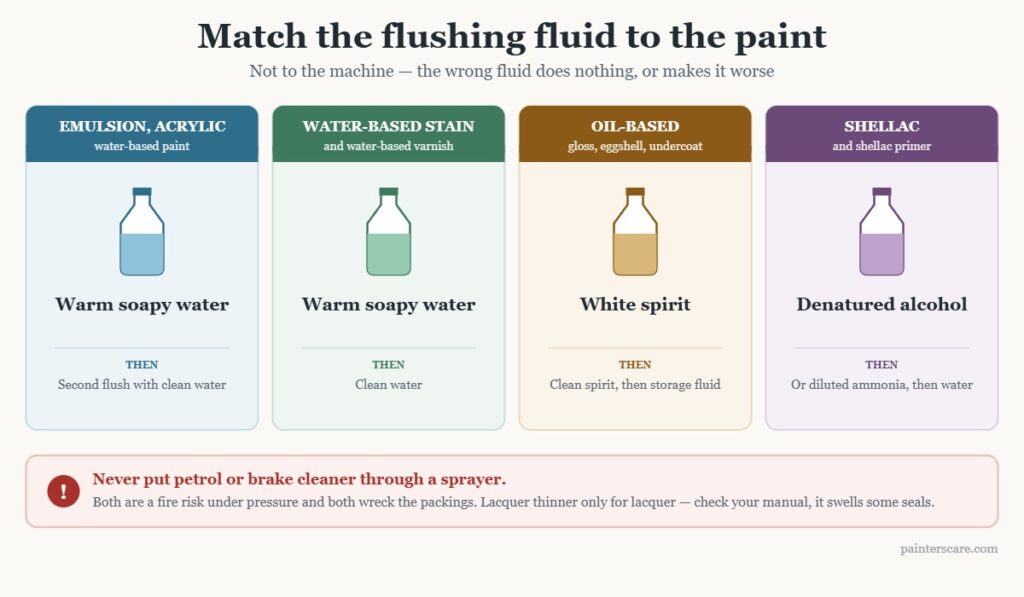
| What you sprayed | Flush with | Then |
|---|---|---|
| Latex paint, acrylic, latex | Warm water with a little dish soap | A second flush with clean water |
| Water-based stain or varnish | Warm soapy water | Clean water |
| Oil-based gloss, eggshell, undercoat | mineral spirits (mineral spirits) | Clean spirit, then storage fluid |
| Oil-based stain or varnish | mineral spirits | Clean spirit |
| Shellac and shellac primer | Denatured alcohol, or household ammonia diluted in water | Water, then dry thoroughly |
| Lacquer | Lacquer thinner — check your manual first | Clean thinner |
Two warnings on that table. Lacquer thinner is aggressive enough to swell or destroy the seals in some machines, so check the manual before it goes anywhere near a pump. And never run gasoline or brake cleaner through a sprayer, whatever a forum tells you — both are a fire risk under pressure and both wreck the packings.
If you are unsure what your paint is based on, the can will say how to clean the brushes. Whatever it names is your flushing fluid. Our guide to using paint thinner properly covers the solvent side in more detail.
How to clean a paint sprayer: airless machines
This is the hose-and-pump machine you hire or buy for walls, ceilings and exteriors — our roundup of airless paint sprayers covers the homeowner-sized units. It holds the most paint in the most places, so it takes the longest.
Step 1: Recover the paint and relieve the pressure
Switch the machine off. Turn the prime valve to prime to drop the pressure, then point the gun into the paint bucket and pull the trigger to release whatever is left in the hose. There is more in there than people expect: 50 feet of 1/4-inch hose holds about a pint, and a 3/8-inch hose closer to a quart. That is perfectly good paint.
Step 2: Take the tip and guard off
Do this before you flush, not after. Flushing with the tip fitted forces fluid through a tiny orifice at pressure, which is slow, wasteful and hard on the tip. Drop the tip and guard straight into a jar of your flushing fluid so they soak while you work.
Step 3: Flush the pump
Move the intake tube into the bucket of flushing fluid and put the drain tube into an empty waste bucket. Set the valve to prime, run the machine on a low pressure setting, and let it pump through until what comes out of the drain tube runs clear.
Step 4: Flush the hose and gun
Switch the valve to spray, hold the gun firmly against the inside wall of the waste bucket — metal against metal so static cannot build up — and pull the trigger. The first thing out is the paint still sitting in the hose, so keep going until it runs clear. Swap to a second bucket of fresh fluid and do it again if the first bucket is heavily colored.
Step 5: Strip and scrub the filters
There are usually three: the inlet strainer on the suction tube, a filter in the pump manifold, and one inside the gun handle. The gun filter is the one people never find, and a clogged one causes spitting on the next job that gets blamed on the machine.
Unscrew them, soak them, and work a soft brush through the mesh. Hold each one up to the light — if you cannot see light through it, keep going.
Then put back the mesh that came out. Filters are color-coded by how fine they are, and a screen finer than the coating needs will choke within a wall. This is the most common reason a machine that sprayed fine yesterday spits today.
| Mesh | Color | What it is for |
|---|---|---|
| 30 | Gray | Heavy coatings and block filler |
| 60 | Black | Latex paint and primers |
| 100 | Blue | Enamels and medium-bodied coatings |
| 200 | Red | Stains and lacquers |
Step 6: Relieve the pressure and dry it off
Turn it off, set the valve to prime, and trigger the gun one last time into the bucket. Leaving a machine stored under pressure stresses the hose and seals for no reason. Wipe the outside down while it is still damp, because overspray on the housing is far harder to remove tomorrow.
How to clean a paint sprayer gun: HVLP and cup guns
Less volume to flush, more small parts to take apart. The finish these guns produce depends entirely on how clean the air cap and fluid nozzle are, so this is the machine where a lazy clean shows up immediately on the next job.
- Empty the cup back into the can and wipe it out with a rag before any fluid goes near it.
- Part-fill the cup with flushing fluid, reattach it, and spray into a waste container until it runs clear.
- Take off the air cap, the fluid nozzle and the needle. Soak them.
- Clean the small holes in the air cap with a soft brush or a wooden cocktail stick.
- Wipe the needle clean along its length and check the tip is not bent.
- Dry everything, then put a drop of gun lubricant on the needle and trigger pivot before reassembling.
The rule that saves guns: never poke a metal wire, drill bit or needle into the air cap holes. Those holes are precisely sized and the pattern depends on them. One scratch from a paperclip and the gun will spray lopsided for the rest of its life. Wood or nylon only.
Also avoid dunking the whole gun in a bucket of solvent overnight. It is the fastest way to strip the lubricant out of the packings and air passages, and solvent trapped in the air channel will spit onto your next coat. Clean the parts, not the assembly. Our HVLP sprayer guide covers which guns come apart most easily, which matters more than you would expect.
Cleaning a handheld sprayer
Handheld units — the all-in-one kind with the motor and paint cup in your hand — are the easiest to clean and the most often ruined, because the whole thing feels disposable until it stops working.
Empty the cup, put flushing fluid in its place, and run that through until what comes out is clean. Then take the nozzle assembly fully apart. Most of them unscrew into 4 or 5 pieces and every one of those faces needs wiping. The seal between cup and body is where paint hides and where leaks start.
If the sprayer takes disposable cup liners, use them. They turn cleanup into lifting a bag out. Our indoor sprayer guide notes which models take them.
Notes for specific machines
Wagner sprayers
Wagner’s own guidance is warm soapy water for water-based materials and mineral spirits for oil-based, with a soft brush and a rag, always finishing with a clean water flush. On the FLEXiO and Control Series units the section that matters is the turbine or hose joint — twist the motor section off the nozzle before you start, because fluid getting back into the turbine housing is what kills them.
On the Control Pro pumps, treat it as an airless: intake into fluid, drain into waste, run until clear. The suction set filter is the one Wagner owners most often forget.
Graco sprayers
Same airless sequence, with two Graco-specific habits worth adopting. The prime valve should be turned to prime before the machine is switched off, every time, so the pump is never left pressurized. And Graco sell a storage fluid — Pump Armor — which is worth using on any machine that will sit for more than a week, not just theirs.
On the smaller handheld Graco units, the piston and cylinder come apart for cleaning and should, because that is where paint sets and jams them.
Dried paint: the rescue
You forgot, or the job overran, and now something is set solid. Before you write the machine off, work through this in order. Each step is more aggressive than the last, so stop as soon as it frees up.
Start with a long soak, not more force
Strip off everything removable — tip, guard, filters, nozzle, needle, air cap — and put them in a jar of the correct fluid. For dried latex paint, hot water with dish soap left for 8 to 12 hours dissolves more than people expect. For dried oil-based paint, mineral spirits. Give it eight hours before you judge it.
Do not start the machine while anything is blocked. Running an airless against a solid blockage is how you destroy a pump that was otherwise fine.
Then try denatured alcohol on dried latex paint
This is the trick that is not in the manual. Cured water-based paint does not redissolve in water, but denatured alcohol will soften it. It is the standard answer among decorators for a gun that has gone off, and it is far gentler on seals than a purpose-sold stripper.
Mechanical last, and only on the right parts
Once softened, a soft brass brush is safe on the outside of steel parts. A nylon brush and a wooden stick are what you use anywhere near an orifice. Never a drill bit, never a steel pin, and never a pressure washer pointed at the machine.
When to give up on a part rather than the machine
Tips and filters are consumables and cost a few dollars. If a tip will not clear after a soak, replace it rather than attacking it — a damaged orifice sprays a distorted fan forever, and you will spend the rest of the job blaming your technique. The same applies to a filter mesh that has torn.
A pump that is seized with cured paint is the one genuinely serious case. Soak the inlet and outlet valves in solvent for 12 hours, and if it still will not turn over, that is a service job rather than a cleaning job.
Storing it so it still works next time
Water left in a pump over winter does two things: it rusts steel parts, and it dries out the packings so they leak the moment you next pressurize the machine. Flushing clean is not the same as storing properly.
- A few days: clean water in the system is fine.
- A week or more: run a storage fluid through — Pump Armor, or mineral spirits if you sprayed oil-based.
- Over winter, or anywhere that freezes: storage fluid is not optional. Water expanding in a pump cracks housings.
- Always: store with the pressure relieved and the prime valve open.
Two things worth knowing about storage fluid before you buy a bottle. The first is that it is antifreeze: the blue liquid is 40 to 60 percent ethylene glycol with a little sodium nitrite as the corrosion inhibitor, and it smells faintly sweet for exactly the reason antifreeze does. Ethylene glycol is toxic swallowed, with a lethal adult dose of roughly 4 fluid ounces and far less for a dog or cat that finds an open waste bucket. Label the jar, keep it off the garage floor, and never put it down a drain.
The second is what it mixes with. Storage fluid is fully miscible in water and will not mix with petroleum solvents at all, which is why it follows a water flush cleanly and why the guidance is mineral spirits or storage fluid rather than both. If you sprayed oil-based, the mineral spirits left in the pump is already the protective film.
A drop of throat seal oil on the piston rod before it goes away keeps the packings supple. On a machine you use a few times a year, that one habit is the difference between it starting cleanly and it weeping paint down the front on the first pull of the trigger.
Where the dirty water goes
Worth 30 seconds, because the default — hose it down the drain — is the wrong answer and in many places an illegal one.
Paint solids should not go into a storm drain at all, since those usually run straight to a watercourse untreated. For water-based paint, the standard advice from Clemson University’s extension service on cleaning painting equipment is to let the rinse water stand for about a day until the solids settle out, pour the clear water into a household drain rather than a storm drain, and let the sludge at the bottom dry before it goes in the bin.
The same principle applies to brushes and rollers, which we cover in cleaning paint brushes. Solvent is different and stricter: never down any drain. Let used mineral spirits settle in a sealed jar, decant the clear spirit to reuse — it works perfectly well a second and third time — and take the residue to a household hazardous waste point.
What never to do
- Never point a pressure washer at a sprayer. It drives water into the motor and past the seals.
- Never clear a tip or air cap with metal. Wood or nylon only.
- Never soak a whole gun in solvent overnight. Strip it down and clean the pieces separately.
- Never put a tip in a dishwasher or boil it. Carbide is hard but the seat is not.
- Never store it pressurized. Relieve the pressure before it goes in the cabinet.
- Never run gasoline or brake cleaner through it. Fire risk and seal damage.
- Never flush solvent in an unventilated space. Open a door and wear a proper respirator — solvent vapor is heavier than air and pools.
- Never put your hand in front of the tip to check flow. Airless pressure injects through skin and that is a surgical emergency, cleaning or not.
Frequently asked questions
What is the best thing to clean a paint sprayer with?
Whatever the paint can tells you to clean brushes with. That one line on the back of the can is the whole decision. Where people go wrong is what comes after it. Water on its own leaves steel parts wet, and a pump put away wet rusts at the packings, so the last fluid through the machine should be mineral spirits or a storage fluid rather than water.
Can I run water through my paint sprayer to clean it?
Yes for water-based coatings, and it is the right fluid for them. No as the final step. Water is the flush, not the storage. Left sitting in a pump for a week it rusts steel and dries the packings out, and anywhere the temperature drops below 32°F it freezes and can crack a housing. Run water until it comes out clear, then push it out with something that leaves a protective film.
What solvent should I use to clean my paint spray gun?
Match the solvent to the coating, not to the gun. Mineral spirits for oil-based paint and varnish, warm soapy water for anything water-based. Lacquer thinner only if the manual says the seals will take it, because it is aggressive enough to swell them. Gasoline and brake cleaner turn up on forums as shortcuts and should not: both attack seals, and one of them is a fire you are holding.
How do you clean a Wagner paint sprayer?
The same two fluids as any other machine, finishing with a clean water flush. What differs is which part traps paint. On the FLEXiO and Control series the turbine housing has to stay dry and only the spray attachment gets washed. On the Control Pro pumps, treat it as a small airless and do not skip the suction set filter. Put the same mesh back that came out, too: a 200 red screen behind latex paint that wants 60 black will have the gun spitting inside one wall.
Why is my paint sprayer not spraying after cleaning?
Four causes, in the order worth checking. A filter put back in the wrong mesh, which chokes on the first wall. A filter refitted backwards or left out of the housing entirely. Solvent trapped in an HVLP air passage because the whole gun went in the bucket instead of its parts. And an air leak at the cup seal or intake, which shows up as a pulsing fan rather than no fan at all. Only once all four are ruled out is it worth suspecting the pump itself.
How do you unclog a paint sprayer hose?
Not with pressure, and not by switching the machine on to push through it. Disconnect the hose at both ends, stand it in a bucket of the matching fluid, and give it 8 to 12 hours. Denatured alcohol will soften cured latex that plain water no longer touches. If a soak and a flush will not clear it, accept the hose as a consumable: a replacement costs a fraction of a pump rebuild.
How do you clean clogged paint sprayer tips?
Soak, reverse, replace, in that order. Drop the tip and guard into the matching fluid at the start of the clean so they soak for the whole job rather than 30 seconds under a tap. A reversible tip can then be turned and triggered briefly to blow the blockage back out the way it came. Never put metal through the orifice: a tip is machined to a thousandth of an inch and one scratch gives a distorted fan for the life of the tip.
What to remember
That is how to clean a paint sprayer properly. Clean it the same day, match the fluid to the paint rather than the machine, and take the filters out — all three of them. Relieve the pressure before it goes away, and use storage fluid if it will sit for more than a week. If something has already set hard, soak it far longer than feels reasonable before you reach for anything abrasive, and never start the machine against a blockage.
