Last Updated on October 6, 2026
To use a paint sprayer, mask everything nearby, strain the paint, thin it only if your machine needs it, prime the pump until paint flows steadily, fit the right tip, then spray 6 to 12 inches from the surface in straight passes that overlap by half, moving your arm before you pull the trigger.
A paint sprayer will do a wall in four minutes that would take you forty with a roller, and it will do it with a finish no roller can match. It will also coat your floor, your windows and the side of your car in a fine mist if you get the setup wrong, and it will spit, run and stripe if you get the technique wrong.
Most guides on how to use a paint sprayer give you the same four steps. What they leave out is the part that actually decides whether it works: which machine you have, whether your paint needs thinning, what tip is on the gun, and how to read the pattern on the wall when it goes wrong. That is what this guide covers.
How to use a paint sprayer: the short version
To use a paint sprayer, mask everything you are not painting, strain the paint into the hopper or bucket, thin it if your machine needs it, prime the pump until paint runs steadily, fit the right tip, and test on cardboard. Then spray with the tip held a steady distance from the surface, moving your whole arm at walking pace, overlapping each pass by half, and triggering just before the edge and releasing just after it.
- Mask and sheet everything within reach of the overspray.
- Strain the paint through a mesh bag or filter.
- Thin it only if your machine needs it — airless usually does not.
- Prime the pump until paint flows with no air in it.
- Fit the tip that matches the paint and the job.
- Test on cardboard and adjust pressure until the pattern is even.
- Spray in overlapping passes, moving before you pull the trigger.
- Flush the machine out the same day.
Steps three, five and six are where nearly every bad finish comes from, so they get a section each below.
First, which sprayer have you actually got?
This matters more than anything else on this page, because the correct spray distance, the correct pressure and the answer to the thinning question are all different depending on the machine. Generic advice averages them and ends up wrong for everyone.
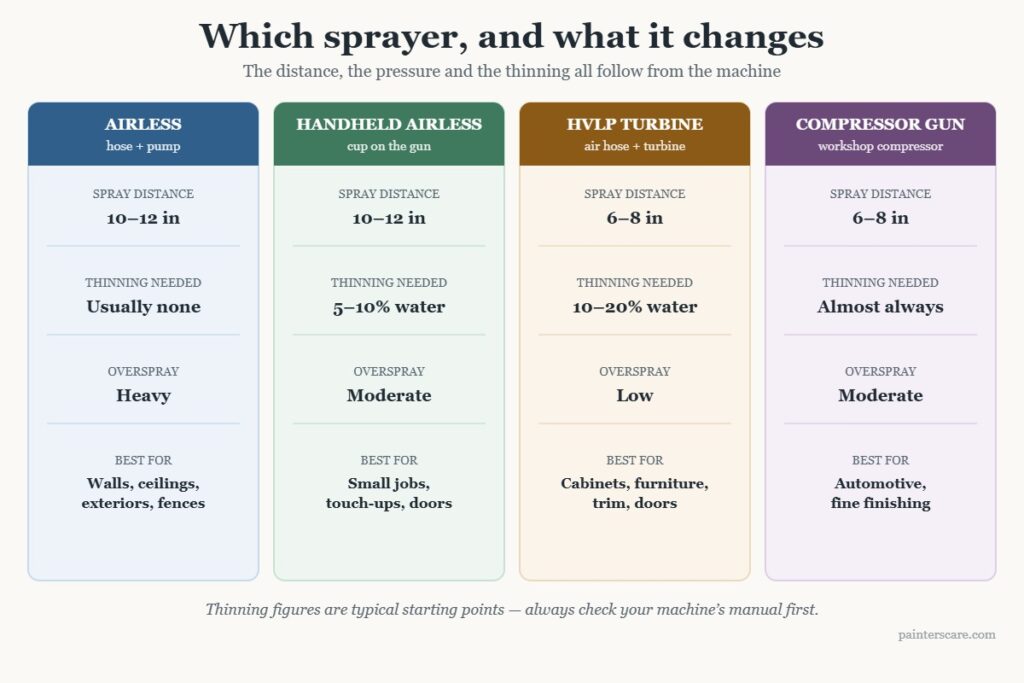
- Airless (hose and pump). A piston forces paint through a small tip at very high pressure. No air is involved. Fast, handles unthinned latex paint, heavy overspray. This is what you hire for a whole house. Our roundup of airless paint sprayers covers the homeowner-sized machines.
- Handheld airless. Same principle, small motor, paint cup on the bottom. Convenient, but the pump is weaker, so thick paint needs thinning and you will refill constantly.
- HVLP turbine. High volume, low pressure. A turbine pushes a lot of warm air through the gun at low pressure, which atomizes gently and throws far less overspray. Slower, but the best finish on anything you look at closely. See our HVLP sprayer guide.
- Compressor-fed spray gun. A conventional gun running off a workshop compressor. Excellent control, but the compressor has to supply enough air — check the gun’s CFM requirement against your compressor’s output or it will stutter constantly. Our air compressor sprayer guide goes into the matching.
Short version: airless for walls, ceilings, fences and exteriors. HVLP for cabinets, doors, furniture and anything where the finish gets inspected from two feet away.
Do you need to thin the paint?
This is the single most asked question about spraying and it gets answered badly almost everywhere, usually as a flat “add ten percent water”. The honest answer depends entirely on the machine.
- Full-size airless: usually not. These are built to spray latex paint and masonry paint straight from the can. Thinning an airless is normally a sign that the tip is too small or the pressure is too low, and it costs you opacity — you will need an extra coat to hide.
- Handheld airless: often, a little. Around 5 to 10 per cent water for latex paint is typical. Check the manual first; many state a maximum.
- HVLP turbine: usually yes. Latex paint generally needs 10 to 20 per cent. Thin oil-based paints and varnishes with the manufacturer’s recommended solvent, not mineral spirits by default.
- Compressor-fed gun: almost always. These have the least ability to atomize a thick fluid.
Rather than guessing at a percentage, use the funnel test. Most HVLP kits include a small viscosity cup with a hole in the bottom. Fill it, and time how long it takes to drain in a steady stream. Latex paint through an HVLP wants to run out in roughly 25 to 40 seconds; thinner finishes like stain or lacquer want 15 to 20. If it drains slower than the range, add a little more water or solvent, stir properly, and time it again. No cup? A clean funnel works — you are looking for paint that runs in an unbroken stream rather than glooping.
Add thinner in small increments and stir for a full minute each time. You cannot take it back out, and over-thinned paint runs down the wall and dries translucent. For oil-based paint specifically, we have a step-by-step on thinning oil-based paint for a spray gun.
Whatever you do or do not thin, strain the paint. A paint filter bag over the bucket costs almost nothing and removes the dried skin and grit that would otherwise block the tip mid-wall. A blocked tip in the middle of a ceiling is how you get a run.
Understanding the tip number

Airless tips are stamped with a three-digit number and it is not arbitrary. Once you can read it, choosing a tip stops being guesswork.
- The first digit, doubled, is the fan width in inches when the gun is held 12 inches from the surface. A 5 gives roughly a 10-inch fan. A 2 gives roughly 4 inches.
- The last two digits are the orifice size in thousandths of an inch. 15 means 0.015 inches. Bigger hole, more paint, thicker material.
So a 515 throws a 10-inch fan through a 0.015 orifice — the standard wall and ceiling tip for latex paint. A 311 throws a narrow 6-inch fan through a fine 0.011 orifice, which is what you want for doors, trim and cabinets. A 517 or 519 is for thick masonry paint and exterior work.
Two rules follow from this. Match the orifice to the paint: thin stains want 0.009 to 0.013, latex paint wants 0.015 to 0.017, masonry paint wants 0.019 and up. Match the fan to the object: a wide fan on a narrow door frame just sprays the wall behind it.
Tips also wear. As the orifice erodes it gets wider and rounder, which means more paint, a narrower fan and a pattern that is heavy in the middle. If your fan has quietly shrunk over a few jobs, the tip is worn out — it is a consumable, not a permanent part.
Setting up
Step 1: Mask far more than you think you need
Overspray is a fine dry mist that drifts. It does not politely stop at the edge of your drop cloth. Indoors, sheet the floor wall to wall, cover every surface in the room, and tape plastic over doorways rather than just closing the door. Outdoors, watch the wind and cover anything within about five meters downwind, cars included.
Budget honestly for this. On a typical room, masking takes longer than spraying does. That is not a sign you are doing it wrong; it is the trade you are making for the speed and the finish.
Step 2: Prime the pump
On an airless, drop the intake tube into the paint, set the valve to prime, and run the machine until paint comes out of the drain tube in a steady stream with no air bubbles. Then switch the valve to spray, point the gun into a waste bucket with the tip guard off, and pull the trigger until clean paint comes through the hose.
Skipping this properly is the usual cause of spitting on the first wall. On a cup gun or handheld there is no pump to prime, but you should still trigger into a bucket until the spray is continuous.
Step 3: Test on cardboard, not on the wall
Tape a flattened box to a wall and spray one pass. You want a fan that is even from edge to edge, with no heavy band down the middle and no ragged tails at the top and bottom. Start with the pressure low and bring it up only until the tails disappear. Most people run far more pressure than they need, which costs paint, makes overspray worse and wears the tip out faster.
Spray technique: how to use a paint sprayer without stripes or runs
Hold the right distance, and keep it
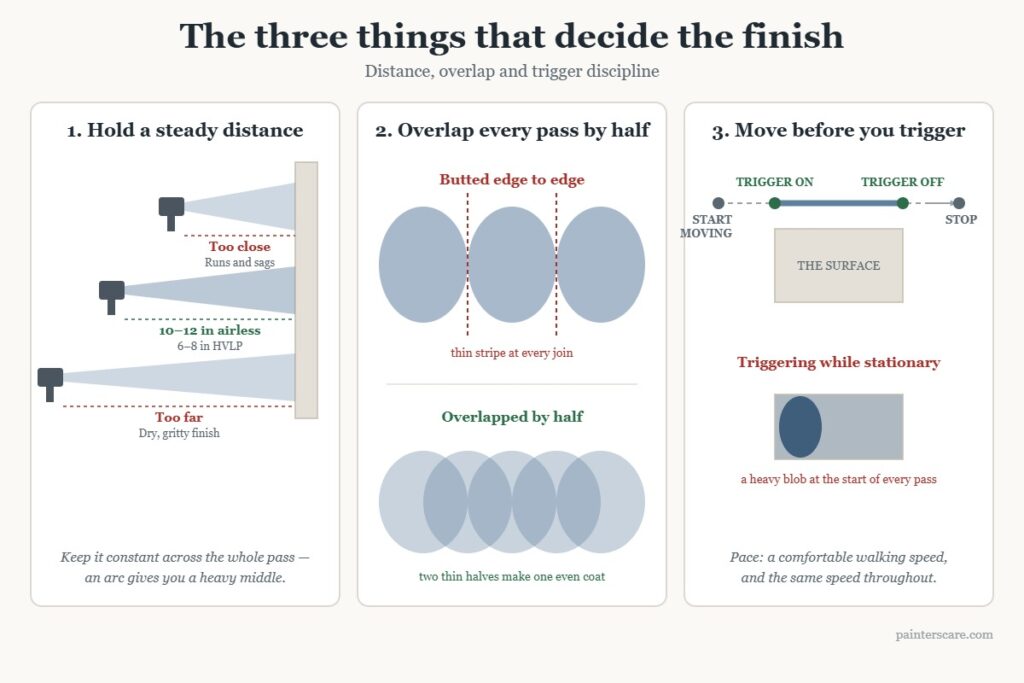
For a full-size airless, 10 to 12 inches. For HVLP and compressor guns, 6 to 8 inches. The distance has to stay constant across the whole pass, which is the hard part — the natural motion is an arc, and an arc means the middle of your pass gets more paint than the ends.
Move your arm, not your wrist
Keep the gun square to the surface and move your whole arm, stepping sideways if you need to. Flicking from the wrist tilts the gun at the ends of each stroke, which is exactly what produces a stripe. Pace should be about the speed of a comfortable walk, and consistent — slowing down deposits more paint, and that is a run.
Overlap every pass by half
A spray fan is heaviest in the center and feathers out at the edges. Butting passes edge to edge therefore leaves a thin stripe at every join. Aiming the tip at the outer edge of your previous pass — a 50 per cent overlap — stacks two thin halves into one even coat.
Start moving before you pull the trigger
Begin the stroke off the edge of the surface, squeeze the trigger once the gun is already moving, and release it after you have passed the far edge. Triggering while stationary dumps a heavy blob at the start of every pass. This one habit separates a sprayed finish that looks professional from one that looks sprayed.
Two thin coats, not one thick one
Sprayers tempt you to lay it on heavy because coverage looks instant. Resist it. Two light coats with the recoat time observed between them will cover better, dry harder and sag far less than one heavy pass. On the second coat, run your passes at ninety degrees to the first where the surface allows.
Reading a bad spray pattern
When spraying goes wrong it tells you exactly what is wrong, if you know how to read it. This is the part missing from almost every guide, and it is the difference between fixing a problem in thirty seconds and sanding a wall back.

| What you see | What it means | Fix |
|---|---|---|
| Tails or fingers at the top and bottom of the fan | Not enough pressure to atomize the paint, or a worn tip | Raise pressure a little at a time; if that does not clear it, the tip is worn |
| Heavy band down the center, thin at the edges | Tip is worn round, or paint is too thick | New tip; thin slightly if the machine allows it |
| Spitting and coughing | Air in the line, a loose tip guard, or the intake sucking air | Re-prime; check the intake is submerged and the fittings are tight |
| Runs and sags | Too close, moving too slowly, or overlapping more than half | Step back, speed up, and let it flash off before the next coat |
| Orange peel texture | Paint too thick, or pressure too low on an HVLP | Thin it and retime with the viscosity cup |
| Stripes at regular intervals | Passes butted edge to edge, not overlapped | Aim the tip at the outer edge of the last pass |
| Dry, gritty, sandpapery finish | Too far away, so the paint half-dries in the air | Move closer; check the tip is not too fine for the paint |
| Sudden stop in the middle of a pass | Blocked tip | Reverse the tip, trigger into a bucket to blow it clear, turn it back |
Almost every reversible airless tip can be turned 180 degrees and triggered to clear a blockage from behind. If you find yourself doing that repeatedly in one session, you did not strain the paint.
Spraying walls and ceilings
Ceilings first, always, then walls, working top to bottom. Spray ceilings in passes that run the same direction as the main light source in the room, so any slight unevenness does not catch the light.
Do the corners and edges first with a narrow vertical pass, then fill the open field with horizontal passes. Trying to cut a clean corner with a wide fan wastes paint on the adjoining wall.
On new plaster, spray a thinned mist coat first and let it soak in, exactly as you would with a roller. Fresh plaster drinks paint, and a full-strength first coat will peel later. A 515 tip and unthinned latex paint covers most interior work. If you are choosing a machine for indoor use specifically, our indoor paint sprayer guide narrows it down, and there is a separate roundup for spraying ceilings.
Spraying cabinets, doors and furniture
This is HVLP territory. The finish is the entire point of the job, and an airless is too aggressive for a cabinet door.
- Take the doors off and spray them flat, horizontally. Paint sags on vertical surfaces and will not on a horizontal one.
- Spray the back first. By the time you flip it, any small blemish on the back is hidden and you have had a practice run.
- Do the edges and profiles before the flat faces, so the overspray that lands on the face gets covered by the face pass.
- Sand lightly with 320 grit between coats and wipe off the dust. This is what makes a sprayed cabinet feel like furniture rather than paint.
Our kitchen cabinet sprayer guide covers the machines suited to this, and there is a separate one for furniture.
Spraying fences and exteriors
Wind is the whole story outdoors. Anything above a light breeze and you are painting the neighbourhood, not the fence. Spray early in the day before the wind gets up, and stop if it does.
Work with the wind at your back so the mist blows away from you rather than into your face. On a slatted fence, hold a piece of card behind the gaps, or accept that you are spraying the ground behind it too and sheet accordingly. On siding and cladding, follow the direction of the boards. There is a fence and staining sprayer roundup if you are buying for this job, and a walkthrough of staining a fence end to end.
Cleaning the sprayer
Do it the same day, every time. Dried latex paint inside a pump is what kills sprayers, and it is the single most common reason a machine gets thrown away after two jobs.
The sequence is: return the leftover paint to the can, move the intake into a bucket of clean warm water (or the correct solvent for oil-based paint), run the machine until the liquid coming out runs clear, then strip and clean the tip, guard and filters by hand. Do not skip the filters — there is usually one in the gun and one in the pump, and both clog.
One warning most guides skip: do not reach for mineral spirits by default. The manual for the 230 V Magnum X5, X7 and ProX9 — the versions sold on UK mains — states that these machines are for water-based materials only, and that you should not spray or clean with flammable materials. Check your own manual before you put solvent through a pump, because the answer differs between models and between the UK and US builds of the same machine.
We go through the full process, including the bits people miss, in our guide to cleaning a paint sprayer gun.
Safety: the part that is genuinely dangerous
Spraying turns paint into a suspended mist fine enough to breathe deep into your lungs. A dust mask does nothing useful against it. For ordinary water-based latex paint indoors you want at least an FFP3 disposable or a half-mask with A2/P3 combination filters, plus ventilation and eye protection. Our respirator guide covers the ratings.
Two-pack (2K) products are a different category altogether. These are the isocyanate-based automotive paints and lacquers, and the UK Health and Safety Executive is explicit that filtering respirators are not suitable for spraying isocyanate paints — the protection required is air-fed breathing apparatus. Isocyanates are the leading cause of occupational asthma in the UK, and the damage is not reversible. If you are considering spraying 2K at home with a cartridge mask, do not.
What is the number one rule when using an airless sprayer?
Never put any part of your body in front of the tip, and never try to stop a leak with your hand. An airless sprayer can inject paint through skin, and the injury that results is a surgical emergency even when it looks like nothing at all.
The numbers explain why. Fluid penetrates skin at around 100 PSI. A Graco Magnum X5, X7 or ProX9 — the machines most home users buy — has a maximum working pressure of 3,000 PSI, per Graco’s specification and operating manual. That is thirty times the pressure needed to break the skin, and the hose holds it after you switch the machine off.
Paint is not an unusual thing to be injected with. In a systematic review of 115 high-pressure injection injuries published in Case Reports in Plastic Surgery & Hand Surgery (Eells and colleagues, 2019), paint was the most commonly injected material at 42% of cases, with paint thinner behind it. Paint injections carried a 17% amputation rate and a 35% rate of tissue necrosis. The index finger was the most common site, and the mechanism described is an ordinary one: discharging the gun with a finger over the nozzle, often just to check the flow — a habit carried over from low-pressure equipment, where it is harmless.
What makes it dangerous is that it does not hurt. The review notes these injuries “may appear innocuous because of the small size of the entrance wound”, and that patients typically feel little or no pain at the moment of injection. Average time from injury to presentation, once a few extreme outliers were set aside, was 34 hours. Several patients were sent home from A&E with antibiotics and a tetanus booster because nobody recognized what had happened, and came back within a day considerably worse.
If it happens to you, go to A&E straight away and say the words “high-pressure injection injury”. It needs surgical debridement within hours, not a plaster. Graco’s own manual says to get immediate surgical treatment if injection occurs.
The rules that prevent it are short:
- Engage the trigger lock every time you stop spraying, even for a second.
- Never spray without the tip guard fitted. Reducing injection risk is the only job it has.
- Never point the gun at a person or an animal.
- Never stop or check a leak with a finger, or with a rag in your hand.
- Run the pressure relief procedure before you touch the tip, clear a clog, or take anything apart. The machine stays pressurized after the power is off.
- Check the hose for cracks or bulges before each session and replace it if you find any.
None of this applies in the same way to an HVLP or turbine sprayer, which moves a lot of air at a few PSI rather than fluid at thousands. That is the practical reason the machine type matters more than any other decision on this page.
The honest downsides
Manufacturers will not tell you this, so here it is. A sprayer is not always the right tool.
- Masking usually takes longer than spraying. For one small room, the total job is often slower than a roller.
- You lose paint. Between priming the hose, the test card, overspray and flushing, expect to lose the better part of a liter on a hose-fed machine before any of it lands on a wall.
- Cleanup is twenty to forty minutes, every time. A roller goes in a bag.
- Overspray travels further than you expect, and it is very hard to remove once it has dried on glass or a car.
The rule of thumb: spray when the area is large, the surface is awkward (spindles, railings, textured ceilings, slatted fences), or the finish has to be flawless. Roll when it is one room with furniture in it. If you are weighing this up, a power roller sits usefully between the two.
Frequently asked questions
How do you use a paint sprayer for the first time?
Mask everything, strain the paint, prime the machine until paint runs without air, fit the right tip, and spend five minutes spraying scrap cardboard before you point it at anything that matters. Hold the tip a steady 10 to 12 inches away on an airless or 6 to 8 on an HVLP, move your whole arm at walking pace, and overlap each pass by half.
Do you have to thin paint for a sprayer?
It depends on the machine. Full-size airless sprayers handle latex paint straight from the can and thinning usually means the tip or pressure is wrong. Handheld airless units often need 5 to 10 per cent water, HVLP turbines typically 10 to 20 per cent, and compressor-fed guns almost always need thinning. Use the viscosity cup rather than guessing.
Can you use regular paint in a paint sprayer?
Yes. Ordinary latex paint, gloss, stain and masonry paint all spray. There is no special “sprayer paint”. What varies is whether your particular machine can atomize it as supplied, which is the thinning question above, and whether you have a tip with a big enough orifice for it.
How far should you hold a paint sprayer from the wall?
10 to 12 inches for a full-size airless, 6 to 8 inches for HVLP and compressor-fed guns. Holding it too far away lets the paint start drying in the air, which gives a gritty, powdery finish. Too close floods the surface and runs.
What does 515 mean on a spray tip?
The first digit doubled is the fan width in inches at 12 inches from the surface, so 5 means a 10-inch fan. The last two digits are the orifice diameter in thousandths of an inch, so 15 means 0.015 inches. A 515 is the standard tip for spraying latex paint on walls and ceilings.
Why is my paint sprayer leaving tails or fingers?
The paint is not being fully atomized. Raise the pressure in small steps until the ragged edges at the top and bottom of the fan disappear. If the pressure is already high and the tails remain, the tip is worn out and needs replacing, or the paint is too thick for that orifice size.
Is a paint sprayer better than a roller?
For large areas, awkward surfaces and finishes that get inspected closely, yes, comfortably. For a single room with furniture in it, usually not — masking and cleanup will cost you more time than the spraying saves. A sprayer also uses noticeably more paint than a roller for the same coverage.
How many coats do you need when spraying?
Two thin coats is the normal answer, and it beats one heavy coat every time for durability and for sagging. Observe the recoat time on the can rather than going straight back over it, and where the surface allows, run the second coat at right angles to the first.
Can you spray paint indoors?
Yes, and it is how most decorators paint an empty house. You need the room genuinely empty or fully sheeted, plastic taped over doorways, ventilation, and proper respiratory protection — the mist stays airborne for a long time in a closed room. An HVLP throws far less overspray than an airless if the room cannot be cleared.
Why is my sprayer spitting?
Air is getting into the paint stream. The usual causes are an intake tube that is not fully submerged, a loose tip guard or fluid fitting, a partly blocked filter, or a pump that was never properly primed. Re-prime it, check every connection is tight, and clean the gun and pump filters.
What to remember
That is how to use a paint sprayer properly. Know your machine, because the distance, the pressure and the thinning all follow from it. Strain the paint. Prime until there is no air in the line. Test on cardboard and use the lowest pressure that gives a clean fan. Move your arm, not your wrist, overlap every pass by half, and trigger only while you are already moving. Two thin coats. Then clean it out the same day, and it will still work next year.
