Last Updated on October 6, 2026
Nearly every guide to painting a bathtub tells you to open the window and set up a box fan. Federal safety regulators say the opposite in plain terms: bathroom fans or open windows do not provide adequate ventilation. At least 14 workers have died since 2000 while refinishing bathtubs, and the room itself is the reason why.
That hazard belongs to the chemical strippers used to take an old coating off, not to the epoxy kit that goes on afterwards, and consumer sale of the chemical responsible has since been prohibited. But old cans outlive the rules they were banned under, and a bathroom is still the worst room in the house to find out. So the first section here is a label check that takes ten seconds, and the rest is how to paint a bathtub so the finish lasts, including the one number that almost nobody mentions and that quietly ruins more tub finishes than bad technique ever does.
Check the label before you check anything else
The chemical is methylene chloride, which also appears on labels as dichloromethane or DCM. It was the standard active ingredient in heavy-duty paint and coating strippers, and the reason it killed people in bathrooms rather than in workshops comes down to physics. The vapor is heavier than air, so it pools in the bottom of the tub. That is precisely where your head goes while you work. It evaporates fast enough to build up in a small room within minutes, and at high enough concentrations it displaces the oxygen you are trying to breathe.

The protective equipment people reach for does not help. Air-purifying respirators are not permitted for this chemical because the cartridges are exhausted too quickly to be relied on, and a half-mask leaves your eyes exposed to vapor that can damage them. The exposure limit is 25 parts per million averaged over eight hours, with a ceiling of 125 parts per million across any 15-minute stretch, and an enclosed bathroom reaches both faster than most people would guess.
Consumer products containing it for paint and coating removal were prohibited from 22 November 2019, and a broader rule finalized in April 2024 banned every remaining consumer use with a two-year phase-out. A kit bought new today is not this product. The risk now sits in garages, estate sales and online resale, so the check is simple: read the ingredients on any stripper before it comes into the bathroom, and if methylene chloride, dichloromethane or DCM appears, leave it out of the job entirely. Sanding is the alternative the safety alert itself recommends.
What a tub kit will and will not stick to
A two-part epoxy tub and tile kit is rated for 5 surfaces: ceramic tile, porcelain, fiberglass, acrylic and cast iron. That covers almost every bathtub in an ordinary house, including the fiberglass and acrylic tubs people most often assume are off limits. Two substrates are ruled out, and 1 use case is ruled out regardless of substrate.
| Surface | Rated for it? | Why |
|---|---|---|
| Porcelain and enamel | Yes | Rigid, non-porous, holds an abraded key well |
| Cast iron | Yes | Same as porcelain, since the enamel is the surface being coated |
| Fiberglass | Yes | Rigid enough that the cured film does not flex and crack |
| Acrylic | Yes | As above, provided the tub is properly supported underneath |
| Ceramic tile | Yes | Surround and tub can be done in the same session |
| Flexible plastic | No | The substrate moves, the cured epoxy does not, and the film splits |
| Galvanized steel | No | The zinc coating prevents adhesion |
One more exclusion matters: these coatings are not rated for continuous water immersion, which rules out swimming pools, hot tubs, ponds and saunas. A bathtub that fills and drains is fine. A tub that holds standing water for days is not. If your tub sits on an unsupported base and gives slightly underfoot, firm it up before you paint rather than after, and the same thinking applies to the thinner tubs fitted in mobile homes.
Humidity is the number almost nobody mentions
The application window is 65°F to 90°F with relative humidity below 80%. The temperature band is easy. The humidity ceiling is the one that catches people, because a bathroom is the most humid room in the house and 80% is not a generous allowance.
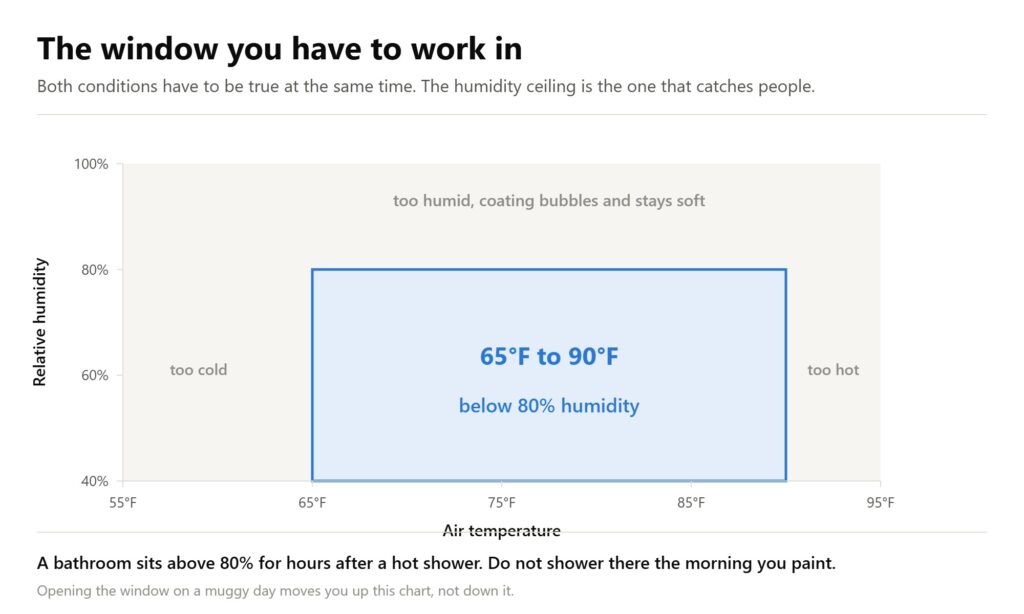
This is also where the standard advice works against you. Throwing the window open on a muggy day pulls damp outside air into a room that was already damp, and you can push past the ceiling while believing you have improved conditions. The epoxy does not fail loudly when you do. It cures slower, stays softer for longer, and is more likely to bubble or stay tacky in the places where moisture was trapped underneath.
Three things fix it. Do not shower in that bathroom on the morning you paint. Run the extractor fan for an hour beforehand to pull the resident moisture out, then stop relying on it as your ventilation once you start. And spend a few dollars on a hygrometer rather than guessing, because the difference between 70% and 85% is invisible and decides the outcome.
How much you need, and how long you have
A quart kit covers 70 to 110 square feet, which is enough material for two coats on a standard bathtub. One kit, one tub. If you are doing the tiled surround at the same time, measure it and buy a second rather than stretching the first thin, because an epoxy applied below its intended film thickness loses the durability that is the entire reason for using it.
The clock that matters starts the moment the two parts are combined. Mixed epoxy has a working life of about six hours at 70°F to 80°F and 50% humidity, and that is a hard limit rather than a suggestion. Warmer and more humid shortens it. So the job is a single sitting, planned from the start, and the sequence runs like this.
| Stage | Timing | What it means in practice |
|---|---|---|
| Mixed epoxy usable | 6 hours | Everything from first brushstroke to last has to fit inside this |
| Between coats | At least 1 hour | Second coat goes on after the first stops being wet, not after it hardens |
| Tack-free | 1 hour | Pull masking tape while the final coat is still slightly soft |
| Safe to handle | 3 hours | Fittings back on, but nothing wet near it |
| Safe for water | 72 hours | Three full days before the tub is used at all |
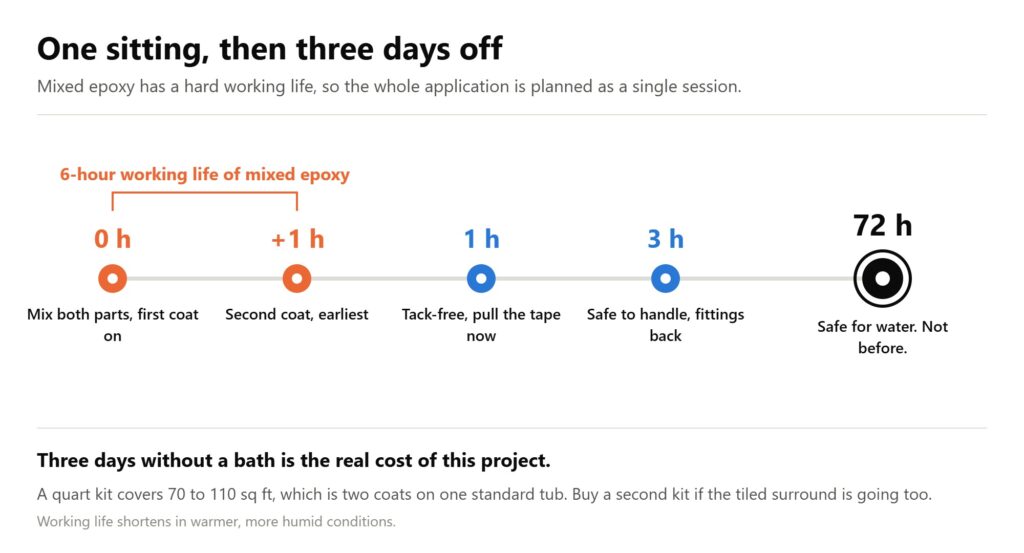
Three days without a bath is the real cost of this project, and it is worth saying out loud before you start rather than discovering it on day two. If the house has one bathroom, plan around it.
Preparation decides the finish
Everything that goes wrong with a painted tub traces back to this stage, and the published preparation is more specific than most guides suggest.
Strip the old caulk out first. Paint applied over a caulk bead will split along it within weeks as the joint moves. Cut it out with a proper removal tool rather than a utility knife, which tends to score the tub lip you are about to coat.
Scrub with a lime-scale remover, not a general cleaner. The goal is not just clean, it is slightly porous. An abrasive lime-scale product worked over the whole surface with a scrub pad etches the glaze enough to give the epoxy something to grip. Soap scum and body oils left behind are the other half of this, and they are invisible once dry.
Wipe down with isopropyl alcohol, not a damp cloth. This is a genuine correction to the advice you will see elsewhere. A damp cloth followed by a tack cloth leaves moisture behind, and trapped moisture is what causes the coating to bubble. Alcohol lifts the residue and flashes off dry.
Then wait 90 minutes. That is the published minimum drying time between finishing preparation and starting to paint. It feels like dead time and it is not.
Treat old paint as lead paint. If anything on or around the tub has been painted before and the house predates 1978, sanding it releases lead dust and a NIOSH-approved respirator is required, not optional. This is separate from the solvent question and applies even to a modern, perfectly safe kit.
Mask the drain, the overflow, the faucet and the walls, bag any faucet that drips, and put something absorbent across the floor. Epoxy that reaches tile grout does not come back off easily.
Putting it on
Mix both parts thoroughly and completely. Epoxy cures by chemical reaction rather than by drying, so any part of the can that did not get stirred in stays soft indefinitely. Scrape the sides and the bottom. There is no induction time to wait out with these kits, so you can start as soon as it is combined.
Cut in the corners, the drain surround and the tight areas near the fittings with a foam brush, then roll the flat surfaces with a 1/4-inch nap roller. Two thin coats, worked quickly, and then left alone. Epoxy self-levels as it sits, and the urge to keep working a patch that looks uneven is what produces roller texture and lap lines. Lay it on and walk away from it.
Wait the full 60 minutes, then put the second coat on the same way. Pull the masking tape while that coat is still slightly soft, because tape removed from fully cured epoxy takes a ragged edge of coating with it. After 72 hours, run a fresh silicone bead where the tub meets the wall and the floor.
What it costs, and what you actually get
A quart kit runs about $45 to $50 and does one tub. Having a professional refinish a standard bathtub costs $350 to $600, rising to $400 to $700 for acrylic, $500 to $1,200 for antique porcelain and $800 to $1,200 if the tub and shower surround are done together. Replacing the tub outright starts around $1,500 and runs past $8,000 once tiling and plumbing are counted.
| Option | Cost | Published lifespan |
|---|---|---|
| DIY two-part epoxy kit | $45 to $50 | No manufacturer claim |
| Professional refinishing, standard tub | $350 to $600 | 7 to 15 years |
| Professional refinishing, tub and surround | $800 to $1,200 | 7 to 15 years |
| Full replacement | $1,500 to $8,000+ | Life of the tub |
That blank is not an oversight on anyone’s part. A consumer tub kit commits to adhesion, durability and color retention in high-moisture areas, and declines to put a number of years against any of it, while professional refinishers quote 7 to 15 years routinely. The difference is partly the product and mostly the conditions: a shop controls temperature and humidity and surface preparation in a way a homeowner in a bathroom cannot.
Where a DIY finish gives out first is predictable. The drain surround, where water sits longest, and the seat area, where feet scuff and body weight flexes the shell. Expect those two spots to show wear before anything else does, and judge the job by how long they hold rather than by how it looks on day four.
Frequently Asked Questions
Can a fiberglass tub be refinished?
Yes, and it is one of the surfaces these kits are designed for rather than an exception to them. The condition is rigidity. Press firmly on the side wall and the base before you start: any noticeable give means the shell needs packing and supporting underneath, because a cured epoxy film has no flex in it and will craze wherever the tub moves. Otherwise the process is the same as for enamel, since what you are keying into is the gel coat on top, not the glass underneath.
Can you paint a plastic bathtub?
It depends which plastic. Acrylic tubs take epoxy well and are on the approved list. Flexible plastic is specifically excluded, because the substrate moves and the cured coating does not, which splits the film. The quick test is to press firmly on the side wall of the tub: noticeable give means flexible, and flexible means the finish will not last whatever you do to prepare it.
How long will a painted bathtub last?
No consumer kit carries a published lifespan, which is itself informative. Professional refinishing is documented at 7 to 15 years, and a DIY application of the same class of coating sits somewhere below that depending almost entirely on how well the surface was prepared and how close the room was to 80% humidity on the day. Failure shows up first at the drain and in the seat area rather than across the whole tub.
Is painting a tub a good idea?
For a tub that is structurally sound but stained, dated in color, or lightly scratched, it is the cheapest intervention available by an order of magnitude: roughly $50 against $350 to $600 for professional refinishing and $1,500 upwards for replacement. For a tub that is cracked, rusted through, or flexes underfoot, paint hides the symptom and the problem continues underneath. The coating is a cosmetic repair, and it is a good idea exactly when the fault is cosmetic.
One thing worth doing before any of this: read the label on everything that comes into the bathroom with you. The federal safety alert that documents those 14 deaths is published free as a two-page PDF, and it takes less time to read than mixing the kit does.
