Last Updated on October 10, 2026
How to smooth silicone caulk, in one line: tool it dry, in a single unbroken pass, within 5 to 15 minutes of laying the bead. The soapy water and alcohol that almost every guide tells you to spray on first are the two things the tube’s own instructions tell you not to use.
Google’s AI summary for this search opens with “use a lubricant like denatured alcohol or soapy water”. Every question in the People Also Ask box underneath it is a variation on the same theme — Windex, rubbing alcohol, what to spray on it. The whole page agrees.
The instruction sheet folded inside the tube says the opposite, and it says it for a reason that has nothing to do with how the bead looks.
Smoothing is not a cosmetic step
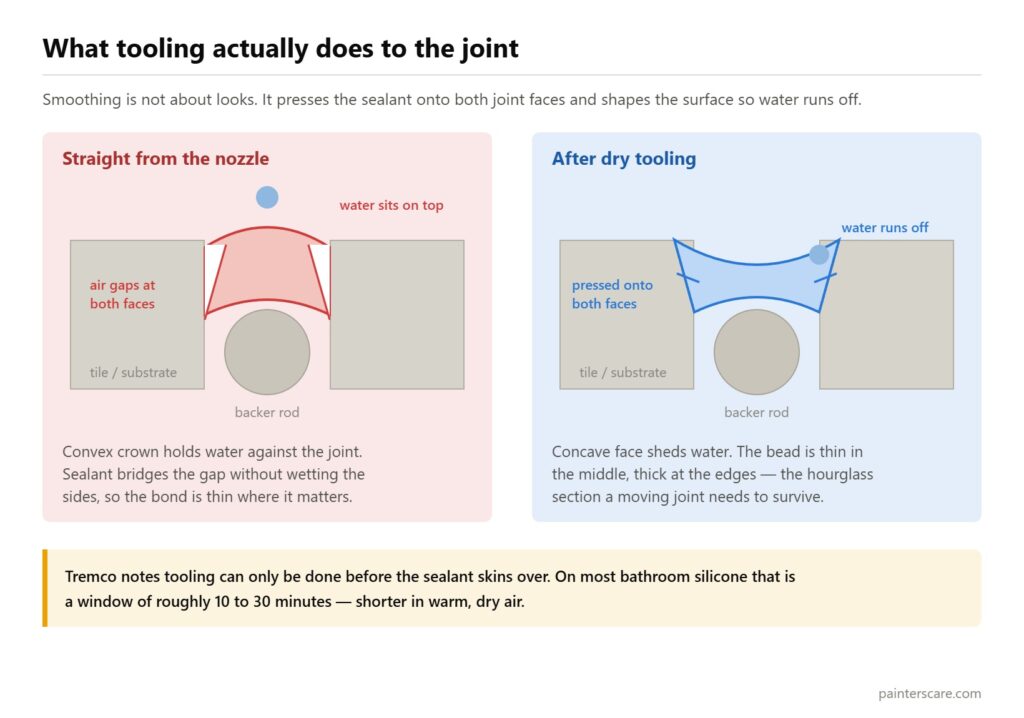
This is the part that reframes everything else. Tooling is not tidying up. It is the step that makes the bead work.
The pass has three jobs, and only one of them is cosmetic:
- Wetting. It presses the silicone into contact with both faces of the joint. Sealant laid over a gap is touching it. Sealant that has been tooled is bonded to it.
- Shape. It forms the hourglass cross-section, thin through the middle and thicker where it meets each side. That is the profile that survives movement, and these sealants are rated to take joint movement of plus or minus 25 percent of the joint width.
- Water shedding. A tooled surface is shaped to run water off the joint. An untooled one holds it in the hollows.
So the neat line is a by-product. What you are really doing is pushing the sealant into the joint and giving it a section that will not tear. Skip the pass and you have a bead that looks fine and is only lightly stuck to anything.
Why the soap trick works against you
Once you know tooling is about adhesion, the problem with a lubricant is obvious. You are deliberately putting a release agent between the sealant and the surface at the exact moment you press one into the other.
Soap is a release agent. It is what you reach for when you want something not to stick, which makes it a strange thing to introduce at the moment you are pressing sealant onto a surface you need it to grip. Water, soap, detergent and isopropyl alcohol are all named together as liquids to keep off a wet bead, because any of them can interfere with cure and adhesion. Isopropyl alcohol does have a job on this joint, but it is the step before: wiping the faces clean, ideally within 1 to 2 hours of gunning the bead. A 100% silicone is over 97 percent solids and cures by reacting with moisture in the air rather than by anything evaporating out of it, which is why it will not cure at all in a fully enclosed space. Nothing flashes off to burn through a film left on the joint. Whatever you put on the surface before tooling is still there afterwards.
What actually happens is that the wet finger drags surfactant down into the corner of the joint, exactly where the sealant needs to grip. The bead looks immaculate. Six months later it peels away from one edge in a clean strip, and it looks like the silicone failed when really it was never bonded.
So how do you smooth silicone caulk? Dry, in one pass
It is harder than the soapy version for about two joints, and then it is not.
- Get the bead size right first. Most smoothing problems are extrusion problems. A bead twice the size of the joint cannot be tooled neatly by anyone, because there is nowhere for the surplus to go. Cut the nozzle small — our guide to using a caulk gun covers where to cut it.
- Use a dry profiled tool, not a finger. A plastic profile with the right radius does in one pass what a finger does in three, and it does not warm the silicone. We have compared the caulk finishing tools worth owning.
- One pass, one direction, firm pressure. Press in as much as along. You are trying to force sealant into the joint, not skim the top of it.
- Wipe the tool between passes, on a dry cloth or paper towel. A loaded tool smears. This is what people mistake for needing lubricant.
- Do not go back over it. A second pass over a partly skinned bead tears the surface and leaves the ripples you were trying to remove.
If the silicone is dragging rather than shaping, the bead is too big or the surface has already skinned. Neither is fixed by wetting it.
Masking tape is the trick, not the spray
The reason people reach for soapy water is that they are trying to solve a mess problem. Tape solves it properly and costs nothing in adhesion.
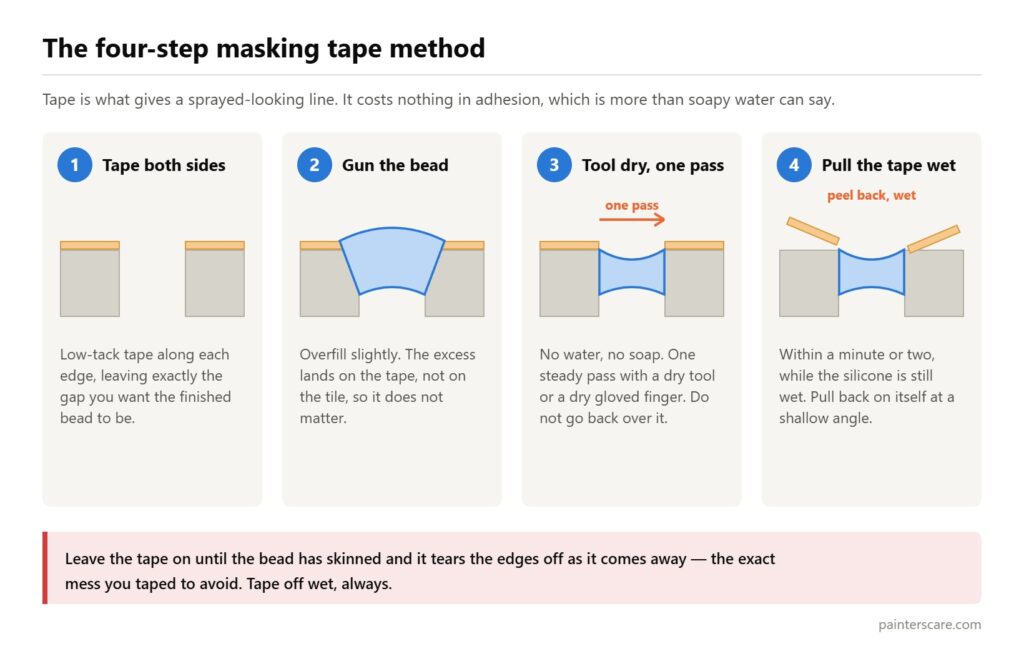
Run a line of low-tack tape along each side of the joint, leaving the gap you want the finished bead to be. Gun the sealant, tool it dry in one pass, and then pull both tapes off immediately, while the silicone is still wet, pulling back on itself at a shallow angle rather than straight up.
Leave the tape until the bead has skinned and it tears the edges off as it comes away, which is the opposite of what you wanted. Tape off, always, within 1 to 2 minutes of tooling. Leave the tape gap no wider than 1/2 inch while you are at it: half an inch is the widest joint these sealants are rated to fill on their own, and anything deeper than that wants foam backer rod behind it rather than a second squeeze of silicone.
Two tapes, one pass, tape off wet. That is the method that produces the lines people assume come from a spray bottle.
Your tooling window is 5 to 15 minutes, not half an hour
This is where almost every guide goes wrong, including the earlier version of this page. Tooling time and skin time are two different published figures, and the one that matters is the shorter one.
Working time on a 100% silicone runs 5 to 15 minutes depending on the grade. Tack-free time, the point at which the surface has skinned, runs 10 to 50 minutes. So the familiar instruction to tool it before it skins is true and almost useless: on an advanced kitchen and bath grade the skin does not form until 50 minutes in, a full 35 minutes after the window to shape the bead has closed.
That is a hard stop, not a guideline, and it is the reason to work in sections rather than running the whole tub in one go and then starting to tool.
Gun about three feet, tool those three feet, move on. That is also the point at which a mildew-resistant grade earns its money on a tub joint — we have picked through the caulk for showers and bathtubs. The skin time is part of the same set of figures as the cure time, which is covered in how long caulk takes to dry.
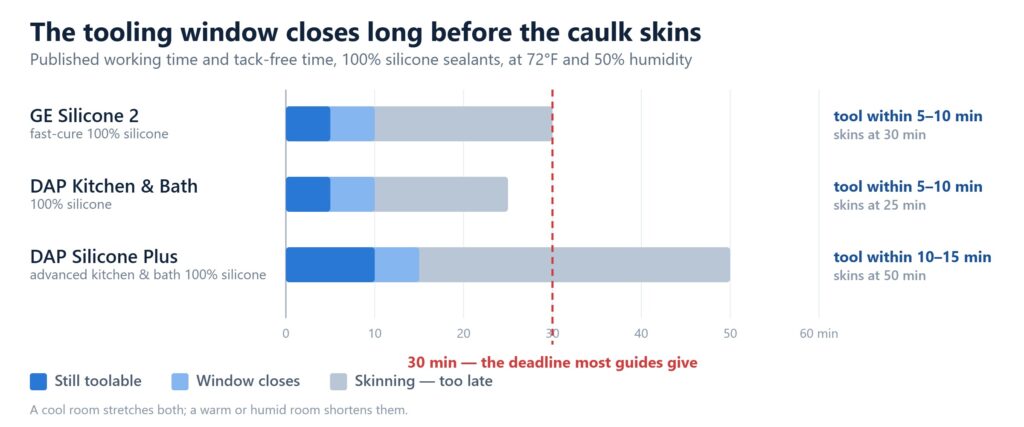
A cool, dry room stretches both figures and a warm, steamy bathroom shortens them. The same conditions govern how deep the cure reaches: silicone cures inward from the exposed face at roughly 2 to 3 mm a day, so a half-inch joint is still soft in the middle days after the surface became water-ready at 30 minutes. That is also why a joint deeper than half an inch wants foam backer rod behind it rather than more sealant, and why silicone will not cure at all in a fully enclosed space.
Tool or finger for the smoothing pass
A tool, for silicone specifically, and the reason is temperature as much as shape.
A finger is around 91 °F. Silicone gets softer and stickier as it warms, so a bare finger makes the bead tackier as it goes and starts to pick up more than it shapes. A plastic profile stays at room temperature and has a fixed radius, so the bead is the same section from one end to the other.
Where a finger genuinely wins is feedback. You can feel whether the joint is full or whether you are bridging a void, which is worth a lot on an uneven old joint. If you use one, use a dry nitrile glove: it is cooler than skin, silicone comes off it easily, and you avoid the part where cured silicone stays on your fingers for two days.
Acrylic decorator’s caulk is a different question. It is water-based, tools happily with a damp finger, and none of the release-agent problem applies in the same way — another of the practical differences set out in latex caulk against silicone.
If the bead is already a mess
Be honest about which problem you have, because only one of them is fixable in place.
- Still wet, within the window. Scrape the lot out with a plastic spreader, wipe the joint clean and dry, and start again. Faster than rescuing it.
- Skinned but recent. Leave it. Anything you do now tears the surface. Let it cure fully, then decide.
- Cured and lumpy. It has to come out. You cannot smooth cured silicone, and you cannot lay fresh silicone over it either, because nothing bonds to cured silicone. Cut both edges, pull the strip, scrape the residue back to bare surface — our caulk remover comparison covers the products that soften it.
The one thing not worth trying is a thin skim of new silicone over an ugly cured bead. It will not stick, and in a month you will have two beads to remove instead of one.
Frequently asked questions
How long do you have to smooth silicone after applying it?
Between 5 and 15 minutes. That is the published working time, and it is a different figure from the 10 to 50 minute skin time that most guides quote. Both are measured at 72°F and 50% relative humidity, so a steamy bathroom with the shower just run will shorten them and a cold, dry garage will stretch them. If you do not know which grade is in your gun, treat 5 minutes as the deadline.
Can you smooth silicone caulk after it dries?
No, and there are two stages of too late that need different responses. Inside the first hour the bead has skinned but not cured, so the quickest route is to scrape the whole run out with a plastic spreader, wipe the joint dry and gun it again, rather than trying to rescue the surface. After 24 hours it has cured, and then it has to be cut out properly. A second bead laid over the first will lift off as a sheet.
Can I use soapy water for caulking?
For acrylic decorator’s caulk, yes, and none of this applies to it. For silicone, no. The two are not interchangeable: acrylic caulk is paintable and typically rated for about plus or minus 12.5 percent joint movement, while a 100% silicone is not paintable at all and is rated for plus or minus 25 percent. Silicone only earns that figure if both faces of the joint are bonded to it, and a film of surfactant is the one thing certain to stop that.
Can Dawn dish soap be used on silicone?
Not on a wet bead, and not as a joint cleaner either. Dish soap leaves a residue, and soap residue on cured silicone feeds the secondary mold growth that mildew-resistant grades exist to prevent. The 5 and 10 year mold warranties printed on these cartridges are conditional on regular cleaning for that reason. Dish soap is the right thing for washing your hands afterwards. Use isopropyl alcohol on a cloth to clean the joint before you gun it.
How to make silicone not stick?
Stop trying to make it slide and give it less to do. Cut the nozzle so the bead roughly matches the joint instead of overfilling it. At a 3/16 inch bead a single 10 ounce cartridge covers 51 to 59 linear feet, so most people are extruding far more than the joint can take. Then tool with a dry plastic profile rather than a finger: skin sits at about 91°F, and silicone softens and gets tackier as it warms, so a bare finger makes the bead stickier the further along it goes.
Can I use my finger to smooth silicone caulk?
Yes, if it is dry and inside a nitrile glove. The reason to glove it is temperature rather than mess: bare skin runs at about 91°F, silicone softens as it warms, and an ungloved finger therefore leaves the bead tackier with every inch it travels until it starts lifting material instead of shaping it. The one thing no tool matches is the pressure you can judge through a fingertip, which is why plenty of installers run the straight lengths with a profile and do the internal corners by hand.
How do you smooth silicone without a tool?
The back of a plastic teaspoon has close to the right radius for a standard tub or shower joint, and it is rigid, cool and easy to wipe, which are the three things that matter. An old credit card cut to a curve handles corners. A proper profiled kit gives you three or four radii for a few dollars, which is worth having because joint width should not exceed half an inch for silicone anyway. Whatever you use, keep it dry and wipe it on a paper towel between passes, because a loaded tool smears and that smearing is what people mistake for needing a lubricant.
How to apply silicone without making a mess?
Mask it rather than spray it, and get two details right. The tape has to come off while the bead is still wet, because tape pulled after the surface skins takes the edge of the bead away with it. And the nozzle has to be cut to size: a 45 degree cut matched to the joint width stops the surplus that rolls ahead of the tool looking for somewhere to go. The spray bottle gets reached for when one of those two is wrong.
What to remember
The short version of how to smooth caulk, silicone or otherwise: tool dry, tool once, and tool inside the 5 to 15 minute window. If the bead will not shape, the answer is a smaller bead, not a wetter finger.
The soapy water everybody recommends is solving the wrong problem: it makes the pass easier and the bond worse. Mask with tape instead, pull it while the silicone is wet, and you get the clean line without putting a release agent into the joint. Joint shape is the other half of this, covered in our guide to caulking properly, and the same rules apply outdoors when caulking exterior windows. The full tooling section of the manufacturer sealant guidance is published if you want to read the tooling section yourself.
