Last Updated on October 6, 2026
Almost every answer to this treats it as a reach problem. It is not much of one: a $4 roller and two minutes of care will get paint onto the wall behind a tank. The harder question is why that paint so often looks tired a year later, and the answer has nothing to do with your technique. The wall behind a toilet tank is the coldest surface in the room, it spends part of every day below the dew point, and it stays damp.
So this covers both halves. How to paint behind a toilet without taking anything apart, when to lift the tank off instead, and what to change so the result survives.
Measure the gap, then pick the tool
Everything depends on one measurement, and almost nobody takes it. Put a tape between the tank and the wall. That number decides whether you reach behind the tank or lift it out of the way, and it is the difference between a clean job and a smeared one.
A roller cover’s thickness is its core plus twice its nap. A standard wall roller sits on a 1½-inch core, so with the usual ⅜-inch nap it is about 2¼ inches thick before you add the frame. A mini roller uses a ¾-inch core, which brings the same nap down to about 1½ inches. Drop to a ¼-inch nap and it is nearer 1¼.
| Gap behind the tank | What fits | Nap |
|---|---|---|
| 2½ in or more | Standard wall roller, no change needed | ⅜ in |
| 1¾ to 2½ in | Mini roller, 4 or 6 in wide | ⅜ in |
| 1½ to 1¾ in | Mini roller with a short nap | ¼ in |
| ¾ to 1½ in | Paint pad taped to a stir stick | — |
| Under ¾ in | Lift the tank off | — |
Two details matter more than the tool. Turn the frame so the open wire side faces the tank, not the wall, which buys you the better part of half an inch. And load the cover lightly: a wet roller in a tight gap transfers paint to the porcelain, and that is the mess people remember.
The version where you take nothing apart
Take the lid off first and put it somewhere it cannot be knocked over. It is the heaviest loose piece of porcelain in the room and the most expensive thing in this job to break.
Wipe the wall down and let it dry. Behind a tank you are usually clearing dust rather than grease, and a damp cloth wrapped round a stir stick reaches it. If the wall is chalky or the old paint is powdery, that has to come off first, or the new coat bonds to the powder instead of the wall.
Bag the tank. A trash bag pulled over it and taped tight at the base keeps the plastic from billowing into your roller, which the loose drop-cloth approach does not. Cover the bowl and the floor separately.
Cut in the corners and the edges with a 2-inch angled brush, then roll the flat. Two thin coats, and take the recoat time off the can rather than guessing it. Interior wall paints generally want two to four hours between coats, and going back early, while the first coat has skinned but not set, is what causes wrinkling. Pull the bag once the paint is dry to the touch, not before.
Lifting the tank off, which is a smaller job than it sounds
Under about three quarters of an inch there is nothing that fits, and fighting it produces a worse result than spending ten minutes on two bolts. The important point is that this is not the same as pulling the toilet. The seal between the bowl and the floor stays untouched, so the part of the job that can actually go wrong is not part of the job.
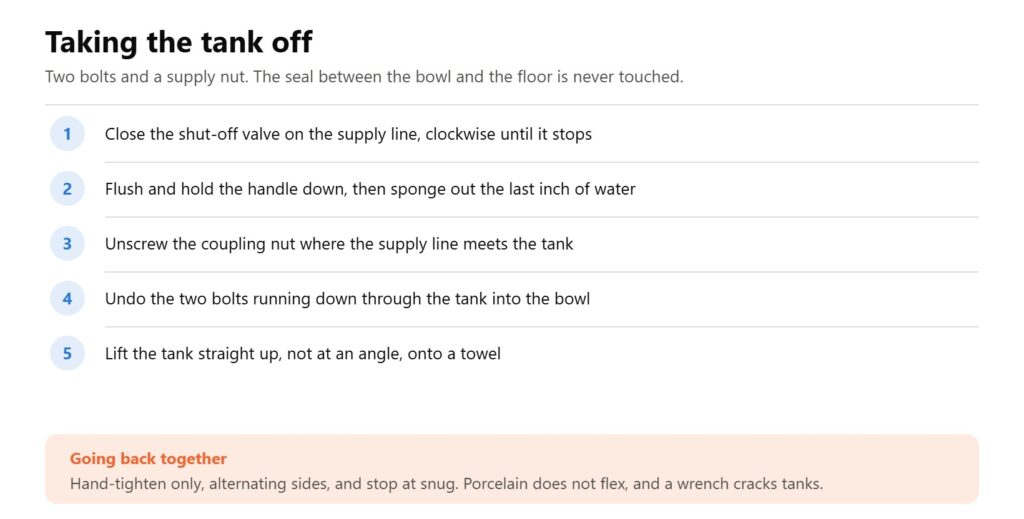
- Close the shut-off valve on the supply line near the floor, turning it clockwise until it stops.
- Flush and hold the handle down until the tank empties, then sponge out the inch or so that always stays in the bottom.
- Unscrew the coupling nut where the supply line meets the underside of the tank, with a towel underneath.
- Undo the two bolts that run down through the tank into the bowl. Hold the bolt head inside the tank with a screwdriver and turn the nut underneath.
- Lift the tank straight up, not at an angle, and set it on a towel.
Hand-tighten the nuts, alternating sides a little at a time so the tank seats evenly, and stop at snug. Porcelain does not flex, and a wrench on those bolts cracks tanks. If it weeps after the water goes back on, another eighth of a turn is the right response; a hard pull is not.
Let the wall cure before the tank goes back against it. Dry to the touch is not the same as hardened, and a tank pressed onto soft paint will print its shape into the finish.
Why the paint back there fails, and it is not your technique
A toilet tank is a tank of cold water with a thin porcelain wall. Mains water arrives somewhere between about 45 and 60°F across most of the country, colder in the northern states, and the tank sits at roughly that temperature all day. The wall directly behind it is shaded, unventilated and in contact with that cold mass of air.
Condensation is not a question of how humid a room feels. It happens whenever a surface is colder than the dew point of the air touching it, and the dew point in a bathroom moves a long way in a short time.
| Bathroom air | Dew point | A 55°F tank |
|---|---|---|
| 72°F at 40% humidity | 46°F | Dry |
| 72°F at 50% humidity | 52°F | Dry |
| 72°F at 60% humidity | 57°F | Sweating |
| 75°F at 70% humidity | 65°F | Sweating hard |
| 78°F at 75% humidity | 69°F | Running wet |
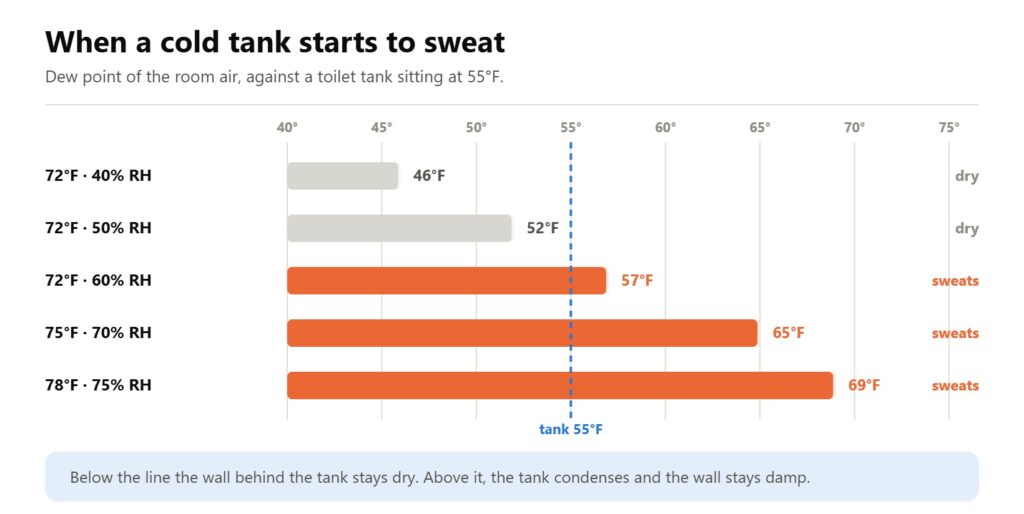
Read down that table and the whole problem is visible. At 50% humidity a 55°F tank is a few degrees above the dew point and the wall behind it stays dry. At 60% it is below, and condensation starts. After a shower, at 70 or 75%, it is not close.
Which means the wall behind your toilet is dry or damp depending on about ten points of relative humidity. That is a smaller margin than most bathrooms hold, and it is why this one patch of wall ages differently from the rest of the room.
The fix is the fan, not the paint
Ten points of humidity is what an exhaust fan is for, and the sizing is not a matter of opinion. Residential code puts bathroom exhaust at 50 cubic feet per minute if the fan runs intermittently, or 20 if it runs continuously. A fan that cannot move that much air is not a weak fan, it is an undersized one.
Running it matters as much as having it. The humidity peak arrives after the shower stops, not during, so the fan needs to keep going for fifteen or twenty minutes afterwards. A timer switch does this better than anyone remembers to.
The target to aim at is under 60% relative humidity, and ideally between 30 and 50%. That is the published guidance for controlling mold indoors, and it happens to be exactly the range that keeps a cold tank above the dew point. A $15 humidity meter on the windowsill tells you which side of the line your bathroom sits on.
If the tank still sweats in a well-ventilated room, two fixes address the tank rather than the air. An insulated tank has a foam liner that keeps the outer surface near room temperature. An anti-sweat valve mixes a little hot water into the fill so the tank never gets cold enough to condense. The liner is a tank replacement; the valve is a plumber’s job.
What to actually put on the wall
Use a bathroom paint with a mildewcide in it, in satin or semi-gloss. The sheen is not decoration here: a tighter film sheds moisture and takes repeated wiping, and flat paint in a condensation zone holds water in its surface.
Prime anything bare. Fresh drywall, filled screw holes and patched damage all absorb differently from the surrounding wall, and behind a toilet that difference shows as a dull patch the first time the room steams up.
If the wall already has mold on it, paint is not the answer and mold-blocking paint is not either. It has to be cleaned off and the surface dried before anything goes on top, or it grows through. Paint over live mold and you have hidden it for a season.
Two thin coats beat one heavy one, which matters more in a gap where you cannot see what you are doing. If you want the timings for the paint you are using, dry and cure times by paint type has the ranges, and how long a room takes covers where a bathroom fits in a day’s work.
Frequently asked questions
Do you have to remove a toilet to paint behind it?
No, and you almost never need to. Removing the toilet means breaking the seal to the floor, which is the one part of this that can go wrong. If the gap is too tight for a mini roller, take off the tank instead: two bolts and a supply nut, with the floor seal untouched. The whole fixture only has to come out if you are retiling or replacing it anyway.
What type of tool is best for painting behind a toilet?
Whichever one clears your gap, which is why the tape measure comes first. A 4-inch mini roller on a ¾-inch core is about an inch and a half thick and handles most tanks. Below that, a short nap buys a quarter inch, and a flat paint pad taped to a stir stick gets into roughly three quarters of an inch. Turn the frame so the wire faces the porcelain, and keep the cover lightly loaded.
How to paint a bathroom without removing the toilet?
Bag the tank and work around it, which is what the steps above cover. The part that catches people out is sequence rather than technique: do the wall behind the tank first, while your hands are clean and the roller is fresh, instead of leaving the awkward bit until last. Paint the reachable walls after. And run the fan for the whole job, because a bathroom with wet paint in it is a bathroom with more moisture in the air than usual.
How do professional painters paint behind toilets?
On a repaint they bag the tank and use a mini roller, because the time cost of removing a tank is not recoverable on a bathroom. On a full renovation, or where the tank sits against the wall, the tank comes off and often the whole fixture does, since the floor is being done anyway. The habit that separates them is the one invisible step: they deal with the ventilation, because they are the ones called back when it fails.
