Last Updated on October 14, 2026
How to use a caulk gun, in one line: pull the plunger rod all the way back, drop the cartridge in base first, and push the rod up against it. The part nobody tells you is that the number printed on the packaging — the thrust ratio — decides how hard the trigger will be to squeeze, and most people are fighting the wrong gun. If you are not sure which tube to load, start with the types of caulk and what each one handles.
Every guide to how to use a caulk gun gives you the same six steps. Cut the tip at 45 degrees, puncture the seal, load the tube, squeeze the trigger, smooth the bead, cap the nozzle. All of it is correct and none of it explains the two things people actually get stuck on: why the gun is so hard to squeeze, and why it keeps oozing after they stop.
Both have the same cause. There is more than one kind of caulk gun, they are not operated the same way, and the generic instructions are written for whichever one the writer had on the bench.
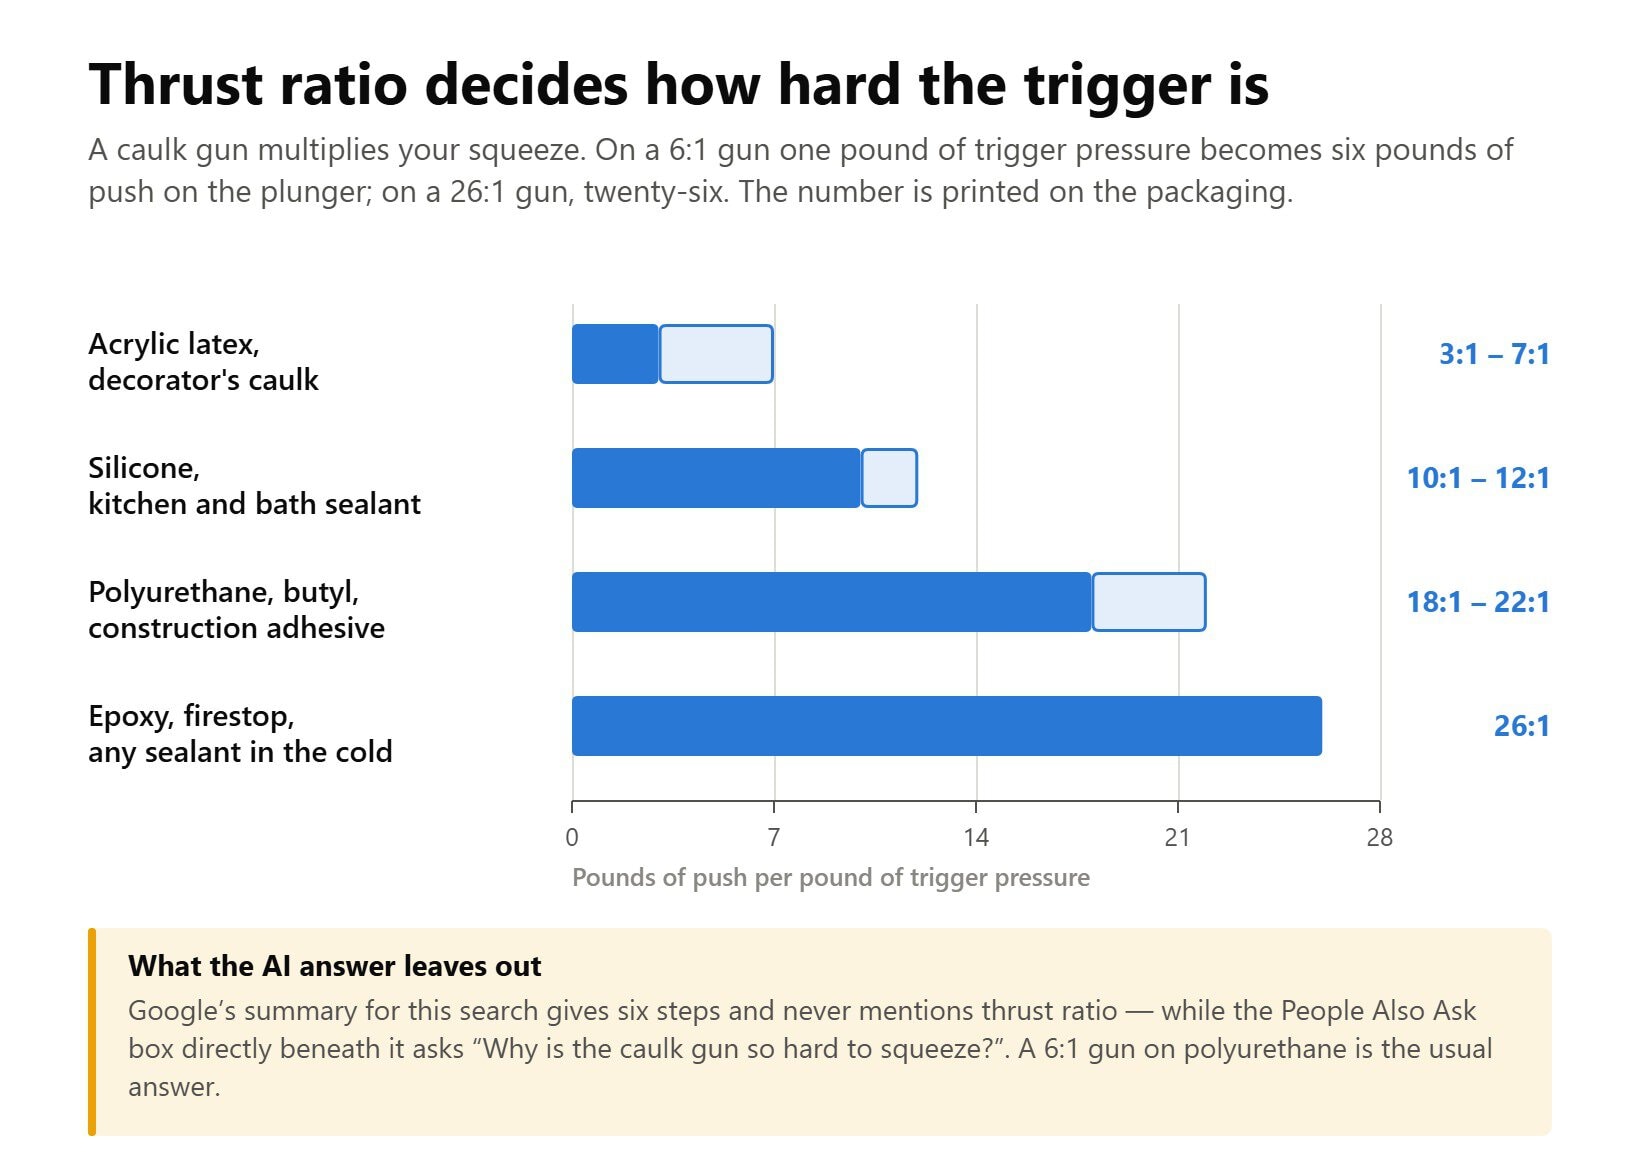
Thrust ratio: the number that decides how hard this is
Thrust ratio is the mechanical advantage of the gun — how much it multiplies your squeeze. Newborn Brothers, who have been making these guns since 1938, put it plainly: on a 6:1 gun, one pound of trigger pressure becomes six pounds of push on the plunger. On a 26:1 gun the same squeeze delivers twenty-six pounds.
That number is printed on the packaging of every gun sold and almost nobody looks at it. It is the difference between a bead that comes out smoothly with a relaxed grip and a tube you cannot empty before your hand gives out.
Sealants are not all the same thickness. Acrylic decorator’s caulk flows easily. Silicone is stiffer. Polyurethane and construction adhesive are thicker again, and epoxy thicker still. Newborn’s own bands:
| Material | Thrust ratio | What that means in the hand |
|---|---|---|
| Acrylic latex, decorator’s caulk, siliconized acrylic | 3:1 to 7:1 | The cheap cradle gun. Fine for long runs of thin caulk. |
| Silicone, kitchen and bath sealant, most general sealants | 10:1 to 12:1 | The everyday range. Comfortable all day on standard materials. |
| Polyurethane, hybrids, butyl, construction adhesive | 18:1 to 22:1 | Expansion joints, exterior work, adhesives. |
| Epoxy, firestop, any sealant in cold weather | 26:1 | Maximum advantage. Less material per pull, no strain. |
Here is the part that surprises people: a higher ratio is not automatically better. Newborn are blunt about it — a high-thrust gun moves less material per pull, so on thin caulk it slows you down for no benefit, and the frame, rod and springs are built heavier to carry the load, which you feel overhead. Their advice is to pick the lowest ratio that moves your material comfortably.
So if you have a budget cradle gun from the DIY shed and you are trying to push a tube of polyurethane through it in an unheated garage in January, the gun is not broken and you are not weak. It is a 3:1 or 6:1 tool being asked to do an 18:1 job.
Smooth rod or ratchet rod changes the instructions
This is where the standard advice quietly breaks. Google’s AI summary for this search tells you to stop the flow by “pressing the thumb release lever at the back of the gun so the caulk stops oozing out”. That is a smooth-rod instruction, and it is not what most people are holding.
- Ratchet rod. The rod is notched along one side and a pawl catches a notch on every squeeze. It is the cheapest mechanism and the most common. Pressure stays on the cartridge after you let go, so the bead keeps creeping out. To stop it you rotate the rod half a turn so the notches face away from the pawl, then pull the rod back.
- Smooth rod. No notches. A friction plate grips the rod and a thumb lever at the back releases it. These are the ones sold as dripless, and here the AI’s instruction is correct — press the lever and the pressure drops immediately.
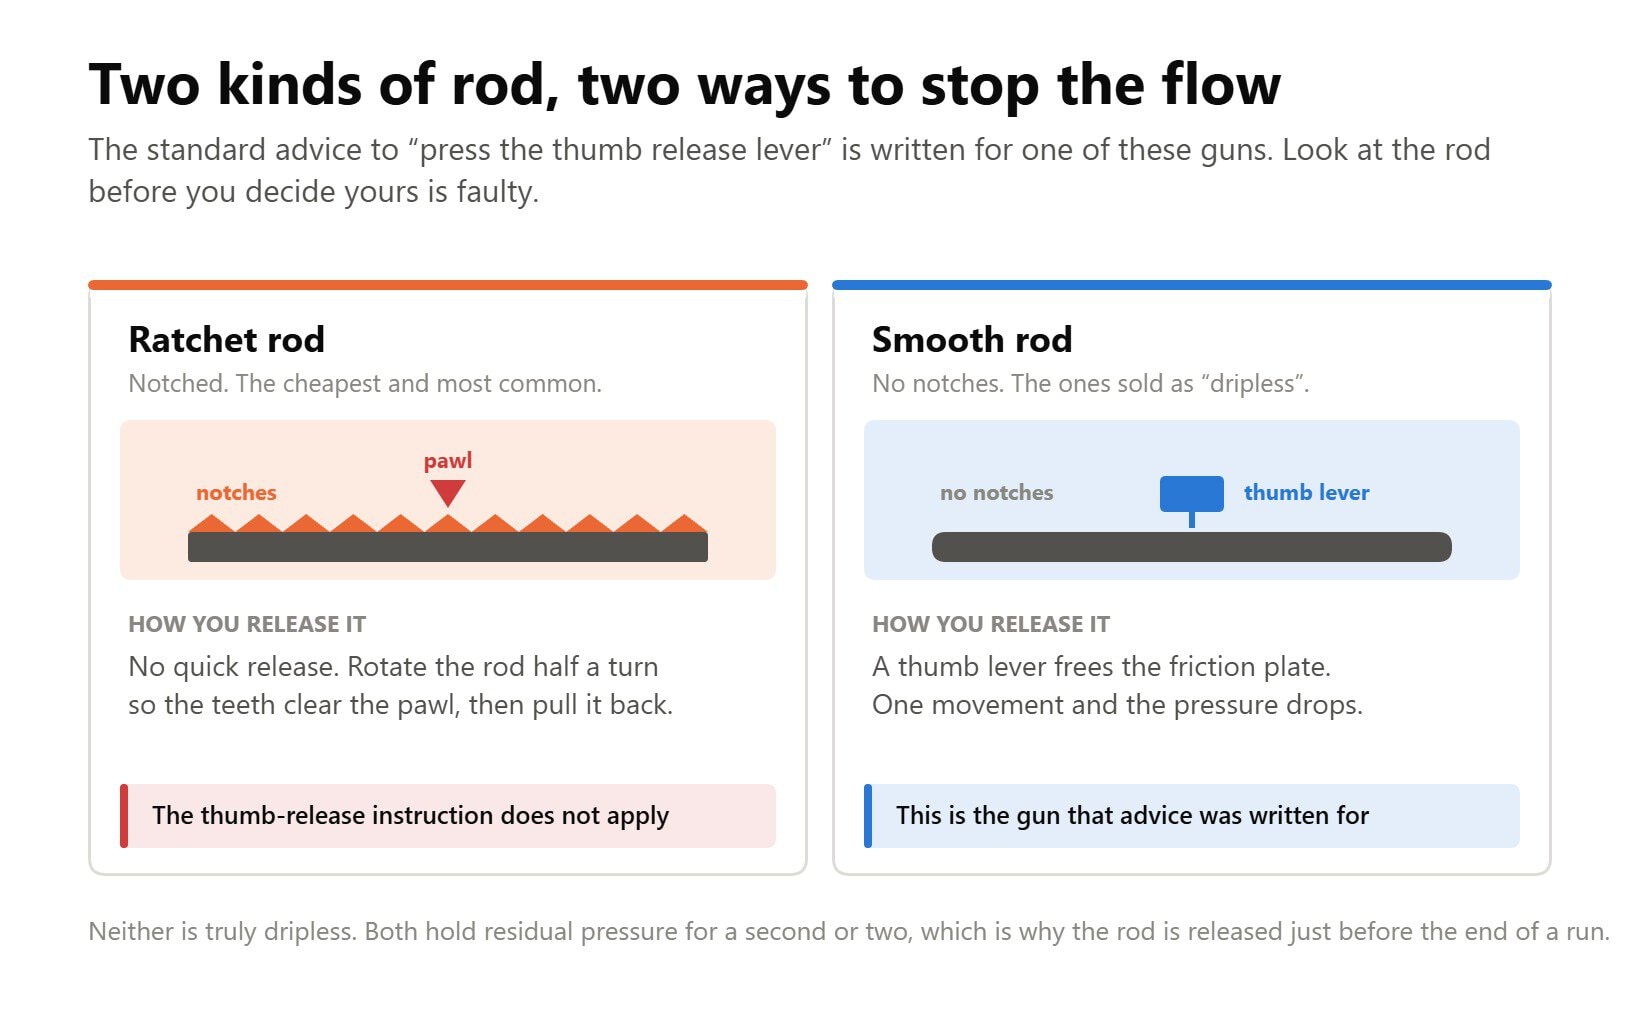
Look at the rod before you buy or before you blame the gun. If you can see teeth, you have a ratchet rod, and the twist-and-pull is your release. People who think their gun is faulty because it will not stop dripping are usually following smooth-rod instructions on a ratchet-rod tool.
Neither one is truly dripless. Even a smooth-rod gun holds residual pressure in the cartridge for a second or two, which is why professionals release the rod a beat before the end of the run rather than at it.
Cut the nozzle to the joint, not to the angle
Every guide says cut the tip at 45 degrees. That is fine advice and it is the least important part of the cut. What matters is where along the taper you cut, because that sets the diameter of the hole, and the diameter of the hole sets the width of the bead.
A nozzle is a cone. Cut it near the tip and you get a 1/8 in bead. Cut it 1 in down and you get a 3/8 in bead you cannot take back. Start small; the cut only goes one way.
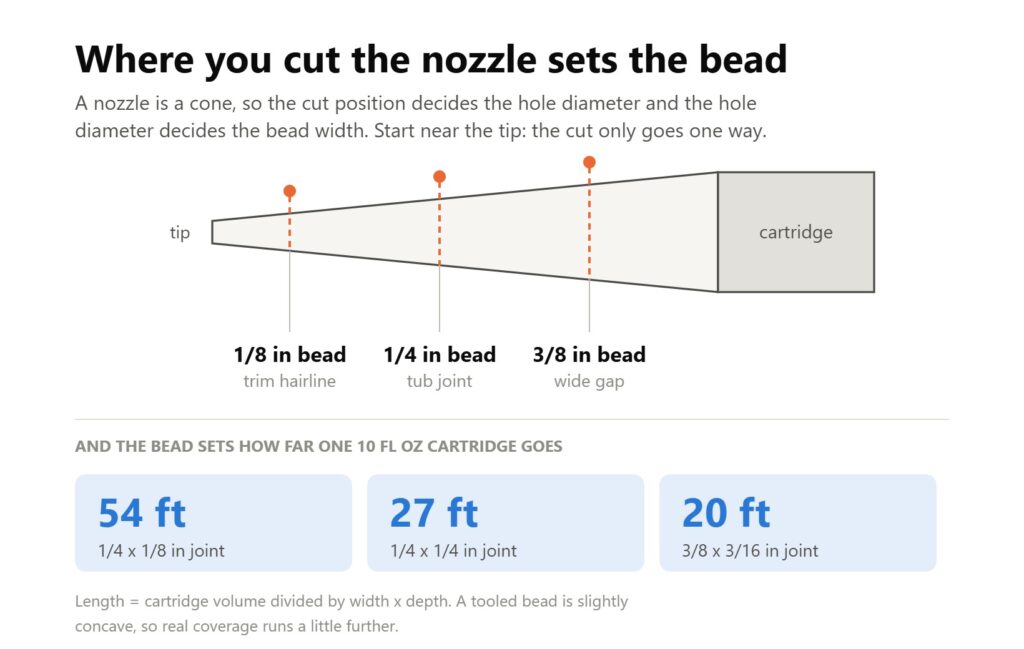
Match the opening to the joint rather than to the tube. Sealant manufacturers work to a 2:1 rule — the bead should be about twice as wide as it is deep — with a minimum joint width of around 1/4 in for anything that has to move. Our guide to caulking properly covers joint shape and backer rod in full, because getting that wrong is what makes beads fail.
Over-filling is the standard beginner mistake and it costs twice. A deep bead is weaker, and it also takes days longer to cure: silicone hardens at roughly 1/16 to 1/8 in of depth per day, so doubling the depth roughly doubles the wait. That is covered in how long caulk takes to dry.
How much caulk is in a tube?
A standard cartridge holds about 10 fl oz, which is 10.1 US fluid ounces. UK cartridges are often 10.5 fl oz. That volume divided by the cross-section of your bead gives the run length, and the arithmetic is worth doing before you go to the shop rather than halfway along a tub.
| Joint width × depth | Run from one 10 fl oz cartridge | Typical use |
|---|---|---|
| 6 × 1/8 in | About 54 ft (54 ft) | Baseboards, door casing, a tidy tile line |
| 6 × 1/4 in | About 27 ft (27 ft) | A normal tub or shower joint |
| 10 × 3/16 in | About 20 ft (20 ft) | A wide gap, backer rod behind it |
| 13 × 1/4 in | About 11 ft (11.5 ft) | The widest joint most sealants are rated for |
An average tub perimeter is three to four meters, so one cartridge does a bathroom twice over at 6 × 1/8 in and only just covers it if you have cut the nozzle wide. Buy two.
Loading the gun
- Release the rod fully. On a smooth-rod gun, hold the thumb lever and pull the rod back as far as it goes. On a ratchet rod, rotate the rod so the teeth face up, away from the pawl, then pull it back.
- Cut the nozzle before the tube goes in, not after. It is easier to judge the opening with the cartridge in your hand, and you are not fighting the frame.
- Puncture the inner seal. Most guns have a stiff wire folded into the handle for this. Push it right down the nozzle until it stops — the foil seal sits at the base of the thread, not at the tip, so a short jab does nothing.
- Drop the cartridge in base first, then swing the nozzle end down into the cradle. Forcing the nozzle in first is how frames get bent.
- Push the rod up until the plate is flat against the base of the cartridge, then squeeze two or three times until sealant reaches the tip. Do this over a bin, not over the joint.
Running the bead
Hold the gun at about 45 degrees to the joint with the cut face flat against it. The angled cut is there so the opening sits parallel to the surfaces you are sealing — that is the actual reason for cutting at an angle, and it only works if you keep the gun rolled the right way up.
Then push, do not pull. This is the one that starts arguments, and the manufacturers are on the side of pushing: Tremco’s joint guidance says sealant should be filled from the backside to the frontside of the joint, and that working front to back is not recommended because air gets trapped behind the bead. Pulling lays sealant over the gap. Pushing drives it into the gap, which is where it needs to be.
Match trigger pressure to travel speed rather than pumping. Squeeze until the bead starts, then move at whatever speed keeps it the same thickness. A stuttering bead almost always means the two are out of step, or the gun is under-geared for the material.
Release the rod a second before you reach the end of the run, and stop short of interior corners rather than turning them in one pass. Corners are easier done as two runs that meet.
Tooling the bead
Tool it within about half an hour, because that is roughly when a skin forms and after that you are dragging the surface rather than shaping it. A wet finger works. So does a profiled tool, and on silicone the tool usually gives a cleaner line because your finger warms the sealant and pulls it about.
Whatever you use, one pass in one direction, wiping the excess off between strokes. Going back over a tooled bead is what leaves ridges. Our guide to smoothing silicone caulk goes through the technique, and if you would rather use a profiled tool, we have compared the caulk finishing tools worth owning.
Stopping, storing and unclogging
Release the rod the moment you finish. Leaving pressure on the cartridge is what produces the puddle in the bottom of the toolbox.
To save a part-used tube, push a long screw into the nozzle so it seals against the inside of the cone, or fit the plastic cap if the tube came with one. A wire nut works as well as anything. What does not work is tape over the end: silicone cures on contact with atmospheric moisture, and tape will not keep that out for long.
A tube that has skinned over in storage is usually recoverable. Cut 3/16 to 3/8 in off the nozzle and push the plug through — there is generally a slug of cured material behind it and then good sealant. A tube that is soft in the nozzle but will not extrude at all has usually cured through, and no amount of squeezing will fix it. Silicone has a shelf life of a year or two, and it is printed on the cartridge.
Why is my caulk gun so hard to squeeze?
Four causes, in the order they are likely.
- The thrust ratio is too low for the material. A 6:1 gun on polyurethane or construction adhesive is the usual answer. Check the packaging against the table above.
- The sealant is cold. Viscosity climbs sharply as temperature drops, which is exactly why Newborn put cold-weather sealant in the same band as epoxy. A cartridge left in a van overnight is a different material from one that has been indoors. Bring it inside for a few hours.
- The nozzle opening is too small. A 1/8 in hole with a thick sealant behind it needs real force. Cut a little more off.
- The inner seal is not fully pierced. A partially punctured foil restricts the flow and feels exactly like a stiff tube. Push the wire all the way down.
If none of those is it, the gun itself may be worn — a slipping pawl or a glazed friction plate lets the rod creep back under load. That is a sign to replace it rather than repair it, and our round-up of caulking guns worth buying covers what to look for.
Frequently asked questions
Do you push or pull a caulking gun?
Push. Tremco’s guidance for sealant joints says the joint should be filled from the backside to the frontside, and that filling front to back is not recommended because air gets entrapped behind the bead. Pushing drives sealant into the gap; pulling lays it across the top and leaves a void behind it that you will not see until the joint fails. Pulling is easier and gives a neater-looking line straight off the gun, which is why so much advice recommends it.
What thrust ratio caulk gun do I need?
For household silicone and general sealants, 10:1 to 12:1. For acrylic decorator’s caulk, 3:1 to 7:1 is enough. For polyurethane, butyl or construction adhesive, 18:1 to 22:1. For epoxy or any sealant used in the cold, 26:1. Do not simply buy the highest number: a high-thrust gun delivers less material per pull and is built heavier, so on thin caulk it is slower and more tiring, not less.
Why does my caulk gun keep dripping?
Because the pressure is still on the cartridge. On a ratchet-rod gun there is no quick release: you have to rotate the rod half a turn so the teeth clear the pawl, then draw it back. On a smooth-rod gun the thumb lever does it in one movement. If a smooth-rod gun still drips after the lever is pressed, the friction plate is worn. Some seepage for a second or two after release is normal on any gun, which is why you release just before the end of a run.
What angle should you cut a caulk nozzle?
About 45 degrees, but the angle matters less than the position. The angle exists so the opening lies flat against the joint when the gun is held at a natural working angle. Where you cut along the cone is what sets the bead width, so start close to the tip and open it up only if the bead is too thin. You cannot uncut a nozzle.
How do you unclog a caulk gun nozzle?
Cut 3/16 to 3/8 in off the end of the nozzle and push the cured plug out with the puncture wire from the gun handle. There is usually a short slug of set material and live sealant behind it. If the blockage runs deep into the cartridge rather than sitting in the nozzle, the tube has cured through and is finished.
How do you store a half-used tube of caulk?
Seal the nozzle against air. A long screw pushed into the cone, a wire nut, or the plastic cap supplied with the tube all work. Store it upright and indoors. Tape over the tip is not enough for silicone, which cures by reacting with moisture in the air. Even sealed, expect to lose the first few centimeters next time.
Is it better to caulk with a tool or your finger?
A finger is quicker and gives you feedback on how much sealant is in the joint. A profiled tool gives a more consistent line, wastes less and keeps silicone off your hands, which matters because it is difficult to get off. On silicone specifically the tool usually wins, because body heat softens the bead and a finger tends to drag it. Either way the rule is one pass in one direction.
Is it hard to use a caulking gun?
The gun is not the hard part. Loading it takes ten seconds once you know whether your rod is ratcheted or smooth. What takes practice is keeping trigger pressure and travel speed matched so the bead stays one thickness, and most people have that after a meter or two on a scrap board. The mistakes that ruin a job are choosing the wrong sealant and over-filling the joint, not trigger technique.
Do you need a dripless caulk gun?
For a single bathroom job, no. For anything where you are starting and stopping repeatedly — trim, window frames, a whole room of baseboards — a smooth-rod gun saves a lot of wiping up. “Dripless” is a description of the smooth rod and thumb release rather than a guarantee, and no manual gun stops instantly.
Can you use a caulk gun for construction adhesive?
Yes, if the ratio suits it. Construction adhesive sits in the same band as polyurethane, 18:1 to 22:1, so a light cradle gun will struggle badly. Check the frame length too: adhesive often comes in the same 10 fl oz cartridge as sealant, but some products use a 20 fl oz sausage pack that needs a barrel gun rather than a cradle.
How do you clean a caulk gun?
Wipe the cradle and the plunger plate before the sealant sets; cured silicone on the plate stops it sitting flat against the next cartridge. Acrylic caulk comes off with a damp cloth. Cured silicone has to be picked or scraped off, and the same removers used on old bathroom sealant will soften it — our caulk remover comparison covers those. Keep the rod clean and dry; a gritty rod is what wears a friction plate out.
What to remember
Check the thrust ratio before you blame your grip, look at the rod before you blame the gun for dripping, and cut the nozzle to the joint rather than to the tube.
Everything else is practice. If you are choosing between materials before you start, our comparison of latex caulk against silicone covers which goes where, and for a wet room specifically we have picked through the caulk for showers and bathtubs. The thrust ratio bands quoted here are published by Newborn Brothers if you want to check your own gun against them.
