Both directions are possible. They are not the same job, and most advice treats them as one.
Oil over latex is a movement problem that takes 2 or 3 seasons to show. Latex over oil is an adhesion problem that shows in under 2 weeks. Only the second one needs a bonding primer, and the primer you pick changes the job by a factor of 6 on VOC and from 45 minutes to 4 hours on recoat time. A clear coat raises the same question in a different form: polyurethane over paint has its own cure and ambering traps.
Oil over latex usually works, and fails slowly when it fails — the rigid film cracks as the flexible one underneath keeps moving. Latex over oil fails fast and obviously, because latex will not key to a cured oil film at all. That second one is the job that needs a bonding primer, and it is the one people are actually standing in front of when they search.
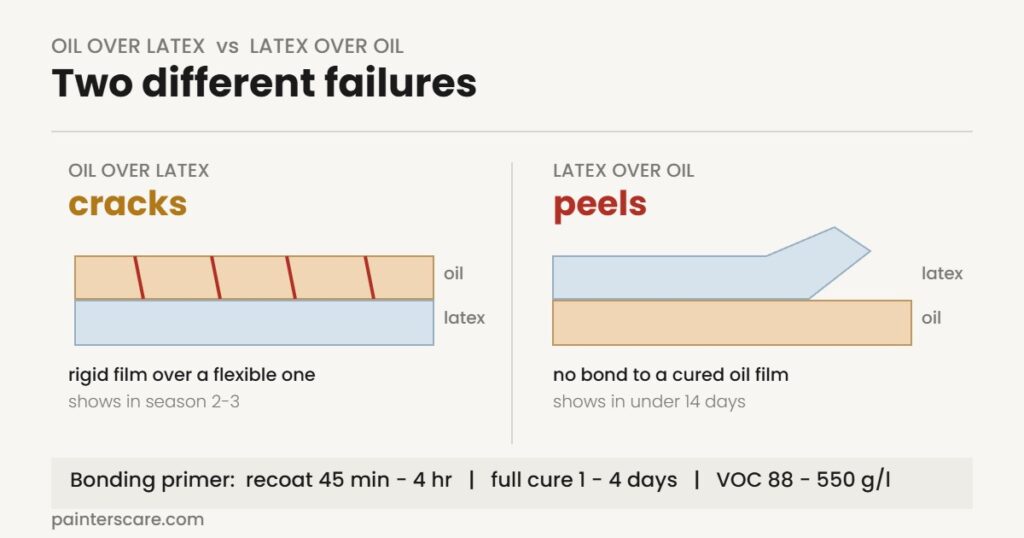
The two directions, side by side
| Oil over latex | Latex over oil | |
|---|---|---|
| Failure mode | Cracking, alligatoring | Peeling in sheets |
| Cause | Rigid film over a flexible one | No adhesion to a slick cured film |
| Shows up | Months to years | Days to weeks |
| Fix | Scuff, clean, thin coats | Bonding primer, no exceptions |
| Can you skip the primer? | Often, indoors on stable trim | No |
| Worst case | Exterior, or anything that moves | Trim, doors, cabinets — all the glossy things |
First, find out what is already on the wall
Soak a cotton ball or rag in denatured alcohol, press it to an inconspicuous patch for about 30 seconds, and rub.
Color transfers to the cotton, or the surface goes tacky: that is latex. Nothing comes off and the sheen is unchanged: that is oil. Alcohol softens a latex film and does nothing to a cured alkyd, which is the whole basis of the test.
Two things to watch. Test several spots — a house repainted over 40 years can be oil on the trim and latex on the walls, sometimes in the same room. And a latex film that has had a decade to harden can resist the first few seconds, so give it the full half minute before calling it oil.
Oil over latex: what actually goes wrong
Oil-based paint cures by oxidation into a hard, rigid film. Latex stays flexible for its whole service life. Put the rigid one on top of the flexible one and every seasonal movement in the substrate is transmitted through a layer that cannot follow it.
Indoors, on trim that barely moves, this often never surfaces. Outdoors, on siding that swells and shrinks through the year, it shows up as alligatoring — the surface breaks into a pattern of small plates — usually in season 2 or 3 rather than the first. Wood moves most across the grain, which is why wide boards fail before narrow trim does.
So the honest answer is that oil over latex is a judgment call about the substrate, not a yes or no:
- Interior trim, doors, stable millwork: generally fine with a scuff and a clean
- Exterior siding, fascia, anything timber-framed and exposed: do not
- Over a latex coat applied within the last 30 days: wait, because an uncured latex film is still shrinking
- Over builder-grade flat latex on drywall: scuff first, since flat latex is porous and chalky
Latex over oil: the one that peels
This is the direction that strips off in sheets, and it is a bonding problem rather than a movement one. A cured oil film is slick, closed and chemically unlike the acrylic going on top. Water-based paint sits on it instead of keying into it. A fingernail or a strip of tape is often enough to lift it 7 days later, and a full-height door can come away in 2 or 3 pieces rather than flaking.
No amount of sanding fixes this on its own. Scuffing helps a primer grip, but a scuffed oil film is still an oil film, and latex applied directly to it will still fail. The bonding primer is the component doing the real work. Kitchen cabinets are where this bites hardest, because they combine old oil, a hard gloss and daily handling — the same reason paint stops sticking to cabinets in the first place.
Which bonding primer, by the numbers
| Zinsser B-I-N | INSL-X Stix | Kilz Adhesion | |
|---|---|---|---|
| Base | Shellac | Acrylic urethane | Waterborne |
| Recoat | 45 minutes | 3–4 hours | 30 minutes |
| Full cure | 1–3 days | 3–4 days | Not stated |
| VOC | 550 g/l | 87.6 g/l | 100 g/l |
| Coverage | ~500 sq ft/gal | 300–400 sq ft/gal | — |
| Application temp | 0–90°F | 35–90°F | — |
| Exterior | Spot priming only | Yes, if topcoated | Yes |
| Cleanup | Ammonia or denatured alcohol | Soap and water | Soap and water |
Three figures in that table decide most jobs.
The 550. Shellac carries roughly 6 times the VOC of either waterborne option, because it is carried in denatured alcohol. On a big interior surface that is the difference between a window open and a room you cannot use. It also has a 54°F flash point and 29% solids by volume, so it is genuinely flammable while wet and goes on thin at 0.75 to 0.9 mils.
The exterior row. Shellac is an interior product. Whole-surface exterior use is outside what it is specified for, and it is not for floors, decks or anything in prolonged contact with water. If the oil-painted surface is outside, that narrows the choice to the waterborne primers.
The 0°F. Shellac can be applied in freezing conditions, which the acrylics cannot — Stix stops at 35°F. For an unheated porch in February that is the only one of the three that will work.
There is also a straight disagreement between the makers worth knowing about. Shellac is specified as adhering to glossy surfaces without scuff sanding. The acrylic urethane is formulated for glossy surfaces and still tells you to de-gloss them first. Sanding costs an hour and removes the argument, so scuff either way with 180 to 220 grit.
Recoat time is not cure time
This is the line in the data that causes more failures than any other, and almost nobody repeats it.
A bonding primer gives two numbers. The recoat time is when you may put paint on it. The cure time is when it has reached full adhesion. Those are not close together:
- Shellac: recoat at 45 minutes, full adhesion and hardness at 1 to 3 days
- Acrylic urethane: recoat at 3 to 4 hours, maximum resistance to scrape-off at 3 to 4 days
You can legitimately topcoat long before the primer is at full strength. What you cannot do is rehang a door, tape the edges, stack the shelves or let anything rub against it during those first few days. The paint is dry. The bond is not finished. Most of the peeling blamed on the wrong primer is really a cured-paint film pulled off a primer that had not finished curing.
Tint matters here too: adding universal colorant to shellac prolongs the dry time, and so do low temperatures and humidity above 70%.
Doing it: latex over oil
- Confirm it is oil with the alcohol test, in several spots.
- Wash it. Degrease thoroughly — old trim and kitchen cabinets carry a film that defeats any primer. Do not use TSP if you are going over to shellac.
- Scuff with 180 to 220 grit until the sheen is gone and the surface is uniformly dull. Dust off completely. On cabinet doors there is a case for skipping the sanding, but only with the right primer.
- Check conditions. Below 70% humidity, surface more than 15°F above the dew point, substrate moisture under 12%.
- One coat of bonding primer. Spot priming is for high-hiding topcoats only — prime the whole surface and you will not see the joins.
- Wait the recoat interval, not the touch-dry time.
- Two thin topcoats rather than one heavy one.
- Leave it alone for 3 to 4 days before anything touches it.
If you are spraying rather than brushing, shellac wants a 0.011–0.013 inch tip at 800–1,200 psi, and the acrylic urethane a 0.013–0.017 inch tip at around 2,500 psi. Thinning is not an option with either.
If you already painted latex over oil
Test before you do anything drastic. Press packing tape firmly over a painted area and pull it off sharply.
Paint lifts with the tape: the bond has failed and the new coat has to come off. Scrape what releases, sand the edges flush, then prime and repaint properly. Tape comes away clean: it may have keyed well enough to leave, especially if the oil underneath was already dull and well-worn — watch it through a season before committing to a strip.
Either way, deal with it now rather than after another coat. A failing layer under fresh paint takes the fresh paint with it. Give it 2 to 3 weeks before you judge — latex that is going to let go usually does so inside 14 days, and anything still holding at a month is likely keyed well enough to leave.
Frequently asked questions
Can latex paint be painted over an oil-based primer?
Yes. This is the one combination that causes needless worry. An oil-based primer is formulated to accept a water-based topcoat, unlike an oil-based paint. Check the recoat window and stay inside it — our guide to oil-based primer dry times has the figures, and the oil-based primer roundup covers which to buy.
Can I put oil-based paint over water-based paint?
Yes, with a scuff and a clean, indoors on surfaces that do not move much. Outdoors, or over latex applied in the last 30 days, do not.
What paint can go over latex paint?
More latex, with no preparation beyond cleaning. Oil, with scuffing and the caveats above. Waterborne alkyd enamel is the usual compromise on trim — it levels like oil without the rigid film or the yellowing.
How do you paint over oil-based paint without sanding?
One product type carries that claim on its label, and it is the shellac. You pay for it with 550 g/l of VOC and interior-only use. Anywhere an abrasive will physically reach, an hour with 220 grit is the better trade.
Can you paint oil over latex outside?
Avoid it. Exterior substrates move seasonally, and that movement is exactly what cracks a rigid film over a flexible one. If the existing exterior coat is latex, stay with an acrylic.
Is latex paint the same as oil-based paint?
No. Latex carries acrylic resin in water, stays flexible for life, and washes out of a brush under a tap. The alkyd sort hardens by reacting with air and needs solvent for cleanup. Different flexibility, different odor, different cleanup, and different answers to what will bond to them.
Can you paint oil-based paint over oil-based paint?
Yes, and it is the simplest combination of all. Clean, scuff the sheen, recoat. No bonding primer needed.
