Last Updated on October 14, 2026
To caulk well, get the joint right before you touch the gun. The gap wants to be at least 1/4 in wide and 1/4 in deep, with the sealant half as deep as it is wide and backer rod behind it so it sticks to two faces rather than three. Then cut the nozzle to match, gun it in from the back, and tool it once. Before you load the gun it is worth checking which type of caulk the joint actually needs, because movement capability decides it rather than the brand.
Almost every guide to how to caulk is about your hands. Cut at 45 degrees, pull don’t push, wet your finger, keep a rag handy. The technique matters, but it is the second thing that matters, and teaching it first is why so many people lay a tidy-looking bead that splits within a year.
Sealant manufacturers do not write about finger technique. They write about joint geometry, because that is what decides whether the bead survives. This guide starts there and then covers the handwork, which is genuinely easy once the gap is the right shape.
The short version
Here is how to caulk, start to finish. The reasoning behind each step is below it.
- Cut out the old sealant completely and clean back to sound material.
- Check the gap. Under 1/4 in wide, open it up. Over about 3/8 in deep, fit backer rod.
- Cut the nozzle to the width of the gap, not to a habit.
- Gun the sealant in from the back of the joint, pushing ahead of the nozzle.
- Tool it once, firmly, with a wet tool or wet finger.
- Leave it alone. Skinning is not curing.
Why caulk fails, and it is usually not your technique
A sealant joint is not glue. It is a flexible bridge between two things that move independently, and it spends its whole life being stretched and squashed. A door frame swells in winter. A tub drops 1/16 in when you fill it and get in. A baseboard shifts as the floor takes up moisture.
Sealant copes with that by deforming. It can only deform if it is free to. Two things stop it being free: it is stuck to too many surfaces, or it is the wrong shape.
Three-sided adhesion, the failure nobody warns you about
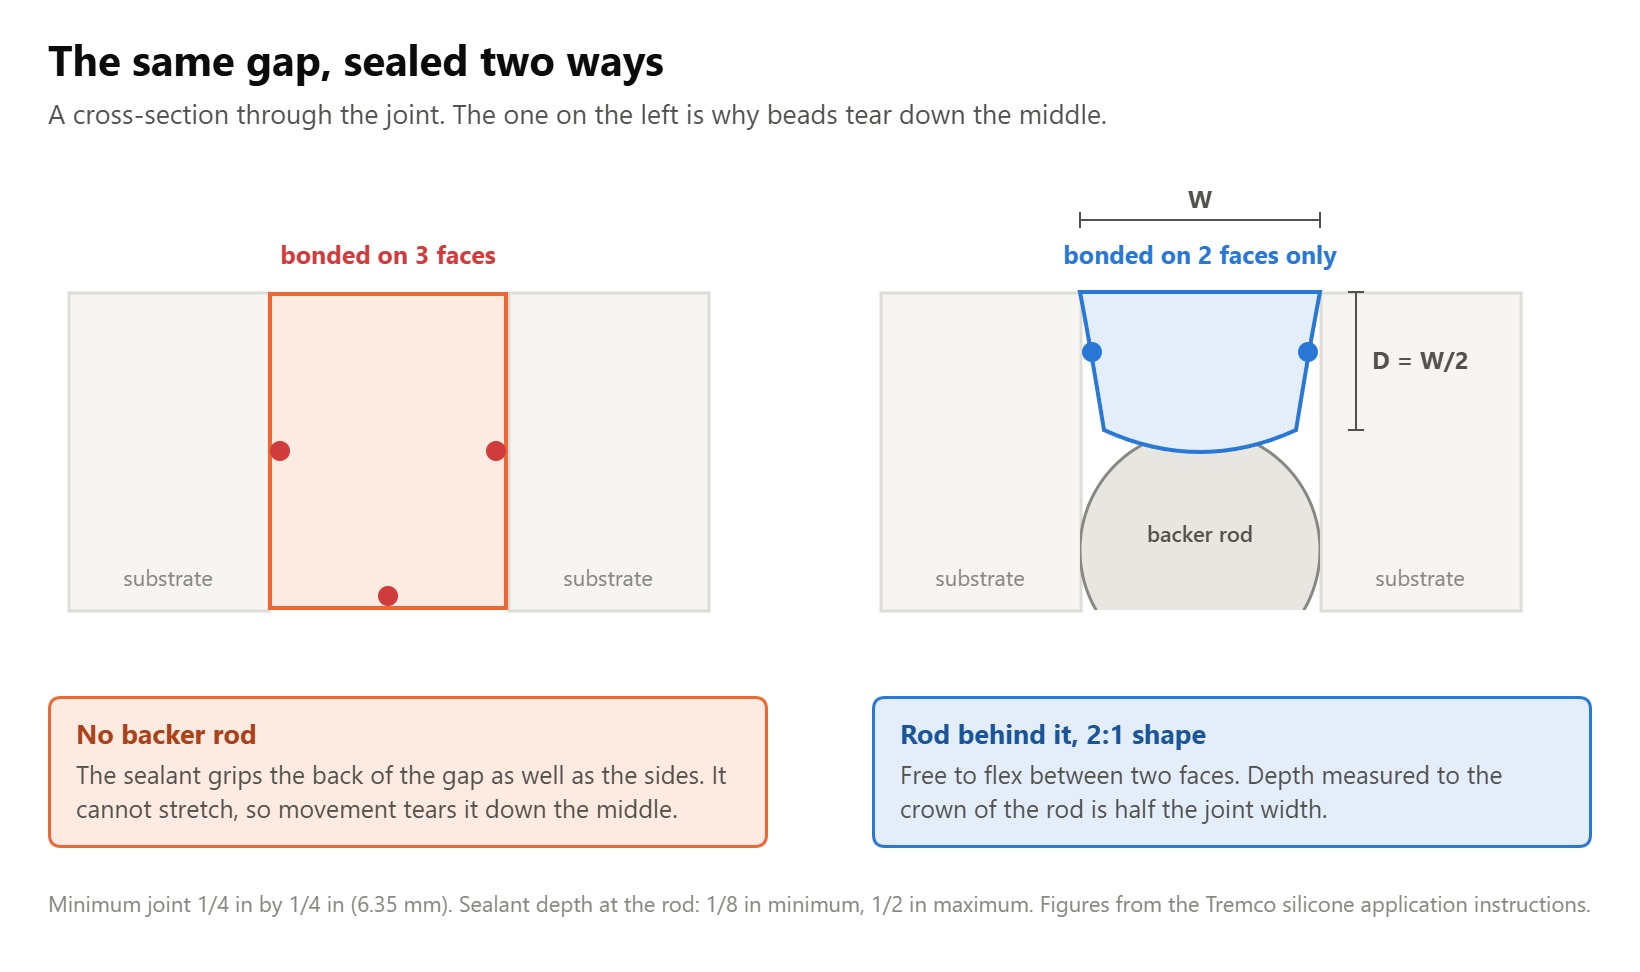
Squeeze sealant into an open gap and it touches three surfaces: the left face, the right face, and the back of the gap. That sounds like more grip, and it is exactly wrong. Stuck at the back as well as the sides, the bead cannot stretch when the joint opens. The stress goes straight into the middle of the bead instead of being shared along its length, and it tears.
That is what backer rod is for. A closed-cell foam rod pushed into the gap before you seal gives the sealant something it will not bond to, so it grips the two sides only and is free to move in the middle. Tremco’s application instructions for silicone put the job of backing material plainly: to control the depth of the bead, to promote an hour-glass bead shape, and to prevent three-sided adhesion.
Inside corners are the awkward case, because you cannot fit a rod into a corner. The published fix is bond breaker tape laid into the corner and extending at least 1/4 in in both directions, so again the sealant bridges rather than grips all the way in.
The 2:1 rule
The other half of it is shape. The published ratio is 2:1 width to depth: the sealant should be half as deep as the joint is wide, measured from the face of the bead down to the crown of the backer rod.
So a 1/2 in gap wants roughly 1/4 in of sealant sitting on a rod, not 1/2 in of sealant filling the void. This is the part that feels wrong. More sealant sounds stronger. It is not. A thick bead has to stretch a much greater distance across its own depth to accommodate the same movement, and it fails sooner than a thin one. Deeper is weaker.
What size does the joint need to be?
There are hard minimums, and they are bigger than most people expect. These are Tremco’s figures for silicone and they are representative of elastomeric sealants generally.
| Dimension | Figure | What it means on the job |
|---|---|---|
| Minimum joint width | 1/4 in / 1/4 in | A hairline crack cannot be sealed. Open it out or fill it instead. |
| Minimum contact depth on each face | 1/4 in / 1/4 in | How much of each side the sealant must grip. |
| Minimum sealant depth at the rod | 1/8 in / 1/8 in | Thinner than this and the bead has no body. |
| Maximum sealant depth at the rod | 1/2 in / 1/2 in | Anything deeper is wasted and weaker. Fit a rod. |
| Width above which you need another approach | 3/4 in / 3/4 in | Too wide to bridge reliably. Trim, fill or flash it. |
The 1/4 in minimum is the one that catches people. A shrinkage crack in plaster or a hairline gap where two pieces of trim meet is below the working range of any sealant. Sealing it produces a smear that debonds the first time anything moves. Rake the crack out to 1/4 in, or use filler and accept that a rigid filler will crack again if the joint genuinely moves. On timber that is the better answer rather than a compromise: a nail hole, a dent or a split in a windowsill is not going anywhere, and a two-part wood filler sets in minutes, sands flush and takes paint the way the board around it does.
Which caulk should you use?
Two questions decide it: does it need painting, and how much will the joint move?
Paintability is the one that ruins jobs. Silicone cannot be painted. Not with the right primer, not with a special paint — latex paint and most trim paints will not wet it, and what does go on peels. If the bead will be painted, it has to be acrylic or a paintable hybrid, chosen before you gun it, not after. Our comparison of latex caulk against silicone caulk goes through where each one belongs.
| Type | Paintable | Movement | Use it for |
|---|---|---|---|
| Acrylic, decorator’s caulk | Yes | Low | Baseboards, door casing, filling before painting |
| Siliconized acrylic | Yes | Low to medium | Trim in slightly damp rooms |
| Silicone | No | High | Tubs, showers, sinks, glass, anything wet |
| Hybrid polymer, MS | Usually | High | Movement joints you also need to paint |
Movement is the professional half of the question, and it is printed on better cartridges as an ASTM C920 class. The class number is the percentage of the joint width the sealant can take, in both directions: Class 25 handles plus or minus 25% of the joint width, so a 1/2 in joint can open or close about 1/8 in. Class 12.5 suits interior trim. Class 25 covers window and door perimeters. Class 50 is for glazing and wide panel joints.
Two other letters appear on the same line. Type S means one-part, ready to use; Type M means two parts you mix. Grade NS means non-sag, the gun grade that stays where you put it on a vertical joint; Grade P is pourable, for horizontal joints in floors. For household work you want Type S, Grade NS.
For the specific jobs, we have gone into which caulk holds up in a shower without going moldy and what to use outside around doors and windows.

How do you cut the caulk nozzle?
Cut it to the width of the joint. That is the whole rule, and it is more useful than the 45-degree advice you will read everywhere.
The angle is a convenience: somewhere between 30 and 45 degrees lets you hold the gun comfortably and keeps the nozzle face flat against the work. The diameter is what actually decides the bead. Most cartridges have molded rings on the nozzle marking bead sizes, so hold the nozzle against the gap and cut at the ring that matches. Start narrower than you think. You can always cut again; you cannot uncut.
Then puncture the foil seal inside with the wire on the gun or a long nail. A cartridge that needs heavy trigger pressure usually has an intact seal, not thick sealant, and forcing it is how you end up with a sudden slug of caulk halfway along a run.
If the gun itself is fighting you, a dripless one with a decent thrust ratio makes a real difference on stiff silicone — we compared them in our caulking gun reviews, and there is a step-by-step on loading and controlling a caulk gun if you have not used one before.

Should you push or pull the caulk gun?
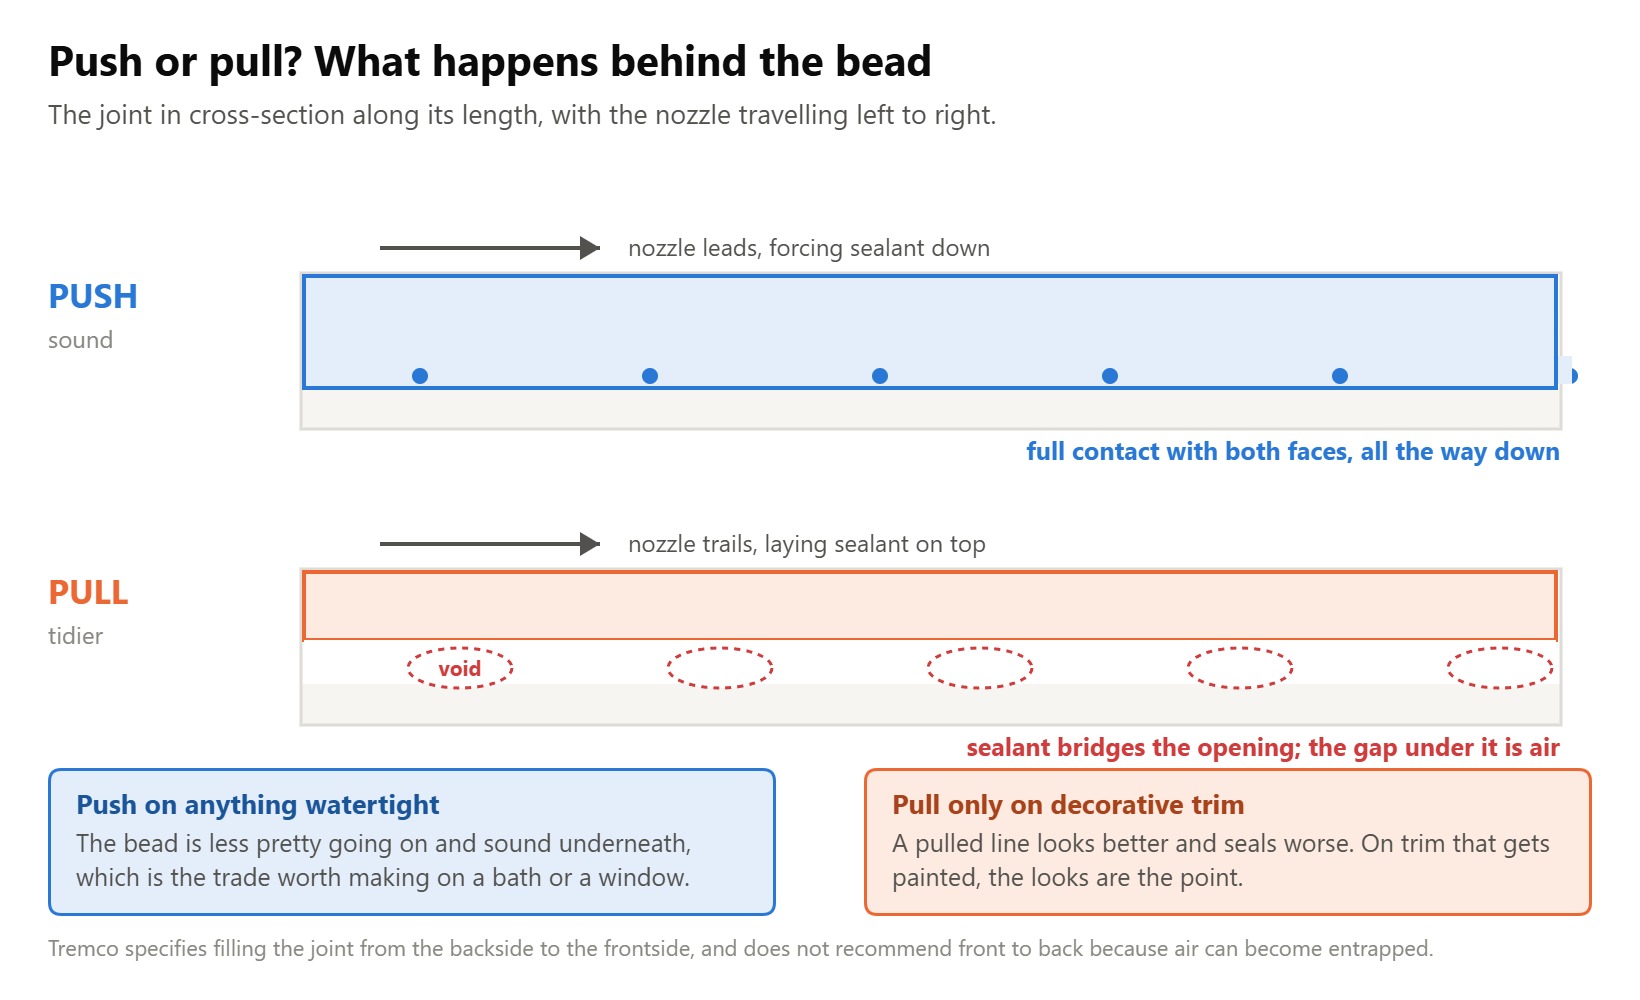
Push. This is the one place where the common advice and the manufacturer’s instructions point in opposite directions, and it is worth knowing why.
Almost every video says pull the gun towards you. It does produce a neater-looking line, because you are laying sealant onto the surface and trailing the nozzle over it. Tremco’s instruction is the opposite: the joint should be filled from the backside to the frontside, and filling front to back is specifically not recommended because it lets air become trapped in the joint.
Pushing drives sealant into the gap ahead of the nozzle and forces it against both faces. Pulling drapes it across the opening, and the voids behind it are invisible until the bead fails there. A pulled bead can look better and seal worse.
In practice, push the nozzle along the joint at a shallow angle so the tip is plowing into the gap, keep the trigger pressure and the travel speed constant, and work in runs of a meter or so rather than trying to do a whole wall in one pass. If pushing feels uncontrollable on your first go, the honest compromise is to push on anything that has to stay watertight and use whichever is steadier on decorative trim.
Is it better to smooth caulk with a tool or your finger?
A tool, for anything you will look at every day. A finger is fine and sometimes better on short runs and awkward corners.
What matters is not which one but that you do it once. Tooling is not cosmetic. Pressing the bead firmly is what pushes the sealant into contact with both faces and gives you the concave hour-glass profile that lets it stretch. Going back over a bead that has started to skin drags the surface and breaks the bond you just made.
A finger gives you feel and follows a wobbly gap. Its weaknesses are consistency, and that most people use too little pressure. A profiled tool gives a repeatable radius over a long straight run, which is what makes trim look professional rather than homemade. Wet either one — water for acrylic, soapy water for silicone — and wipe it between passes.
We have tested the profiled ones in our guide to the best caulk finishing tools, and there is more detail on technique in smoothing silicone caulk, which behaves differently from acrylic and is far less forgiving of a second pass.
How do you get a perfect caulk line?
Tape both edges, tool once, then pull the tape immediately while the sealant is still wet.
The timing is the whole trick. Tape pulled from wet sealant leaves a clean edge because the bead flows back very slightly and closes the line. Tape pulled from sealant that has skinned tears the edge and takes a ragged strip of the bead with it. If you are taping, you are committed to finishing that run and pulling the tape before you start the next one.
Pull the tape away from the bead and at a shallow angle rather than straight up. Note that paint works the other way round: its tape comes off after the film has formed, at about 1 hour, not while it is still wet. On acrylic before painting you can often skip the tape entirely, because a small imperfection disappears under the paint. On silicone against a tub, tape is worth the time, because what you see is what you keep.
What are the most common caulking mistakes?
In rough order of how much damage they do:
- Sealing over the old bead. New sealant bonds to old sealant, not to the surface, and the old one is already failing. Cut it all out. Our guide to removing old silicone and adhesive covers the softeners that make this quick.
- No backer rod in a deep joint. Three-sided adhesion, and the bead tears down the middle within a season.
- Silicone where paint has to go. Unfixable without cutting it all out and starting again.
- Filling a gap that is too narrow. Under 1/4 in there is nothing for the sealant to grip.
- Tooling twice. The second pass breaks the bond the first one made.
- Caulking a wet surface. Silicone will not bond to a damp tub rim. Dry it, and give it longer than you think.
- Filling the tub after sealing it. Fill the tub with water before you seal, and leave it full until the sealant has cured, so the joint is sealed at its widest. Otherwise the first tub you take opens the gap the bead was never sized for.
How long before you can use it?
Longer than the tube suggests, and the number on the tube is usually skin time rather than cure time. A bead that feels dry on the surface can still be liquid underneath, which is why a shower used the same evening often peels within days.
Cure runs from the outside in and depends on the chemistry, the temperature and, for silicone, the humidity in the room. We have set out the figures by type in how long caulk takes to dry. The short version for a bathroom: seal it, leave it overnight at minimum, and ideally give it a full day before any water touches it.
Frequently asked questions
How do you caulk for beginners?
Start on baseboard with acrylic caulk, not on a tub with silicone. Acrylic is water-cleanable, forgiving of a second attempt, and gets painted over, so early mistakes disappear. Cut the nozzle narrow, push the gun along the joint at a steady speed, tool it once with a wet finger, and wipe the excess straight away. Do a meter, look at it, adjust, then carry on.
Do you push or pull when caulking?
Push, on anything that has to be watertight. Manufacturers specify filling the joint from the back to the front, because filling front to back can trap air in the joint. Pulling the gun lays a tidier-looking bead across the opening but leaves voids behind it that you cannot see until the seal fails.
Do you need backer rod for caulk?
If the joint is deeper than about 3/8 in, yes. Backer rod controls the depth of the bead and stops the sealant bonding to the back of the gap. Without it the sealant grips three faces, cannot stretch when the joint moves, and tears. Use closed-cell rod slightly wider than the gap so it grips, and push it in so the sealant above it ends up half as deep as the joint is wide.
Can you paint over silicone caulk?
No. Paint will not adhere to cured silicone, and no primer reliably fixes it. If the bead needs painting it has to be acrylic, siliconized acrylic or a paintable hybrid, decided before you apply it. Silicone that has already gone on a surface you need to paint has to be cut out and the residue removed, because even a thin smear will repel paint.
How wide can a caulk joint be?
Around 3/4 in is the practical limit for a single bead. Past that the published guidance is to stop trying to bridge it with sealant and change the detail instead, by packing the gap, trimming over it or fitting a flashing. Very wide beads sag while curing and cannot accommodate proportional movement.
What does Class 25 mean on a tube of sealant?
It is the ASTM C920 movement class, and it means the sealant can take the joint opening or closing by 25% of its width. In a 1/2 in joint that is about 1/8 in of movement in either direction. Class 12.5 is for interior trim, Class 25 for window and door perimeters, Class 50 for glazing and wide panel joints.
Can you caulk over a hairline crack?
Not usefully. The minimum working joint for sealant is about 1/4 in wide and 1/4 in deep, and a hairline crack gives the bead nothing to grip. Rake it out to that width if it is a joint that moves, or use a filler if it is a static crack and accept that a rigid filler will reopen if the substrate shifts.
Why does my caulk keep cracking?
Almost always the joint rather than the product. A bead cracking down its middle is a sign of three-sided adhesion or a bead that is too deep for its width. A bead lifting cleanly off one side is a bonding problem: a dirty, damp or dusty face, or sealant applied over an old bead. A bead cracking within days of application is usually movement before it cured.
Should you caulk the tub full or empty?
Full. A tub drops noticeably under the weight of water and a person, and that movement opens the joint at the rim. Fill it before you seal, seal it, and leave the water in until the sealant has cured. The joint is then sealed at its widest, and every later tub compresses the bead rather than stretching it.
How long does caulk take to dry before painting?
Acrylic decorator’s caulk is usually paintable in one to two hours on a thin bead in a warm room, but a deep bead takes considerably longer and paint applied over an uncured bead will crack as the caulk shrinks. If the bead is thick or the room is cold or damp, leave it overnight.
Do you wet your finger when caulking?
Yes, and wet the tool too if you are using one. A dry finger drags the surface and pulls the bead away from the edges instead of pressing it in. Plain water is right for acrylic; use soapy water for silicone, because silicone grabs a wet finger but slides under a slippery one. Wipe between passes rather than smearing the same excess along the joint, and only tool once — a second pass over a skinning bead breaks the bond the first one made.
Can you caulk without a caulking gun?
For a small job, yes. Squeeze tubes and foil sachets with a reusable applicator both exist and are fine for a single joint. What you lose is flow control: a gun with a decent thrust ratio lets you hold a constant bead while you move at a constant speed, and that consistency is most of what makes a bead look professional. For anything longer than a meter or two, or for stiff silicone in a cold room, a gun is worth the few pounds.
What is better than caulking?
Nothing, for a joint that moves — that is the one job sealant does. But plenty of gaps are not that joint. A static crack in plaster wants filler, which sands flat and takes paint properly. A tiled floor or wall joint wants grout, except at the perimeter where it meets a tub or countertop, which does move and does want sealant. A gap wider than about 3/4 in wants packing out, trimming over or a flashing rather than a huge bead. Reach for sealant when two surfaces move independently and water or air has to be kept out; reach for something else when they do not.
What to remember
The bead is the last 10% of the job. Almost everything that goes wrong with sealant was decided before the gun came out: the old bead left in place, the gap too narrow to grip or too deep to flex, no rod behind it, or silicone chosen for something that has to be painted.
Three things to hold on to. Get the gap to at least 1/4 in and the sealant half as deep as the gap is wide. Put backer rod behind anything deep, so the bead grips two faces and not three. And push the gun rather than pulling it, because the seal you cannot see is the one that matters. The full application figures are here if you want to check the exact wording.
