Last Updated on October 14, 2026
Caulking exterior windows means sealing the sides and the top of the frame and deliberately leaving parts of it open. The bead goes where wind-driven rain gets in. It does not go anywhere water needs to get out, and the two places people seal by instinct — the weep holes and the bottom of the frame — are exactly the ones the window manufacturer tells you to leave alone. Exterior joints move more than interior ones, which is why movement capability decides the caulk type.
Almost every guide to this gives you the same procedure: scrape the old bead off, cut the nozzle, run a line around the window, smooth it. Google’s AI summary of this search does precisely that, in six steps, and the top result underneath it — a Reddit thread — says caulk “should be applied around the entire window”.
A sealed-all-round window is a bucket. Every window assumes some water will get past the outer face, and every window has a route for it to drain back out. Seal that route and the water stays inside the frame and the wall.
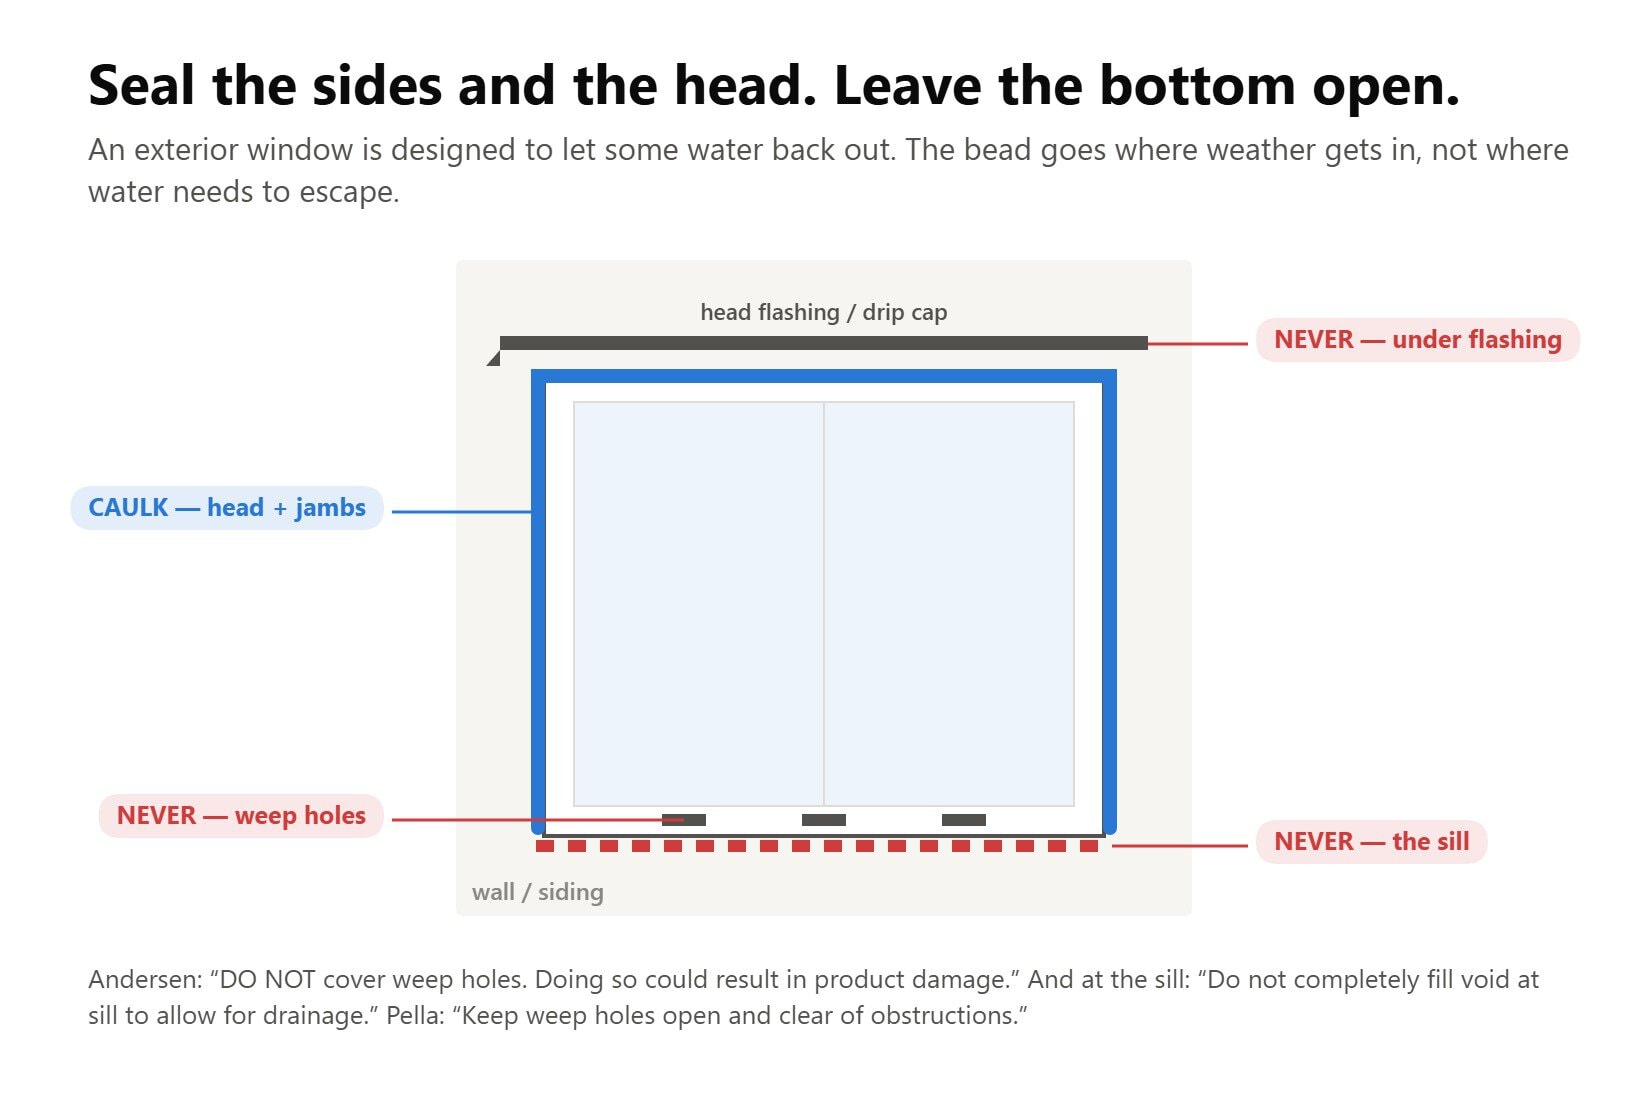
The three places not to caulk
These come from the people who make the windows, not from a rule of thumb.
1. The weep holes
Small slots or holes along the bottom of the outside face of the frame, usually on vinyl, aluminum and clad windows. They look like a manufacturing gap. They are the drain.
Andersen’s installation instructions put it in a warning box: “DO NOT cover weep holes. Doing so could result in product damage.” Their guides even tell the installer to remove the protective tape from the weep holes once exterior trimming is finished. Pella say the same thing in different words: “Keep weep holes open and clear of obstructions.”
Caulk them and rainwater that gets into the frame — which it will, because the frame is designed on the assumption that it does — has nowhere to go. It sits in the bottom of the frame, backs up, and finds the inside instead.
2. The bottom of the frame
Caulk the two sides and the head. Leave the sill joint open.
Andersen’s guide for their A-Series and 400 Series windows carries this as a notice during installation: “Do not completely fill void at sill to allow for drainage.” The same guide has the installer bed the flanges at the sides and head and leave the sill flange unsealed.
That instruction is written for the installer fitting the window, not for you standing outside with a tube. The design intent carries over exactly: the bottom of the assembly is a drainage path. A continuous bead right round the outside closes it.
3. The gap under the head flashing
Above most windows there is a drip cap or head flashing, a strip of metal turned out over the top of the frame and tucked up behind the siding or stucco. The slot where that flashing meets the wall above is not a defect either. It lets anything that runs down behind the cladding get back out above the window instead of behind it.
Caulk along the top of the flashing where it meets the frame if the manufacturer’s details call for it. Do not caulk the line where the flashing disappears under the siding.
So where does the caulk actually go?
The joint between the outside of the window frame and the material around it, up both sides and across the top. That is the gap the weather blows into, and sealing it is what stops drafts and wind-driven rain.
- Both jambs, full height. Frame to brick, stucco, wood or siding.
- Across the head, unless a drip cap or flashing is doing that job already. If there is flashing, the flashing wins and you seal only where its details say.
- Around the frame corners, where mitres open up.
- Not across the sill, and not over any weep hole.
One practical exception: on a window with no weep holes and no sill pan — a lot of older solid wood windows — there may be nothing to drain and the bottom joint can be sealed. Look before you decide, and if the frame has holes along its bottom edge, it drains.
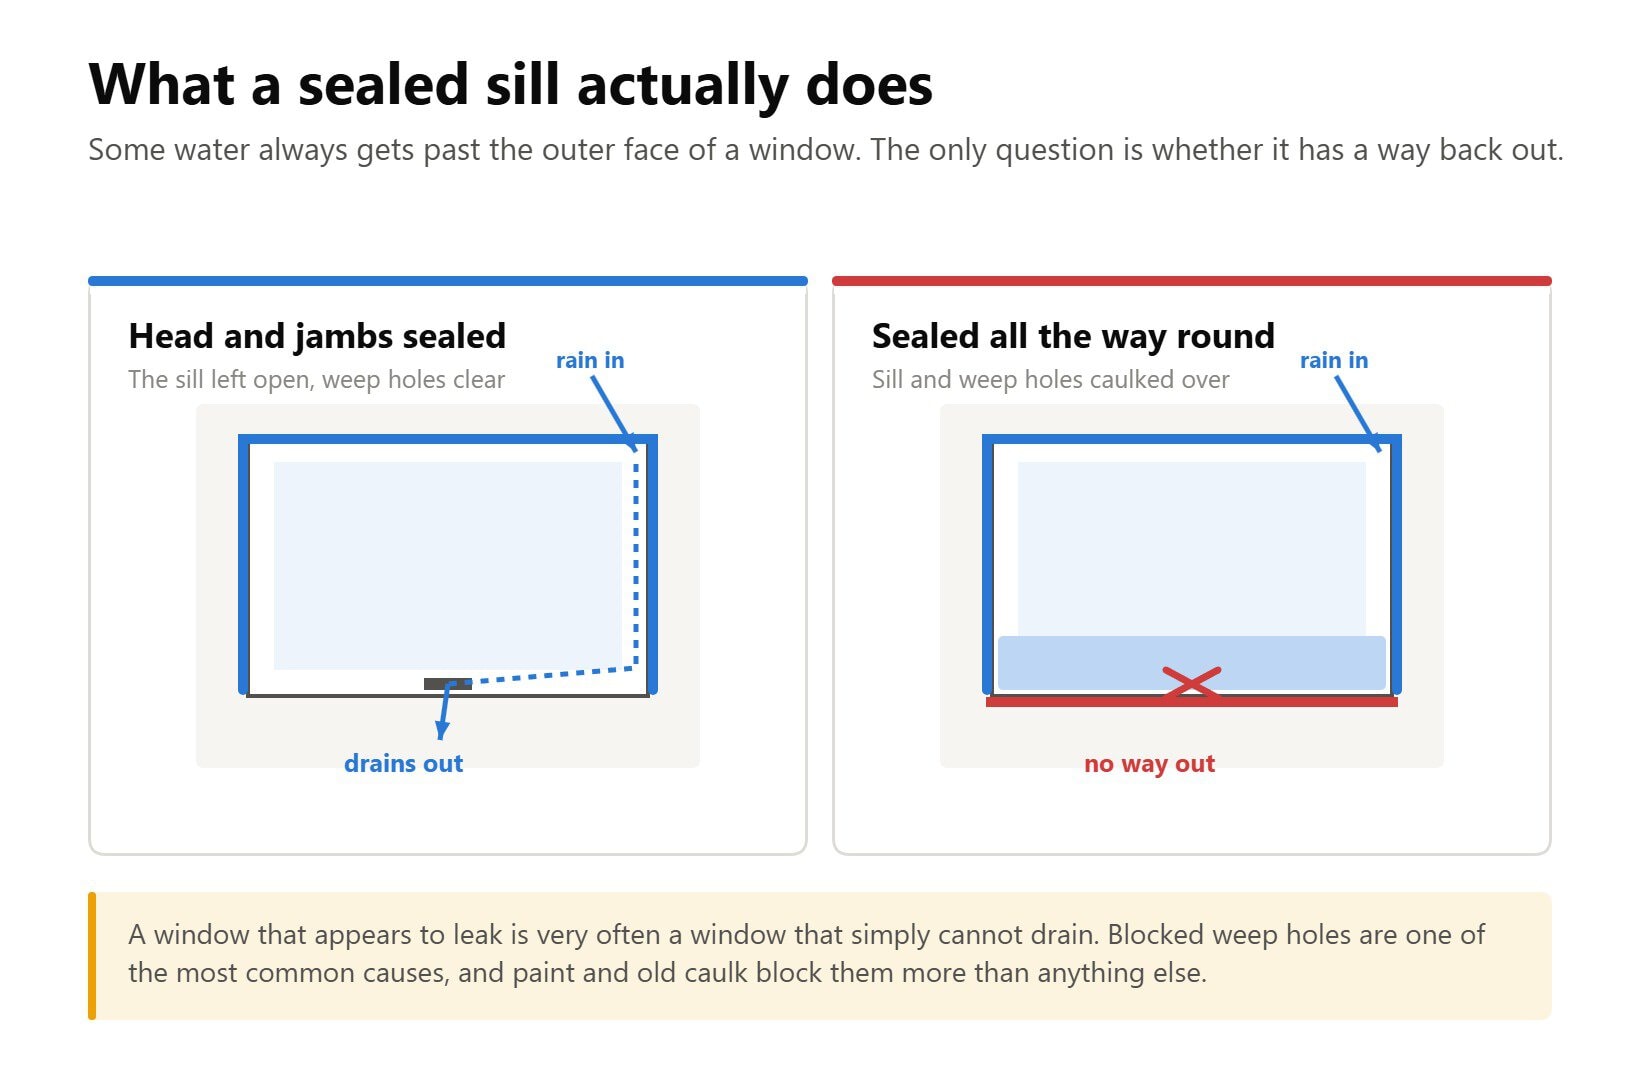
How to tell whether your window drains
Two minutes with a flashlight settles it, and it decides whether the sill joint gets sealed.
Crouch down and look along the bottom edge of the outside face of the frame. Weep holes are slots roughly 3/16 to 3/4 in long, usually two or three of them, sometimes behind a small hinged flap that swings open one way. On a vinyl or aluminum window they are almost always there. On a clad wood window they usually are. On a solid painted wood window from before the 1980s, often not.
If you find them, the window drains and the sill joint stays open. If you genuinely cannot find any, and the frame sits on a solid bedded sill with no pan under it, there may be nothing to drain and sealing the bottom is defensible. When in doubt leave it open: an unsealed sill joint is a much smaller problem than a sealed one.
Poke a blocked weep hole clear with a cocktail stick or a strip of stiff card rather than anything metal, and never with a drill.
Which sealant for outside
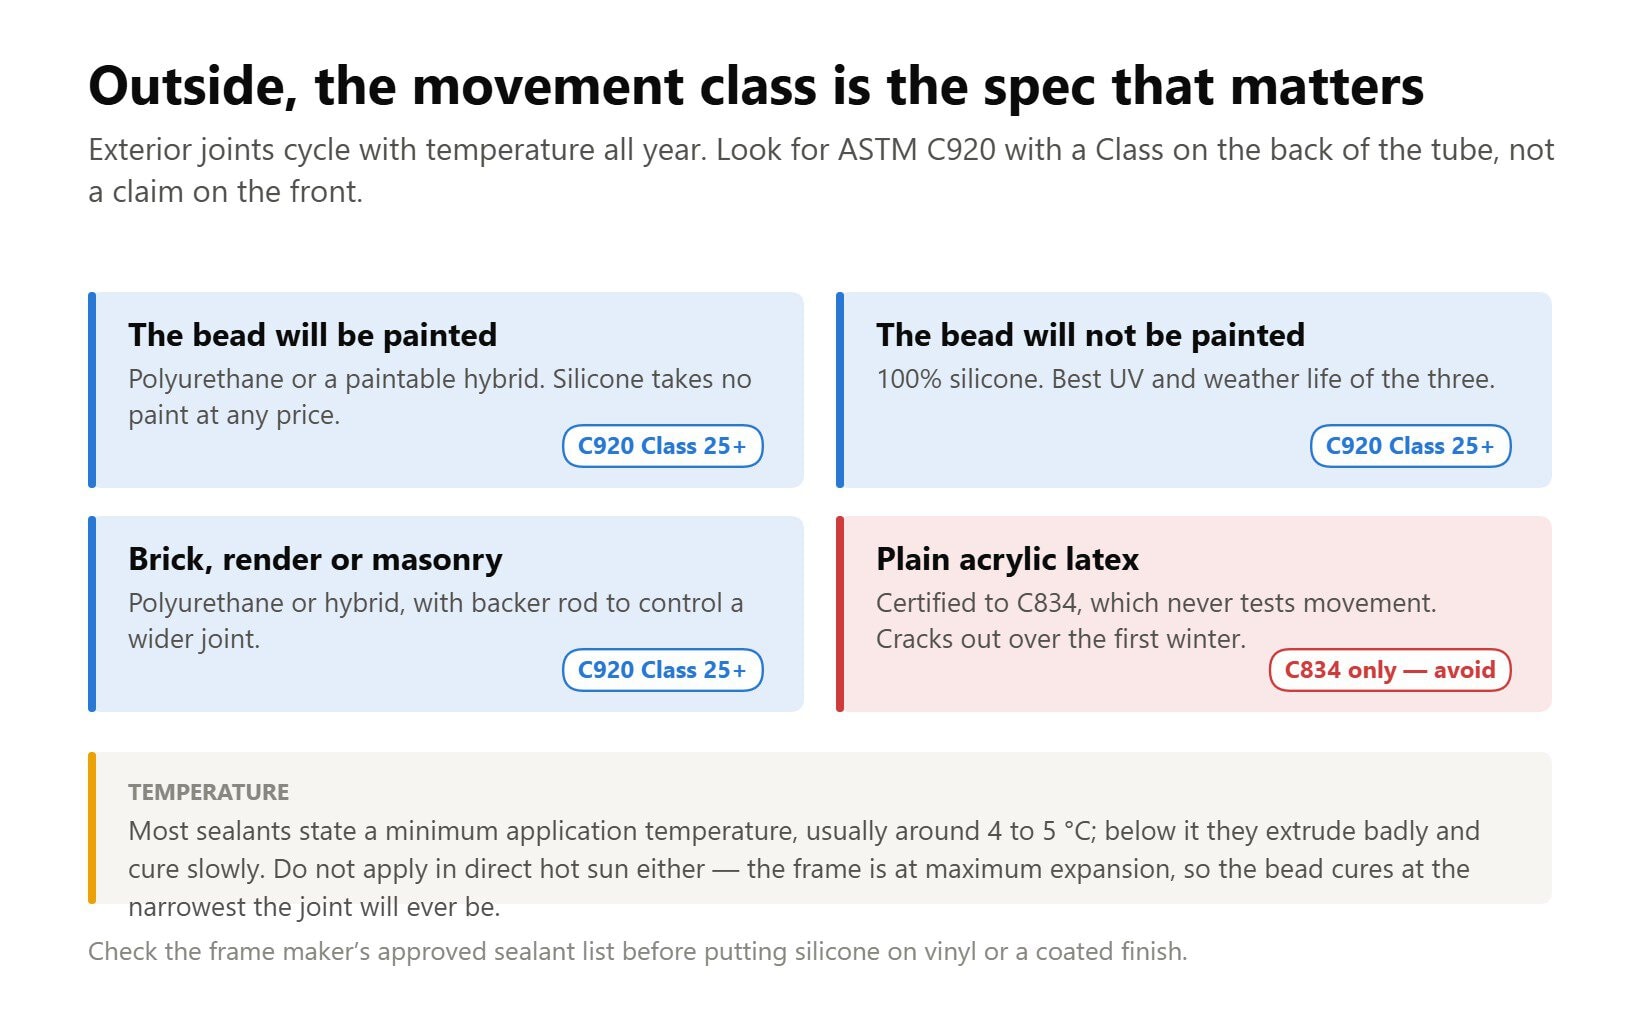
Exterior joints move all year as the wall heats and cools, so the number that matters is the movement class, not the word on the front of the tube.
Look for ASTM C920 with a Class of 25 or better. That is the specification for elastomeric joint sealants and the Class is the movement it survived, plus or minus 25% or plus or minus 50% of the joint width. Plain acrylic latex is usually certified to ASTM C834 instead, which does not test movement at all. Our comparison of latex caulk against silicone goes through what each standard covers.
| Situation | Use | Why |
|---|---|---|
| Bead will be painted | Polyurethane or a paintable hybrid with a C920 class | Silicone will not take paint at any price |
| Bead will not be painted | 100% silicone, C920 Class 25+ | Best UV and weather life |
| Brick, stucco, masonry | Polyurethane or hybrid | Bonds to porous surfaces and takes a wider joint |
| Vinyl or clad frames | Check the frame maker’s list first | Some sealants are not approved on vinyl |
| Anywhere below about 41 °F | Wait, or use a product rated for it | Most sealants state a minimum application temperature |
Whatever you pick, exterior sealants are thicker than indoor decorator’s caulk, so the gun matters more than people expect — see how to use a caulk gun for the thrust ratio that suits each material, and our caulking gun round-up if yours is fighting you.
Get the old bead out first
New sealant over old sealant is the most common reason a re-caulk fails within a year. Nothing bonds to cured silicone, including fresh silicone, so a smear left in the joint is enough to stop the new bead sticking.
- Cut both edges of the old bead with a sharp blade, then pull the strip out in one piece if you can.
- Scrape the residue. A plastic scraper on vinyl and clad frames, a blade on masonry and wood. Take it back to bare material.
- Clean and dry. Dust and chalky stucco stop adhesion as effectively as old silicone. A stiff brush, then let it dry properly — a damp joint seals fine and lifts in weeks.
- Check the weep holes are clear while you are there. Old paint and old caulk block them more often than anything else.
Stubborn silicone residue softens with a chemical remover; we have compared the caulk removers worth using.
Running the bead
Cut the nozzle small and open it up only if the bead is too thin. The cut sets the bead width and it only goes one way.
Work down one jamb, across the head, down the other jamb. Push the gun rather than pull it, so sealant is driven into the joint instead of laid across the top of it. Match travel speed to trigger pressure and the bead stays one thickness.
Tool it within about half an hour, before a skin forms — the same smoothing technique applies outside, and a profiled finishing tool beats a finger on a long exterior run. On a wide or deep joint, push backer rod in first: it sets the depth, stops the sealant bonding to the back of the gap, and halves the cure time. The joint shape rules apply outside exactly as they do inside, and matter more, because an exterior joint moves more.
Then leave it alone. Cure depends on depth rather than on the clock, and a rain shower on an uncured bead can wash material out of the joint — how long caulk takes to dry has the arithmetic.
When to do it
A dry, mild, still day with no rain forecast for 24 hours. Late spring or early fall in most of the UK.
Two things to avoid. Cold, because most sealants state a minimum application temperature and viscosity climbs sharply as it drops, so the tube gets hard to squeeze and the cure slows to a crawl. And direct hot sun on the joint, because the frame is at its maximum expansion, so the bead cures at the narrowest the joint will ever be and then gets stretched every cold night afterwards.
Caulking in October because you want the house sealed for winter is sensible. Caulking in January is usually a job done twice.
Frequently asked questions
Should exterior windows be caulked?
The sides and the head, yes. That joint is where drafts and wind-driven rain get in and sealing it is worthwhile. The sill is different: leave it open unless the window genuinely has no drainage path. A fully sealed perimeter traps any water that gets past the outer face, and every window is designed on the assumption that some will.
What happens if you caulk the weep holes?
Water collects in the bottom of the frame with no way out. It shows up as pooling in the sill track, condensation between panes, swollen wood below the window, or a damp patch on the interior wall. Andersen’s instructions warn that covering weep holes “could result in product damage”, and blocked weep holes are one of the most common causes of a window that appears to leak but is actually just full.
What should you caulk exterior windows with?
A sealant carrying an ASTM C920 movement class of 25 or better. 100% silicone if the bead will not be painted, polyurethane or a paintable hybrid if it will. Plain acrylic latex is the usual false economy outdoors: it goes on easily and cracks out over the first winter, because it is certified to ASTM C834, which does not test joint movement.
Is silicone or caulk better for sealing exterior windows?
Silicone lasts longer outside and handles movement and UV better, so it wins anywhere the bead is not being painted. The moment paint is involved silicone is out entirely, and the answer becomes a polyurethane or hybrid with the same movement class. Check the frame manufacturer’s approved list before putting silicone on vinyl.
Do you caulk around window trim outside?
Where the trim meets the wall, and where the trim meets the frame, up the sides and across the top. Not along the bottom edge of the trim, and not where a drip cap meets the siding above it. The rule is the same as for the frame: seal what keeps weather out, leave open what lets water escape.
How do you caulk windows outside on brick?
The joint is usually wider and the surface is porous, so use backer rod to control depth and a polyurethane or hybrid rather than silicone, which bonds poorly to some masonry. Brush the joint out first: brick dust and loose mortar are the usual reason a bead on masonry lets go. If the gap is wider than about 1/2 in it wants filling properly rather than caulking.
How do you caulk windows with vinyl siding?
Carefully, and less than you think. Vinyl siding is hung loose so it can expand and contract, and caulking it to the window trim removes that movement and buckles the panels. Seal the joint between the window frame and its own trim or J-channel, not the joint between the siding and the J-channel. The J-channel is designed to shed water into the drainage plane behind it.
Should you caulk or paint first outside?
Caulk first, then paint over it, so the paint film bridges the joint and seals the edges of the bead. That only works with a paintable sealant, so it has to be chosen before you start. If the bead is silicone, paint first and caulk last, and accept that the bead stays its own color permanently.
Can you caulk windows in cold weather?
Check the tube for a minimum application temperature; most sit around 39 to 41 °F and some are rated lower. Below that the sealant is stiff to extrude, wets the surface poorly and cures slowly, and a joint that is damp or frosted will not bond at all. Cold-weather grades exist and are worth buying if the job cannot wait.
How often should exterior window caulk be replaced?
Inspect annually and replace on condition rather than on a schedule. A good silicone or polyurethane bead in a correctly shaped joint should give ten to twenty years outside; acrylic on an exposed elevation may not see three. Replace it when it has cracked, gone chalky, lifted at one edge or split down the middle, because any of those is a route for water.
What to remember
Sides and head, not the sill. Never the weep holes. Never the slot under the head flashing.
After that it is joint shape and the right material: a C920 class for anything exposed, the old bead fully removed, and a dry mild day to do it on. If you want to check your own window against the source, Andersen publish their installation instructions with the weep hole and sill warnings in them.
