Last Updated on October 6, 2026
To clean a paint roller: scrape the excess back into the tray with a 5-in-1 tool, roll out what is left onto scrap paper, then work the cover in a bucket of hot water with a few drops of dish detergent until the water runs clear. Wash the frame in the same bucket with a wire brush. Shake the water out and dry it standing upright. For oil-based paint, swap the water for mineral spirits in a glass or metal container.
Knowing how to clean paint rollers is only half of it. The part almost none of the guides mention is where the dirty water is then allowed to go, and that depends on what your house is plumbed into.
Where the dirty water is allowed to go
“Rinse it in the sink” is the standard advice, and it is right in exactly one of the four cases below. The drains are not interchangeable.
| Where it goes | Water-based paint | Solvent from oil-based |
|---|---|---|
| Indoor sink on mains sewer | Acceptable — minimal impact on the sanitary sewer, but wastes a lot of water | Never |
| Indoor sink on a septic tank | No — septic tanks are built for human waste and paper, not paint | Never |
| Storm drain | Never | Never |
| Garden hose, outside, on the ground | Never — it reaches a storm drain or soaks into groundwater | Never |

If you are on a septic tank, the usual advice is wrong for you. Septic systems are designed to handle human waste and toilet paper, and putting anything else down them can alter the balance of bacteria in the tank and lead to septic failure. A rinsed roller is not a one-off exception if you repaint regularly.
Solvent never goes down any drain, indoors or out, and is never poured on the ground. Used mineral spirits and the paint sludge that settles out of it are household hazardous waste, which also means they do not go in the household bin.
The three-bucket method
Running a faucet until a roller rinses clear uses more water than the job needs and sends the paint straight down the drain. The three-bucket alternative uses less and has the useful side effect of separating the paint out so the leftover water is genuinely safe for the sanitary sewer.
- Fill three 5-gallon buckets about two-thirds full, leaving room for splashing.
- Bucket one: submerge the cover and scrub to release the paint held in the fibers.
- Bucket two: once most of the paint is out, repeat the same technique. This takes out the majority of what is left.
- Bucket three: a final rinse, then wring the cover out.
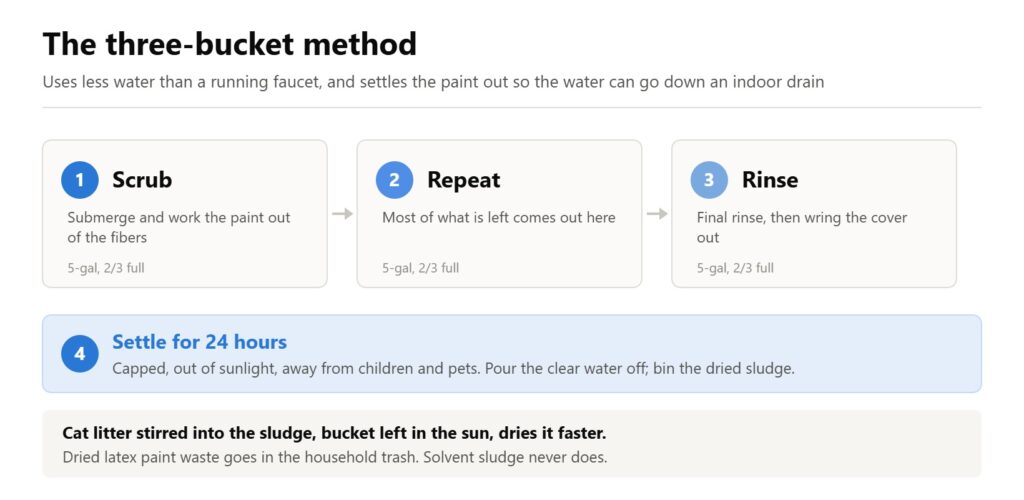
Then leave the buckets somewhere out of direct sunlight, capped, undisturbed for about 24 hours, and out of reach of children and animals. The paint settles to the bottom. Pour the clear water off into a bathroom drain, or keep it for the next project. Once the sludge at the bottom has dried completely it goes in the household trash; stirring in cat litter and leaving the bucket in the sun speeds that up.
Water-based paint: the details that are usually wrong
Most guides say warm water and plenty of soap. The instructions on the can say neither.
- Hot, not warm. Their instruction is that the hotter the water the better — with the caveat that rubber gloves protect your hands from paint, not from heat.
- Less soap, not more. “Avoid using too much soap” is in their steps. Excess detergent is harder to rinse out of the fibers than the paint was.
- Wash the frame as well as the cover. Put both in the bucket, work the paint off the cage and handle, and use a wire brush on anything lodged in the frame.
- Stand it on its end to dry. Not flat. Flat flattens the nap on one side, and that shows up as an uneven finish next time. Another major brand allows laying tools flat on a towel instead, so this is one of the few points the two manufacturers do not agree on; standing it on its end costs nothing, so stand it up. A brush-and-roller spinner is the fast version of the same step, and it is listed as an optional supply for exactly this.
- Waterborne alkyds wash out with soap and water despite behaving like oil paint on the wall. Check the can before reaching for solvent.
The closing step is to read the can, because the correct cleanup method is printed on the specific product. It is the same document that carries the dry and recoat times, and it overrides any general rule.
Oil-based paint, and why the manufacturer says not to bother
Work in a ventilated space, wear gloves, and pour a small amount of thinner into a glass or metal container — enough to cover the painted part. Swirl the cover in it, pressing against the sides to work the solvent through, and after a few minutes the paint releases. Press out the solvent, wipe down with a disposable rag, dry with a second rag.
The used solvent is then sealed and left overnight; the paint settles and clean solvent floats on top, which you pour carefully into a fresh labeled glass or metal container for reuse. The sludge left behind is household hazardous waste and has to go to a collection point — not the trash, not the drain.
The maker’s own instructions concede that some people find that cleaning a roller after oil-based paint is not worth the cost of the mineral spirits and the effort of disposing of them properly.
Dried paint turns a chore into a hazardous-waste problem
Water-based paint washes out with soap and water only while it is still wet. Once it dries in the fibers, a solvent is then needed to clean the equipment. Vinegar is a brush remedy, not a roller one. The vinegar method is written for bristles — soak them in distilled vinegar for one to two hours, and boil the vinegar if they are still stiff — and their roller instructions do not include it, so treat a vinegar soak as a brush rescue and judge a cover on whether the nap still releases paint. So letting a latex roller dry does not just make the job harder — it moves it into the oil-based category, with the solvent cost and the hazardous-waste disposal that come with it.
So the answer to cleaning a roller with dried paint on it is usually that you should not. The instruction is that a cover that has dried hard with acrylic, latex or waterborne paint on it can go straight in the regular household trash. Buying a new cover costs less than the solvent would, and generates nothing you have to drive to a collection point.
The frame is different. Clean it properly every time and it lasts indefinitely; let paint harden in the cage and you lose it.
Between coats: don’t clean it at all
If the same color is going back on within a few days, washing the roller is wasted effort. Wrap the cover tightly in plastic wrap or a bag and put it in the refrigerator.
Let the cover come back to room temperature before you use it. Paint straight out of the fridge is thicker than the paint in the tray, and it lays down differently for the first few minutes.
For longer storage, clean it, dry it completely, then bag it. Storing a roller wet ruins it. If you are working out how long the gap between coats actually needs to be, that is set by the paint rather than by convenience — see dry and cure times by paint type and how those waits shape a room repaint.
Clean it or throw it away?
The Bureau of Labor Statistics puts the median wage for painters at $23.75 an hour as of May 2025. Fifteen minutes of careful cleaning is therefore $5.94 of time at what a professional’s hour is worth. Set that against the price on the roller cover you are scrubbing.
- Cheap cover, water-based paint, already dry: throw it away. A dried latex cover goes in the household trash.
- Good cover, water-based paint, still wet: clean it. Properly cleaned and stored, a cover is good for several more uses.
- Any cover, oil-based paint: the solvent and the trip to a hazardous-waste point usually cost more than the cover did.
- The frame, always: clean it. It is the expensive part and it lasts indefinitely.
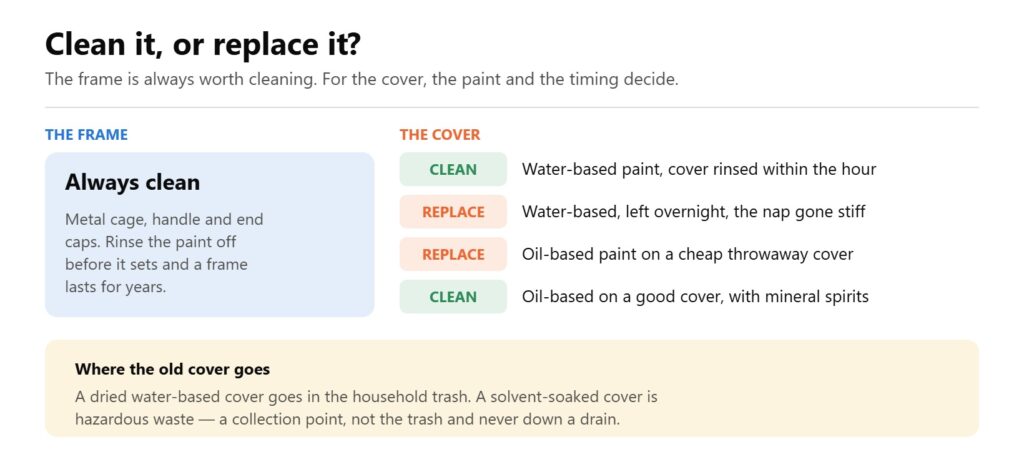
There are published numbers on the cover’s life: three to six months, or up to five projects, for a high-quality one, and replacement is due once the fibers start to shed. Retire a cover when it is visibly worn, shedding fibers, or carrying dried paint debris — a shedding roller leaves its own nap in your finish, which costs more to fix than the cover saved. Choosing the right nap in the first place is covered in picking a paint roller, and the technique side in how to use a paint roller.
Brushes follow different rules from rollers, and those are in how to clean paint brushes.
The full water-resources guidance this article draws on is published here: cleaning painting equipment after household use.
Frequently asked questions
What is the best way to clean paint rollers?
Scrape the excess back into the tray, wash the cover in hot water with a little detergent until the water runs clear, and stand it on its end to dry. Fastest is a 5-in-1 tool and a running faucet. Lowest water use and cleanest disposal is the three-bucket approach, which also settles the paint out so the water can go down an indoor drain. For the cover’s lifespan, though, the method matters far less than the timing — whichever you pick, do it before the paint starts to set.
Can you wash a paint roller and reuse it?
Yes, several times over, provided you clean it before the paint dries and dry it standing on end. No maker puts a fixed number on the cover but says a properly cleaned and stored one is good for several uses, and that the frame lasts indefinitely as long as paint is never left to harden in the cage. Retire the cover once it sheds fibers or carries dried debris.
Is it okay to wash paint rollers in the sink?
For water-based paint on a mains sewer, yes — The published guidance rates the impact on the sanitary sewer as minimal, though it notes the water use. On a septic tank, no: paint can upset the bacterial balance and lead to septic failure. Solvent from oil-based paint never goes down a sink, and nothing goes down a storm drain or onto the ground outside.
Does Dawn dish soap clean paint brushes?
On wet water-based paint, yes — The instructions call for a few drops of dish detergent in hot water, and any brand does the job. Dish soap will not touch oil-based paint, and it will not rescue a brush or roller where the paint has already set. Both of those need solvent, whatever the label on the bottle claims.
What do professional painters use to clean their brushes?
Hot water and a little detergent for anything water-based, mineral spirits for oil-based, and a 5-in-1 tool to strip the excess off first so less of it ever reaches the water. The habit that separates them from most DIY painters is timing rather than equipment: tools get cleaned immediately, while the paint is wet, because everything after that point is harder and more expensive.
