Last Updated on October 6, 2026
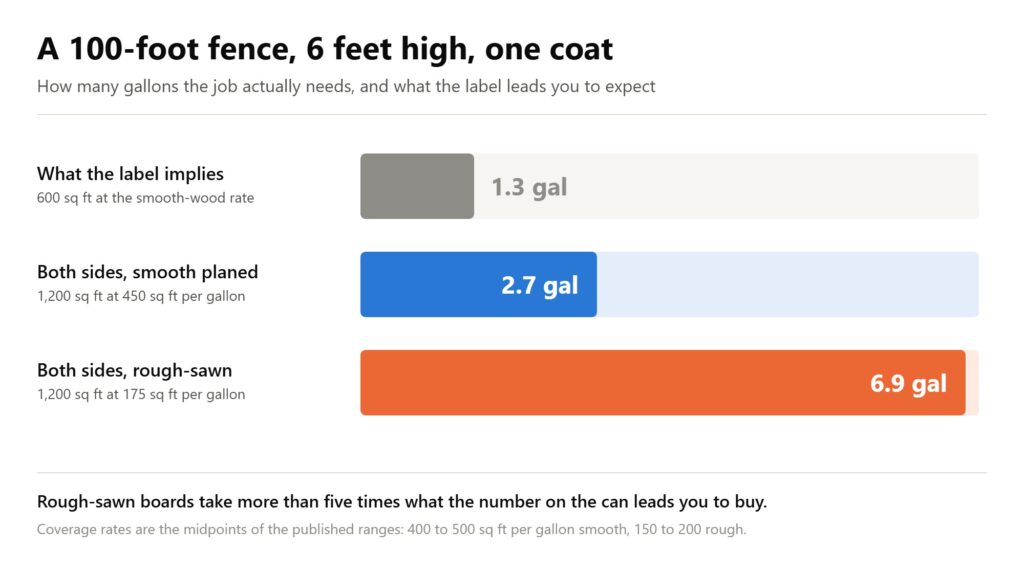
The back of a stain can usually promises 400 to 500 square feet per gallon. A 100-foot fence six feet tall measures 600 square feet, so one gallon looks close and two looks generous. Both numbers are wrong, and that is why so many fence projects stall around the third hour with half a fence stained and an empty can.
The 400 to 500 figure is for smooth planed lumber. Rough-sawn cedar and pine fence boards soak up stain at 150 to 200 square feet per gallon instead, and a fence has two sides. That same 100-foot run is 1,200 square feet of wood at roughly 175 square feet per gallon, which works out near seven gallons for one coat. The gap between what the can implies and what the fence takes is about a factor of five.
Most of what you need to know about how to stain a fence is forgiving, with one exception that costs people their finish every year: a second coat applied more than 60 minutes after the first does more damage than leaving the fence at one coat.
How much stain a fence actually takes
Measure the fence as a solid rectangle: total run multiplied by height, then doubled for the second side. On a picket fence the gaps remove some face area, but you still stain the sides of every picket plus the rails and posts behind them, and in practice those cancel out. Treating the fence as solid gets you close enough to buy with confidence.
Then divide by the right coverage rate, which depends entirely on how the boards were milled. Rough-sawn boards have an open, fibrous face that drinks stain. Smooth planed boards have a closed surface that takes a fraction as much.
| Fence | Both sides | Rough-sawn, one coat | Smooth planed, one coat |
|---|---|---|---|
| 50 ft long, 4 ft high | 400 sq ft | 2.3 gallons | 0.9 gallons |
| 50 ft long, 6 ft high | 600 sq ft | 3.4 gallons | 1.3 gallons |
| 100 ft long, 4 ft high | 800 sq ft | 4.6 gallons | 1.8 gallons |
| 100 ft long, 6 ft high | 1,200 sq ft | 6.9 gallons | 2.7 gallons |
| 150 ft long, 6 ft high | 1,800 sq ft | 10.3 gallons | 4.0 gallons |
| 200 ft long, 6 ft high | 2,400 sq ft | 13.7 gallons | 5.3 gallons |
Solid-color stain behaves differently again, covering around 250 square feet per gallon on rough-sawn wood and 400 on smooth, because it sits on the surface rather than soaking in. If you are switching from semi-transparent to solid, recalculate rather than reusing last time’s quantity.
Buy the whole amount in one purchase and from one batch. Stain color varies between production runs, and a fence stained from two batches will often show the join. Most paint counters will take back unopened gallons, so overbuying by one is cheaper than running out mid-panel and leaving a lap mark that never fully disappears.

Brush, roller or sprayer
The three applicators are not interchangeable, and the difference is not speed. Brushing works the stain into the grain, which is what a penetrating stain needs to do its job. Rolling and spraying lay stain onto the surface and leave it there. That is why both are followed by a brush: a roller or a sprayer puts the material on fast, and a brush drives it in before it skins over.
| Brush | Roller | Pump sprayer | |
|---|---|---|---|
| Penetration | Best | Moderate, needs back-brushing | Poor on its own, needs back-brushing |
| Speed on 100 ft of fence | Slowest | Moderate | Fastest |
| Picket gaps and board edges | Reaches everything | Misses edges and gaps | Reaches gaps, overshoots past them |
| Stain wasted | Almost none | Some, absorbed into the cover | Most, from overspray and drift |
| Lap marks | Easiest to avoid | Manageable | Hardest to control |
| Masking needed | None | None | Beds, paths, siding, cars |
For most fences the fast combination is a sprayer or roller to load two or three boards at a time, immediately followed by a medium-nap roller cover or a 4-inch brush worked along the grain. One person spraying and one person back-brushing will finish a long fence in a fraction of the time either would alone, and the finish is indistinguishable from brushing throughout.
Whichever you use, run each stroke the full length of the board without stopping in the middle. A stroke that stops halfway along a board and restarts leaves a visible band once the stain dries. Work two or three boards at a time from the top down, and keep the leading edge wet.
If you are spraying, a sprayer sized for fence work matters more than tip pressure. Thin stain atomizes easily and a high-pressure setting mostly produces drift onto whatever is downwind, so mask beds, paths and siding with drop cloths before you start.
Oil or water-based
An oil-based semi-transparent stain penetrates into the wood and leaves no coating behind. A water-based semi-transparent stain produces its color through a thin film sitting on the surface. On a fence in full weather, that film is the part that fails first, which is why water-based semi-transparent stains perform best on wood that is relatively sheltered and oil-based stains are the sensible choice for a fence standing in open sun and rain.
The durability difference is not small. An oil-based semi-transparent stain on rough-sawn wood, refinished when it starts to fade, can keep a fence protected for 8 to 10 years. On smooth planed wood a single coat is good for 2 to 3 years before it needs renewing.
What has to happen before the can opens
Three checks decide whether the stain will take at all, and all three are quicker than the staining itself.
Has the fence ever been painted or solid-stained? A semi-transparent stain cannot go over a film-forming finish. It needs bare wood to soak into, so if there is paint or solid-color stain on the boards it has to come off completely first, not just where it is peeling. A fence in that condition is usually a candidate for another solid-color stain rather than a penetrating one.
Is there mildew on the boards? Gray or black patches on the shaded side are mildew, not dirt, and stain applied over them will not stop them spreading underneath. The standard removal solution is one-third cup of household detergent, one quart of 5% sodium hypochlorite bleach and three quarts of warm water. Never use a detergent containing ammonia with it, because ammonia and chlorine bleach react to produce a poisonous gas.
Is the wood dry? After washing, give the fence 24 to 48 hours to dry before any stain goes on. Wood that still holds water from a pressure wash will not absorb stain, and the stain that does go on will sit on the surface and stay tacky. If you are pressure washing, keep it under 1,800 PSI and keep the tip moving; a fan tip held in one place will raise the grain and leave scour marks that show through the stain for years.
New fences are a separate case. Dense smooth lumber such as Douglas fir resists penetration when it is fresh, and the recommended sequence is a water-repellent preservative first, then about 12 months of weathering to open the surface up, then stain. If you stain a brand-new smooth fence immediately, expect the finish to sit shallow and need redoing sooner.
Conditions on the day
Oil-based stain can be applied down to around 40°F, and some products a little below that. The bigger constraint is sun rather than temperature. Stain applied to a board in direct sunlight starts drying on the surface before it has penetrated, which produces exactly the uneven, patchy result everyone is trying to avoid.
Work each side of the fence while it is in shade. On a fence running north to south that means the east face in the afternoon and the west face in the morning. An overcast day solves the problem entirely and is worth waiting for. Do not stain a fence the day before rain is forecast either, since the stain needs the surface to stay dry while it soaks in.
The one-hour window that decides the second coat
Two coats beat one only inside a 60-minute window. Outside that window the second coat leaves the fence looking worse than a single coat would have.
The second coat has to go on no more than 60 minutes after the first, while the first is still wet enough to carry it into the wood. Applied wet-on-wet like that, both coats penetrate and the fence ends up with substantially more protection. Applied the next day, the second coat has nowhere to go: the first has already sealed the surface, so the new stain sits on top as a film, dries glossy in patches and starts peeling within a season.
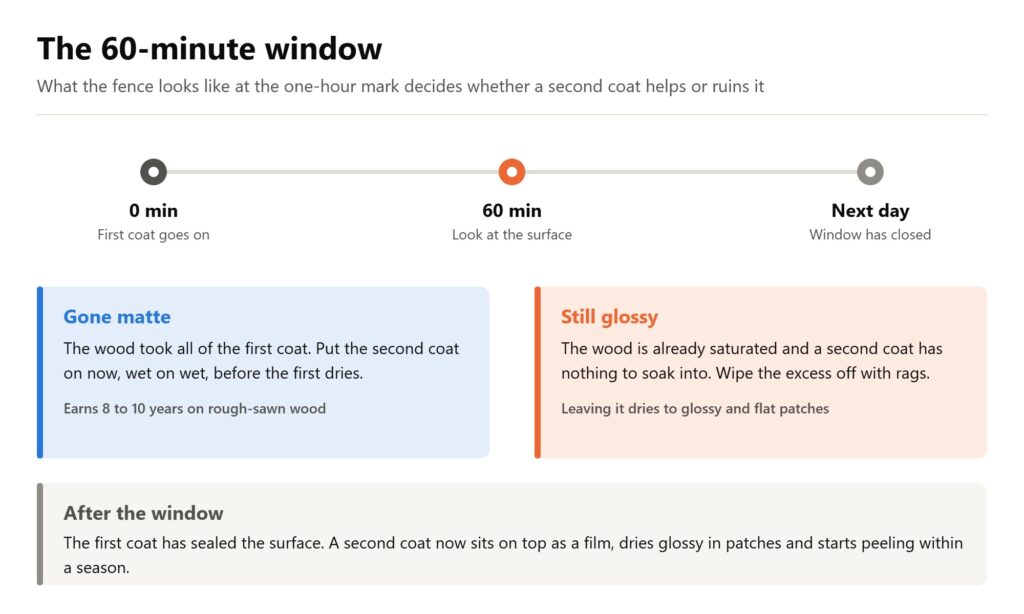
The test is the surface itself, 60 minutes after the first coat went on. If the surface has gone matte, the wood absorbed everything and a second coat will absorb too. If it is still glossy, the wood is already saturated, and a second coat has nothing left to soak into. In that case skip it, and wipe the remaining excess off with rags before it dries into glossy and flat patches.
This is also why a brand-new smooth-planed fence should usually get one coat and not two. A second coat on a smooth surface rarely penetrates evenly, and the result is a mottled finish with shiny areas where it pooled and dull areas where it took. Rough-sawn wood is the opposite case and is where the wet-on-wet method pays off.
The rags are the most dangerous part of the whole job. Oil-based stain contains drying oils that generate heat as they cure, and a pile of soiled rags left in a bucket or a garage corner can reach ignition temperature on its own, sometimes within hours. Spread them flat outdoors until they are completely stiff and dry, or submerge them in water in a sealed metal container.
Where staining a fence usually goes wrong
- Buying for one side. The single most common miss, and it runs short by half before any milling or absorption is accounted for.
- Using the smooth-wood coverage figure on rough-sawn boards. A three-to-one error in the same direction, which compounds with the first.
- Staining in sun. The surface skins before the stain penetrates, and the patchiness is permanent short of stripping.
- Stopping a stroke in the middle of a board. Every restart leaves a line. Run the full length of the board each time.
- Adding a second coat the next day. Outside the one-hour window it becomes a film on the surface instead of a treatment in the wood.
- Staining within a day of a pressure wash. Wet wood will not absorb, and the stain stays tacky.
- Mixing two batches mid-fence. Buy the full quantity at once and stir each gallon before and during use.
- Leaving oily rags in a pile. They can ignite without any external heat source.
Frequently Asked Questions
How much fence does 1 gallon of stain cover?
A gallon of semi-transparent stain treats roughly 15 linear feet of a six-foot rough-sawn fence stained on both sides, or about 37 linear feet if the boards are smooth planed. That is one coat. The figure printed on the can refers to a single face of smooth lumber, which is why it reads so much higher.
Should you stain a fence with a roller or brush?
Both, in sequence. A roller moves stain onto the boards several times faster than a brush can, and a brush immediately afterwards drives it into the grain and reaches the picket edges and gaps a roller skips over. Rolling alone leaves stain sitting on the surface where it protects very little. Brushing alone is slow but will do a complete job unassisted if you have the time.
What are common staining mistakes?
Ranked by what they cost to put right, the expensive ones are irreversible without stripping: a recoat applied a day late, which has to be sanded off, and anything applied in direct sun or onto damp boards, which leaves a permanent blotch. The cheap ones are the quantity errors, where the penalty is a second trip to the store and a visible join where you restarted.
One practical closing note: when you are finished, clean the brushes properly rather than soaking them overnight, and keep any unopened gallons for the touch-up you will want in 2 to 3 years. Every coverage figure and timing rule above is drawn from a free federal technical report on exterior wood stains, if you want to check the numbers yourself.
