Last Updated on October 7, 2026
Ask what the best drywall primer is and you get one answer: PVA, about $16 a gallon, because it seals porous paper and joint compound. Then look at who is actually on page 1 of that search. It is professional painters in forums, and they disagree. In their view PVA is the bottom-line option, and new drywall wants a primer-sealer rather than a plain primer. The KILZ PVA the search engines point at is the cheapest thing on the shelf at about $16.
Both sides are describing different jobs. The short answer: PVA leaves 1.1 mils of dry film and seals porosity, which is all most walls need. Leveling the texture difference between joint compound and paper face is a separate job that takes 9 to 12 mils, and no PVA can get there. Which one you need is set by the finish level your drywall was taped to, and by the light hitting it.
Below are 8 primers sorted by the job each one does: sealing, bonding, blocking, or surfacing. One of them is not a drywall primer and is on the list by mistake.
PVA seals porosity and does nothing else
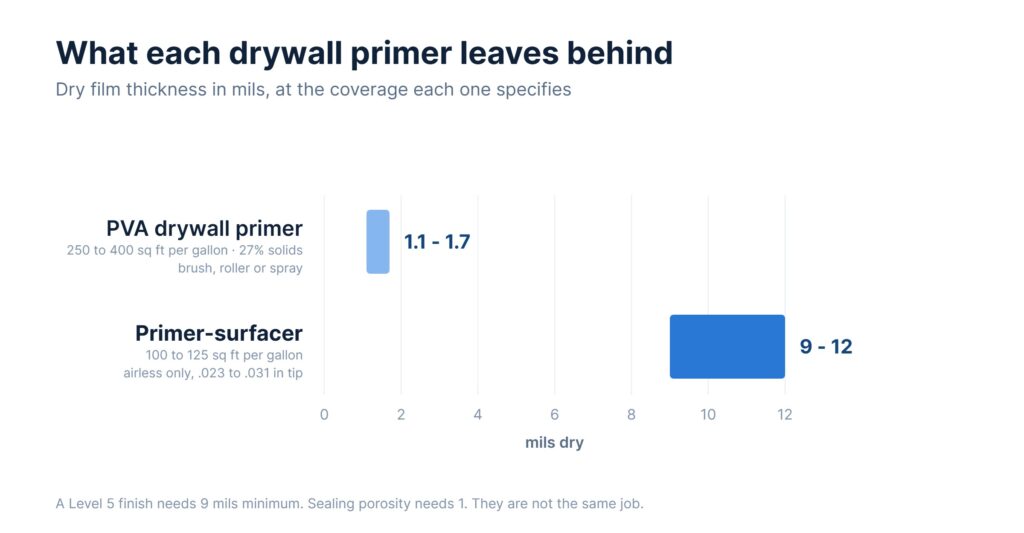
A PVA drywall primer is a polyvinyl acetate resin at 27 percent solids by volume. At 400 square feet per gallon the published film is 4.0 mils wet and 1.1 mils dry; laid on heavier at 250 square feet it reaches 6.4 wet and 1.7 dry. That is the whole range the product has.
You can check the arithmetic on any can. A gallon spread over 1,604 square feet lands one mil thick, so 1,604 divided by the coverage figure gives the wet film. At 400 that is 4.01 mils and the label says 4.0. Multiply by the solids and you have the dry film. Nothing on a drywall primer label is mysterious once you do that division.
1.1 mils is enough to stop raw paper and dried compound drinking your topcoat at different rates, which is what causes flashing. It is not enough to fill, bridge or flatten anything. A primer that thin follows the surface it is painted on exactly, which the Level 5 build figures put in context.
The finish level decides, and no one mentions it
Drywall is taped to a numbered standard, Levels 1 through 5, published as GA-214 and mirrored in ASTM C840. Level 1 is fire taping. Level 2 embeds the tape. Level 3 is a fill coat. Level 4 is the finish coat, and it is what almost every house gets. Level 5 adds a skim coat over the entire surface.
| Finish level | What it is | What the primer has to do |
|---|---|---|
| Level 4 | Finish coat over tape and fasteners | Seal porosity. PVA at 1.1 mils is enough |
| Level 5 | Skim coat over the whole wall | Already level. Prime to seal |
| Level 4 under critical light | Finish coat, raking light across it | Level the surface. Needs 9 mils or more |
That third row is the one that catches people. A Level 4 wall under flat light looks fine with PVA over it. The same wall with a window raking across it, or downlights grazing it, shows every taped joint as a shadow, because compound and paper reflect differently and the joints sit slightly proud. Primer cannot be blamed for that, and PVA cannot fix it either.
What getting to Level 5 actually takes
There are two routes. Skim-coat the whole wall in joint compound, sand it, then prime it. Or spray one coat of a primer-surfacer such as USG Sheetrock Tuff-Hide, a vinyl acrylic latex built thick enough to do both steps at once. The second route has published numbers, and they are nothing like a PVA.
| Spec | Primer-surfacer | PVA primer |
|---|---|---|
| Coverage | 100 to 125 sq ft per gallon | 250 to 400 sq ft per gallon |
| Wet film | 15 to 20 mils | 4.0 to 6.4 mils |
| Dry film | 9 to 12 mils | 1.1 to 1.7 mils |
| Application | Airless spray only for Level 5 | Brush, roller or spray |
| Tip orifice | .023 to .031 inch | Standard .015 to .019 inch |
| Pump pressure | 2,700 to 3,000 psi | Any wall rig |
| Thinning | Not permitted | Permitted |
| Minimum temperature | 55°F | 50°F |
Those spray numbers are the part people underestimate. A .023 to .031 inch orifice is roughly double the .015 inch tip that wall paint runs through, the pump has to hold 2,700 to 3,000 psi while putting out a gallon a minute, and it wants a 30-mesh filter rather than the finer screen a paint rig uses. Most homeowner sprayers cannot feed it.
Technique is specified too, not left to taste. Hold the gun perpendicular and 18 inches off the wall. Spray left to right at about half the final thickness, then crosshatch up and down to build the rest. Overlap each pass by half the fan width. Keep everything above 55°F until it dries, which takes 60 to 90 minutes to touch. Do not thin it, because thinning reduces performance and you lose the build you are paying for.
One constraint matters before you order any of it: a Level 5 finish can only be achieved over wallboard already finished to Level 4. A primer-surfacer is not a repair for bad taping. Spray 10 mils over a Level 3 wall and you get a thick wall that still shows the joints.
Rolled instead of sprayed, the same product goes on at 5 to 10 mils wet with a quarter to three eighths inch nap, and at that thickness it is a high-solids primer rather than a Level 5 surfacer. Useful, but it is not the same result.
8 Best Drywall Primer Picks, By The Job They Do
Two picks first. For new board under ordinary light, number 4, because sealing is the job and PVA does it for the least money. For a mixed-surface room where the walls, trim and old patches all need one product, number 6.
1. Rust-Oleum Flat Gray Primer

A gray spray primer, which is a tool for small patches and trim rather than a wall coating. Gray reads the surface better than white does: under a work light, a gray coat shows a proud joint or a sanding scratch that a white coat hides until the topcoat goes on. Use it on repairs you want to inspect before painting, not on 400 square feet of new board.
2. INSL-X Stix Acrylic Waterborne Bonding Primer

A bonding primer, which is the third job on this page and not the same as sealing. Bonding primers are formulated to grip surfaces a sealer slides off: glossy enamel, tile, PVC trim, laminate. On bare drywall you are paying for adhesion you do not need, because paper takes paint readily. Keep it for the slick surfaces in the room rather than the walls.
3. KILZ Adhesion High-Bonding Interior Primer

The same category as above. Reach for it where the next coat has nothing to key into. It is not a drywall sealer and will not give you a flatter wall. Where it earns its place in a drywall job is the trim, the metal corner bead if it has been sanded bright, and anything previously finished in gloss.
4. PVA Interior Drywall Primer, 5 Gallon
This is the class the search engines recommend and the one most new drywall actually gets. Expect 27 percent solids, 250 to 400 square feet per gallon, and 1.1 to 1.7 mils dry. Buy it in 5 gallons because a house takes several, keep the temperature between 50 and 90 degrees, and understand what you are getting: a sealed, uniform substrate for the topcoat. Not a flatter wall.
5. Acrylic Interior Drywall Primer and Sealer
An acrylic rather than a PVA, which is the upgrade the trade argues for. Acrylic resins generally hold up better under a washable topcoat and stick better to the odd patch of something that is not drywall. On a job where the walls are new board but the ceiling has been patched or there is old paint in the mix, one acrylic primer-sealer across everything is simpler than two products.
6. Zinsser Bulls-Eye 1-2-3 Primer
The one the forums keep naming. Zinsser Bulls-Eye rates 4.4 out of 5 across roughly 1,400 ratings at about $17 a gallon. It is a water-based all-surface primer-sealer, so it covers the drywall and the trim and the patched plaster in one bucket. If you want one can for a mixed-surface room and do not need Level 5, this is the sensible default.
7. KILZ Restoration Stain and Odor Blocking Primer
A blocking primer, the fourth job. Its purpose is to stop something underneath coming through: water stains, smoke, nicotine, marker, pet odor. On new drywall there is nothing to block, so it is the wrong choice and an expensive one. On a remodel where a leak dried into the ceiling board, it is the only thing on this list that solves that.
8. Zinsser Gardz Problem Surface Sealer
A thin penetrating sealer, and the specialist pick here. It soaks into chalky, friable or torn surfaces and hardens them, which is exactly the situation after you strip wallpaper and tear the drywall face paper. Gardz rates 4.7 out of 5 and it is what to use when the paper is damaged rather than new. Over a torn face, a normal primer just lifts the fuzz.
Priming new drywall
Prep first, and it is short. Every joint, fastener and accessory treated with a joint compound system, to Level 4 at minimum. Nicks, voids and gouges filled and dried. Dust off the whole wall, because sanding dust is a bond breaker and a pole sander leaves a lot of it. Keep the room above 50°F for a PVA or 55°F for a surfacer, and the surface sound, dry and free of oil, grease and mildew.
Two coats of PVA is usually a waste. One coat at 1.1 to 1.7 mils seals the board; a second adds another mil of the same sealer and changes nothing about how the topcoat looks. Where a second coat earns its place is a patch that drinks visibly more than the board around it, and there the right move is a second coat on the patch only.
Spraying beats rolling on new drywall for speed and for an even film, and it is what both primer classes are set up for. Rolling a PVA works and is what most people do with a 3/8 inch nap; expect to land nearer 250 square feet per gallon than 400, because dry board grabs it. If you are spraying a wall primer, the sprayers sized for interior walls handle it, and thinning rules apply to the PVA but not to a surfacer.
Frequently Asked Questions
Does new drywall require two coats of primer?
No, for a sealer. One coat of PVA at 1.1 to 1.7 mils dry does the sealing, and a second coat of the same product adds film without changing the result. Spot-prime a patch that is drinking more than the board around it instead of recoating the whole room.
Is Kilz primer good for new drywall?
The PVA version is, for the job it is built for. It seals porosity and leaves about 1 mil of dry film, which is all a Level 4 wall in flat light asks for. The KILZ stain-blocking and high-adhesion lines are built for other problems and are the wrong pick on bare board, so check which one is in the can.
Does new drywall need primer before painting?
Yes. Raw paper face and dried joint compound absorb at different rates, so a topcoat put straight onto bare board dries with the joints showing as a change in sheen. That is flashing, and it is a sealing failure rather than a paint failure. It also wastes finish paint, which costs more per gallon than primer.
Is it better to spray or roll primer on new drywall?
Spray, if the gear is there. It is faster across open wall and lays a more even film, and a primer-surfacer can only reach Level 5 sprayed. Rolling a PVA is perfectly good and is what most homeowners do, with a 3/8 inch nap. The one case where rolling wins outright is a small room where masking takes longer than the priming.
What is the best primer to put on new drywall?
For a Level 4 wall in ordinary light, a PVA or an acrylic primer-sealer. For a Level 4 wall under raking light, a primer-surfacer sprayed at 15 to 20 mils wet, or a skim coat. For a wall with torn face paper after wallpaper removal, a penetrating sealer. The surface decides, not the price.
How to prep new drywall before priming?
Finish the joints to at least Level 4, fill every nick and gouge, let the compound dry fully, then sand and remove the dust. Check it with a light held flat against the wall before you prime, not after, because a raking work light shows the same shadows the room will show later and it is far cheaper to fix a joint than to strip a primed wall.
Final word
There are four jobs here and one word covers all of them, which is why the question has no single answer. Sealing takes 1 mil. Bonding takes a resin that grips. Blocking takes a barrier. Leveling takes 9 mils and an airless rig at 2,700 psi. Work out which of the four your wall needs, and the shelf gets simple.
