Last Updated on September 29, 2026
The best caulk finishing tool is a cheap one. Every tool that reliably shapes a bead costs between about $4 and $8, the $50 to $85 “professional kits” filling the shopping results are the same plastic profiles in a bigger box, and the thing that actually decides whether your bead looks good is not which tool you buy. It is whether you tool it dry, in one pass, before the sealant skins over.
That is an unusual thing to read on a page like this, so here is the evidence for it. The top organic result for this search is a Reddit thread titled “Are those caulk tools worth it?”. A Houzz thread from 2008 still ranks on page one, and its top answer is “No such thing. Your finger is best.” The New York Times’ Wirecutter recommends a $5 tool. And when you line up the mass-market tools by their published ratings, most of them sit between 3.1 and 4.3 stars.
There are only three kinds of caulk finishing tool
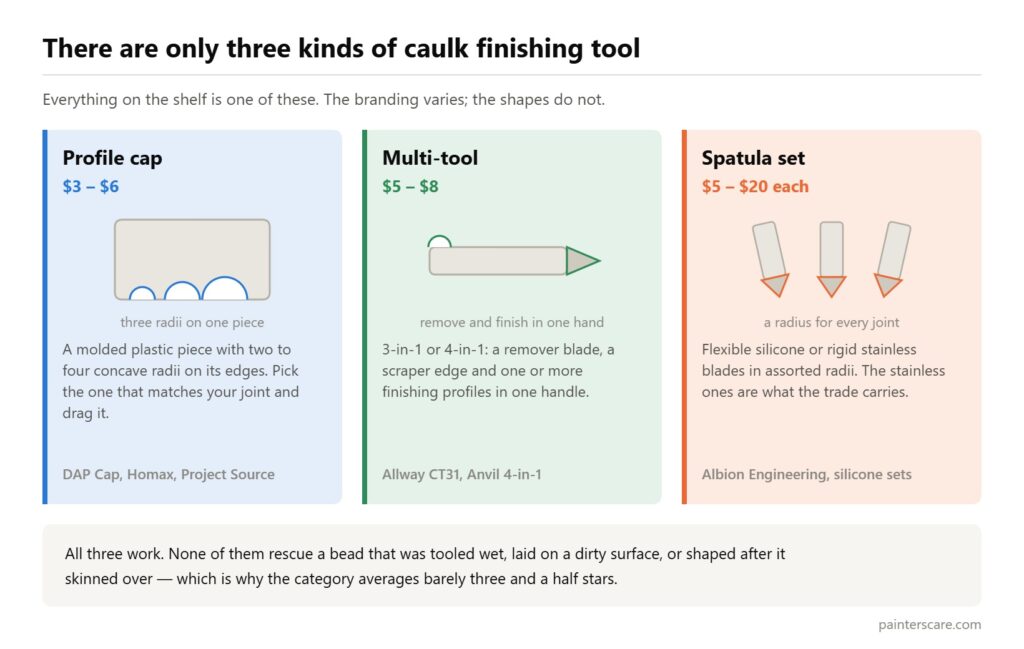
Strip away the branding and every caulk finishing tool on the shelf falls into one of three families.
Profile caps. A small molded plastic piece with two to four concave radii on its edges. You pick the radius that matches your joint and drag it. The DAP Cap and the Homax finisher are the archetypes. They cost $3 to $6 and they are the most-sold tools in the category.
Multi-tools. Usually sold as 3-in-1 or 4-in-1: a remover blade at one end, a scraper edge, and one or more finishing profiles. The Allway CT31 and the Anvil sliding tool are the common ones, at $5 to $8. These are the ones that get the video coverage, because removing and re-finishing in one hand is genuinely convenient.
Spatula sets. Flexible silicone or stainless blades in assorted shapes, the kind sealant contractors carry. The cheap silicone sets are a few dollars. The stainless ones from firms like Albion Engineering are around $20 each and are the only items in the category built to be used every day for years.
What the published ratings actually show
These are the ratings and prices Google Shopping currently carries for the tools that appear in the results for this search. They are aggregated buyer ratings, not a bench test — but the pattern across thousands of votes is more useful than any single reviewer’s opinion, and the pattern is unflattering.
| Tool | Type | Price | Rating | Votes |
|---|---|---|---|---|
| Allway CT31 3-in-1 | Multi-tool | $7.99 | 4.3 | 299 |
| Hyper Tough 3-in-1 | Multi-tool | $6.91 | 4.4 | 117 |
| Project Source finishing tool | Profile cap | $4.49 | 4.2 | 178 |
| Anvil 4-in-1 Sliding | Multi-tool | $4.98 | 3.8 | 253 |
| DAP Cap | Profile cap | $2.99 | 3.8 | 90 |
| Anvil Caulking Tool Kit (8-pc) | Set | $10.98 | 3.8 | 134 |
| DAP Pro Caulk Tool Kit | Set | $17.99 | 3.7 | 267 |
| Newborn Caulk Buddy | Profile cap | $4.99 | 3.4 | 28 |
| Anvil Cap 2-in-1 | Profile cap | $3.98 | 3.1 | 229 |
| Red Devil Caulk Devil | Multi-tool | $4.49 | 2.3 | 3 |
Nothing in the category is loved. The best-rated tool with meaningful review volume manages 4.3 stars, and the single most-reviewed item on Home Depot’s site — the Anvil Cap 2-in-1, with 514 ratings — sits at 3.5. For a product that costs less than a sandwich and does one job, that is a lot of disappointed buyers.
The $50 kits are the $5 tools in a bigger box
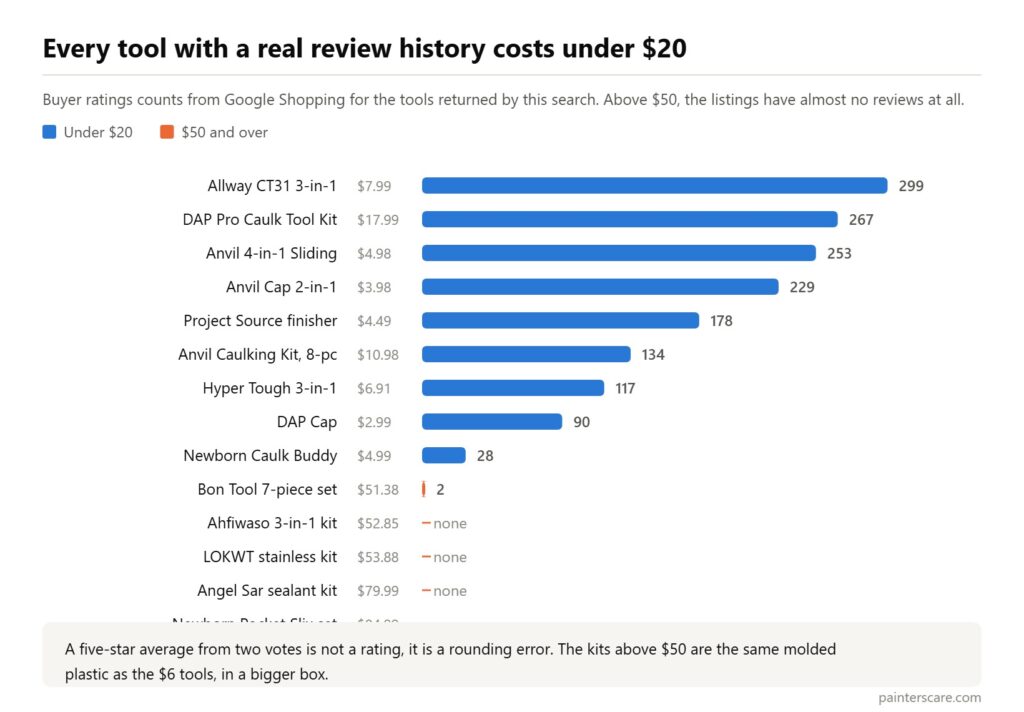
Search this term and the shopping carousel fills with kits at $52, $53, $54, $80 and $85. It is worth understanding what is happening there, because it is not that those kits are ten times better.
They are marketplace listings, mostly from brands you have never heard of, containing the same molded silicone profiles and a plastic scraper that the $6 tools contain. The giveaway is the review counts: where the $5 tools carry 90 to 500 ratings, these carry two, three, or none at all. A five-star average from two votes is not a rating, it is a rounding error.
If you want to spend real money on a finishing tool, spend it on a single stainless spatula rather than a boxed set of plastic. That is what the trade does.
Is it better to caulk with a tool or your finger?
Both work. The honest answer is that this question gets far more attention than it deserves, because the variable that decides the outcome is a different one.
Tooling a sealant joint is not cosmetic. It presses the material onto both joint faces so it actually bonds, and it shapes the surface so water runs off rather than sitting on it. Tremco’s guidance is that tooling should be “completed without the use of tooling agents, such as water, soap, or detergent solutions”, and that it “can only be accomplished prior to the sealant achieving a skinned surface”.
That is the whole game, and it is why so many people conclude their tool is junk. They lick a finger or dip the tool in soapy water, because that is what almost every guide tells them to do, and the bead looks lovely for a couple of weeks and then peels. The tool was never the problem. There is a full account of this, with the manufacturer sources, in our guide to smoothing silicone caulk.
So: a dry tool, or a dry gloved finger, in one unbroken pass, within the skin-over window. Do that and a $4 profile cap produces a professional joint. Skip it and no purchase will save you.
When a tool genuinely beats a finger
There are four situations where the tool earns its money, and they are worth knowing because they tell you which one to buy.
Silicone. Cured silicone does not wash off skin — you have to wait and roll it off. A tool you can wipe on a rag between passes is simply more pleasant, and a glove plus a tool is the standard combination.
Long straight runs. A finger runs out of travel every few inches and each restart is a ridge. A tool with a handle lets you pull several feet in one movement, which matters because one pass is the objective.
Consistent radius. A profile cap gives the same concave section along the whole joint. Fingers vary, and vary more as your hand tires.
Internal corners. The one place a finger genuinely struggles, and the place where a failed bead usually splits first.
If none of those describe your job — a short run of painter’s caulk along a baseboard, say — a gloved finger is a perfectly respectable answer and you can keep your five dollars.
What to buy
Three sensible purchases, depending on what you are doing.
For a one-off bathroom or kitchen job: a profile cap. The DAP Cap is the classic: a few dollars, several radii on one piece, and it does exactly one thing. Buy two so you have a clean one when the first is loaded.
If you are also removing old sealant: a 3-in-1. Removing the old bead is most of the work, and doing it with the same tool saves a swap. A 3-in-1 silicone tool covers scrape, remove and finish. If you are working through a whole bathroom, our caulk remover comparison covers the dedicated options.
If you caulk regularly: flexible spatulas. A set of silicone spatulas in assorted radii is what the profile cap is pretending to be, and the flex lets you match an uneven joint. Step up to stainless if you are doing this weekly.
What not to buy: anything over about $20 that is mostly plastic, and any kit whose five-star rating rests on fewer than ten votes.
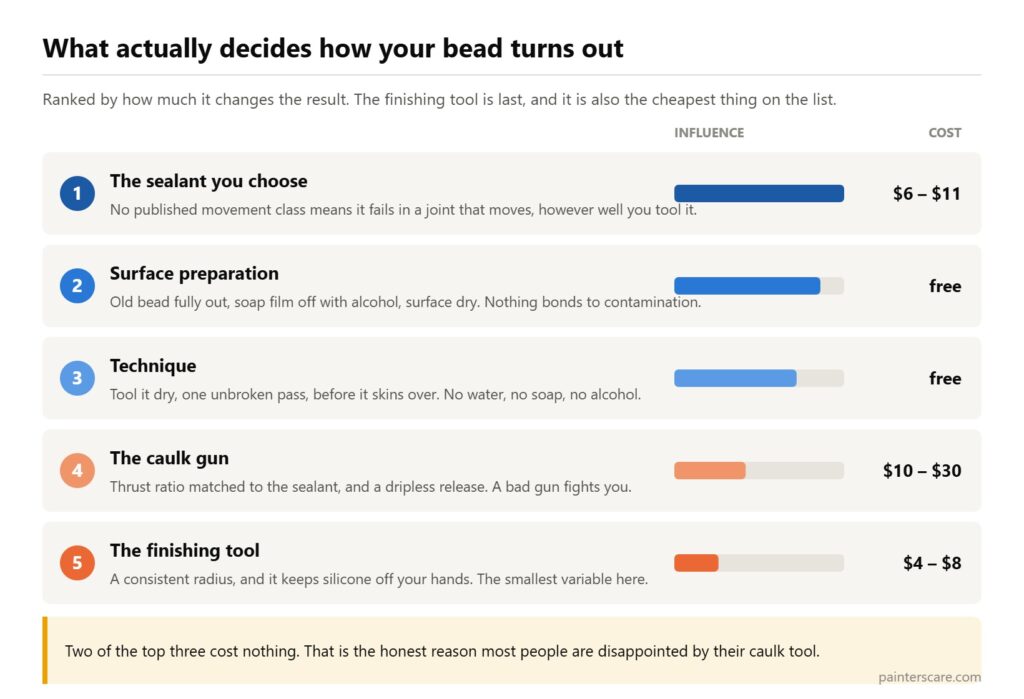
The tool is the cheapest part of the job
Worth keeping in proportion. A finishing tool is $5. The gun matters more — a smooth-rod gun with a poor thrust ratio will fight you on silicone, and Wirecutter’s own advice is that any gun with a padded handle, an on-board piercing rod and a dripless trigger will do. We go into thrust ratios in how to use a caulk gun, and compare models in our caulking gun roundup.
The sealant matters more still. Picking a product with no published movement class for a joint that moves will undo any amount of careful tooling, which is covered in latex caulk against silicone and, for wet rooms, the best caulk for a shower.
Frequently asked questions
Do caulking tools really work?
Yes, but less dramatically than the marketing suggests, and only if you use them dry. A profile cap gives a more consistent radius than a finger and is far more pleasant with silicone. It will not rescue a bead that was over-applied, laid on a dirty surface, or tooled after it skinned over. The published ratings reflect that: the category’s best-selling tools average between 3.1 and 4.3 stars, which is what happens when a product works but is widely used wrongly.
What is the most effective tool for applying caulk?
For applying, the caulk gun — a dripless model with an adequate thrust ratio for the sealant you are using. Finishing tools shape the bead after it is down; they do not apply it. Confusing the two is why people buy a $5 finishing tool and wonder why their bead is still lumpy.
What is a good smoothing tool for caulking?
A cheap plastic profile cap with two or three concave radii, or a flexible silicone smoothing tool set if you want to match uneven joints. Both are under $10. The Allway CT31 is the best-rated multi-tool with real review volume at 4.3 stars from 299 ratings; the profile caps from DAP, Homax and Project Source all sit in the same few-dollar band.
How do you get a good finish on caulking?
Mask both sides of the joint with low-tack tape, lay a bead slightly smaller than you think you need, tool it dry in one unbroken pass, then pull both tapes off immediately while the sealant is still wet. Tape, not lubricant, is what produces the clean line people associate with professionals.
Should I use soapy water or Windex with a caulk tool?
No. Water, soap, glass cleaner and alcohol are the four things most guides recommend and the four things sealant manufacturers specifically warn against, because they interfere with adhesion and can act as a release agent at the joint face. The bead will look smooth and bond worse.
What caulking tools do professionals use?
Professional caulking tools are almost always stainless steel tooling spatulas, a few of them in different radii, from trade suppliers like Albion Engineering at around $20 each. They are rigid, they clean up with a rag, and they last for years. Almost no professional is buying a $50 boxed plastic kit.
How do you use a 3-in-1 caulk tool?
Use the pointed or bladed end to cut and lift the old bead out, the scraper edge to clear the residue, then the concave profile to tool the new bead. Do the removal completely before you gun anything: fresh silicone will not bond reliably to cured silicone, so any old material left in the joint becomes the weak point.
Are the expensive caulking tool kits worth it?
Generally no. The kits at $50 to $85 dominating the shopping results are marketplace listings containing the same molded plastic as the $6 tools, and most carry single-digit review counts. If you want to spend more, buy one good stainless spatula rather than a box of plastic ones.
Can I just use a spoon or an old credit card?
Yes, and plenty of people do. The back of a teaspoon has roughly the right radius for a normal tub or shower joint, and a credit card cut to a curve will do a corner. They work for the same reason the $4 tool works: a rigid, smooth, correctly shaped edge pulled once in a steady line.
Why does my caulk tool drag and leave ridges?
Almost always because the sealant has started to skin. You have roughly ten to thirty minutes on most bathroom silicone, less in a warm dry room. Work in sections of about three feet, tool each section before moving on, and wipe the tool clean between passes — a loaded tool smears rather than shapes.
Do I need a different tool for silicone and for painter’s caulk?
No, the same profiles work on both. The difference is in handling: acrylic painter’s caulk cleans off skin and tools with water, silicone does not, which is the main practical reason to own a tool at all rather than use a finger.
What to remember
Buy a cheap one. A $4 to $8 profile cap or 3-in-1 does everything a $60 kit does, and the ratings across hundreds of buyers say nothing in the category is worth more than that. Own two so you always have a clean edge.
Then spend your attention where it changes the result: mask the joint, tool it dry, do it in one pass, and get it done before the sealant skins. Tremco’s silicone guidance, including the dry tooling instruction, is published in full. If you are starting from scratch, our guide to caulking properly covers joint preparation, and a drop cloth will save your floor while you learn.

These caulk finishing and removal tools seem helpful, and I will purchase one of these tools when my work is completed. This work is essential, and I have to complete it as soon as possible.