Last Updated on October 6, 2026
To remove paint from walls, first decide whether you should. On an interior drywall wall the answer is usually no: take off whatever is loose, feather the edges, fill the hollows and skim if you want it flat. Full stripping belongs on plaster, masonry and joinery, not on paper-faced board.
Search this and you will be handed a stripping procedure. Scrape the flakes, brush on a chemical stripper or run a heat gun over it, scrape again, fill, sand, repaint. It is a real method and it is the wrong one for most of the walls people ask about.
The tell is in the results underneath the advice. The top discussion on this query has someone asking how to get paint off their walls, and the most useful reply is simply: take off the loose stuff and skim the whole wall with joint compound. That is the professional answer, it has a name in the trade standards, and almost nothing written about this mentions it.
First, which of the three states is your wall in?
Everything follows from this, and it takes a minute to establish. Press a wide scraper flat against the wall and push. Then run your palm over the surface.
| What you find | What it means | What to do |
|---|---|---|
| Paint lifts in sheets or flakes ahead of the scraper | The bond has failed, usually damp or a coat applied over something greasy or dusty | Take off everything that moves. Stop where it holds. |
| Paint holds, but the surface is lumpy, ridged or has roller texture | Sound paint, poor finish. Nothing is wrong with the bond | Do not strip. Fill, sand and skim. |
| Paint holds and the surface is smooth | Nothing is wrong at all | Clean, key it lightly, paint over it. |
Only the first case is a removal job, and even then it is a partial one. The instinct to take a wall back to bare board because part of it is flaking is what turns a morning’s work into a week of it.
What is the wall actually made of?
Knock on it. A hollow, drummy sound with a bit of give is drywall. A dense, hard, unforgiving sound is plaster on masonry or on lath. They tolerate completely different things.
| Wall | Chemical stripper | Heat | Sanding |
|---|---|---|---|
| Drywall | No | No | Light only |
| Plaster on masonry | Yes, with care | Cautiously | Yes, wet |
| Bare brick or render | Yes | Yes | Yes |
Drywall is a gypsum core with a paper face, and the paper is the bit you decorate. Soak it in stripper and the paper goes soft and lifts; put a heat gun on it and it scorches. Once the paper is breached the board underneath is exposed and crumbly, and you have converted a decorating job into a patching job. That is the specific reason the standard advice does not fit the most common kind of interior wall in a modern home.

Check for lead before you choose a method
Assume lead in any paintwork from before the 1980s until a swab test says otherwise. This matters more on walls than almost anywhere else, because the surface area is large and the methods people reach for — dry sanding and heat — are the two that put lead into the air.
The official line is not to strip it at all unless you have to. Leave sound paintwork in place, key it and paint over it. If you genuinely must remove it, the acceptable methods narrow to chemical stripper, which keeps the lead in a wet sludge you can bag, and wet abrasive with a scraper. Hot air stays below 500 °C and blowtorches are out entirely. Wear an FFP3 mask rather than a dust mask. Our guide to matching the removal method to the surface goes through the HSE guidance in full.
If the paint is loose: scrape, feather, fill
This is the job most people actually have, and it is not stripping.
- Take off everything that moves. A 100 mm stripping knife held at a shallow angle, pushed rather than dug in. Work until the scraper stops finding an edge to get under.
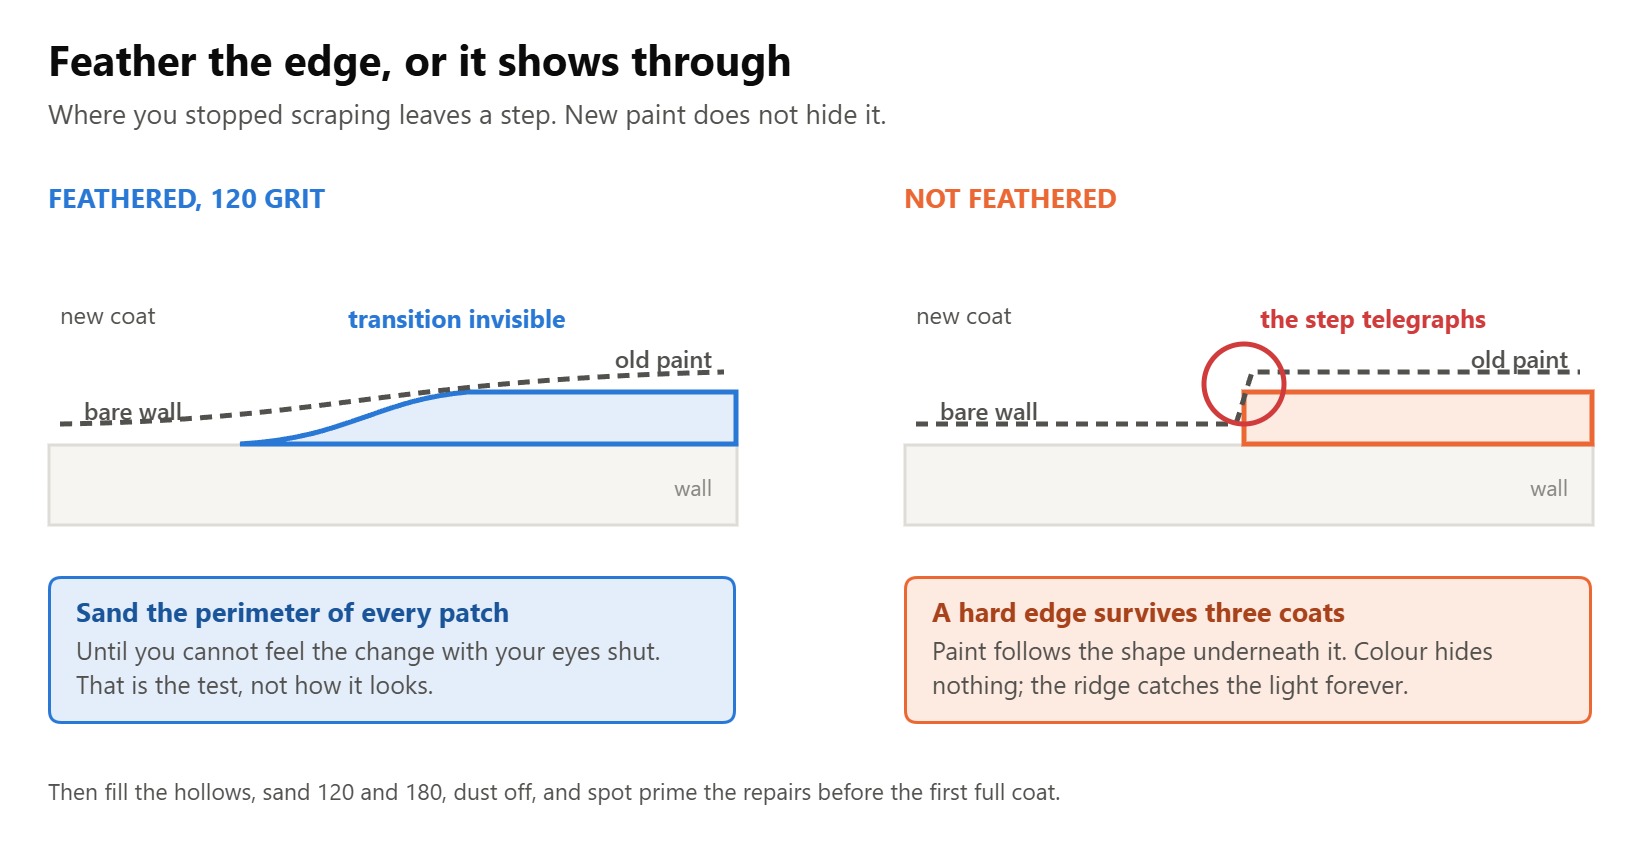
- Feather the edges. Every place where you stopped leaves a step between bare wall and remaining paint, and that step will show through new paint like a watermark. Sand the perimeter of each patch with 120 grit until you cannot feel the transition with your eyes shut.
- Fill the hollows. Joint compound or a lightweight filler, applied wider than the hole and thinner than feels right. The Gypsum Association’s own repair guidance is to let compound dry at least 24 hours before sanding, which is longer than the tub usually says. The technique is the same one used overhead, covered in our guide to spackling a ceiling.
- Sand and dust. 120 then 180 grit, then a damp cloth. Filler dust left on the wall is the most common reason a new coat looks patchy.
- Spot prime the repairs. Bare filler and bare board drink paint at a different rate from old paintwork, and without a primer the patches flash through the topcoat.
If you are choosing between products for step three, our comparison of painter’s putty against spackle covers which belongs where.
If you want a flat wall: skim it, do not strip it
When the complaint is that the wall looks bad rather than that the paint is failing, the answer is a skim coat, and it is a specified finish rather than a botch.
The Gypsum Association’s GA-214 standard sets out levels of finish for board walls. Level 4 is two coats over the joints, and it is specified where smooth walls are decorated with flat paint, light textures or wallcoverings — the standard notes that non-flat or dark, deep-tone paints are not recommended at this level. Level 5 adds a skim coat of joint compound across the entire surface, and it is what the standard specifies where the wall takes a sheen or gloss paint, a dark color, or sits under critical lighting.
That is the whole answer to most “how do I get this paint off” questions. You do not want the paint off. You want a Level 5 surface, and a thin skim over sound paintwork gets you there in an afternoon per wall, with no stripper, no heat and no risk to the board.
Two conditions. The existing paint has to be sound, because a skim coat over failing paint fails with it. And it has to be clean and keyed, so wash off any grease and give a gloss or silk surface a rub with abrasive paper first.
When stripping actually is the right call
There are real cases. Gloss or oil-based paint on plaster walls, which is common in houses done up in the seventies and eighties and will not hold a modern latex paint. Many layers built up until moldings and details have disappeared. Masonry paint on brick that is trapping damp. A wall being taken back for a full re-plaster.
On solid plaster or masonry, a poultice-type chemical stripper is the safest method: brushed on thick, covered, left for hours rather than minutes, then scraped into a bag. It is slow, and slow is the point — it does the work instead of you gouging the substrate. Steam strippers also work on plaster walls and add no chemicals, though they add a great deal of moisture, so the wall needs days to dry before anything goes back on it.
For the other surfaces in the same room, the method changes again: timber takes heat well, metal takes abrasive, and plastic takes neither, and glass wants a blade rather than a chemical.
Should you use a heat gun on a wall?
Not on drywall, and cautiously on plaster.
The advice you will read is to hold the gun four to six inches away and keep it moving. That is sound technique on a timber door. On a paper-faced board it is a way to scorch the face and, in the worst case, to set light to whatever is in the cavity behind it — dust, cobwebs, insulation. The paper browns long before the paint blisters.
On solid plaster a heat gun can work, but plaster holds heat and expands, and you can crack a ceiling line or blow a patch off the lath by dwelling. If the paint is old enough to be worth stripping it is old enough to be worth lead-testing first, and heat is the method the HSE caps at 500 °C for exactly that reason. Our guide to removing paint with a heat gun covers the temperatures and where the method belongs.
Splashes, drips and dried spots
Half the people asking this question do not want to strip anything. They want one mark off an otherwise fine wall, and that is a different job with a different answer.
Still wet: a damp cloth, and quickly. Latex paint comes off anything in the first few minutes.
Dried latex paint on a painted wall: hold a cloth soaked in warm water against the spot for a minute to soften it, then lift the edge with a plastic scraper or an old card held almost flat. Work from the outside in. Do not rub, because rubbing takes the wall paint with it.
Dried gloss or oil-based on a painted wall: denatured alcohol or denatured alcohol on a cloth will soften it, but it will soften the latex paint underneath at the same rate. Test in a corner. On a matte wall you will almost always end up with a shiny patch where you rubbed.
Which leads to the answer most decorators give and most guides skip: on a matte latex wall, touching the spot in with the original paint is faster and looks better than getting it off. Removing it damages the sheen around it, and a repaired sheen is more visible than a small mark ever was. Keep the can. If you do not have it, cut in a full wall rather than a patch, because a patch of even the correct color will flash.
On trim, baseboards and anything gloss, the opposite is true: let the drip harden completely, then pare it off with a plastic blade held flat. Hard paint chips away cleanly; half-cured paint smears.
Frequently asked questions
What is the easiest way to remove paint from walls?
Not removing it. Scrape off whatever is loose, feather the edges with 120 grit, fill the hollows and skim the wall if you want it flat. That is faster than stripping, costs less, and carries no risk to the board underneath. If the paint genuinely has to come off a plaster or masonry wall, a poultice-type chemical stripper left on for hours is the least effortful method that does not damage the substrate.
Does vinegar take paint off walls?
No. Vinegar is a dilute weak acid and cured paint is not something acid dissolves. Warm vinegar will soften a fresh splash of latex paint enough to wipe, which is where the idea comes from, but it will not touch a cured wall coating. The version of this trick with fabric softener works on wallpaper paste, not on paint, and the two get confused constantly.
What dissolves paint fast?
Methylene chloride did, which is why it was banned for consumer use. What is left works by softening rather than dissolving, and none of it is fast: a modern benzyl-alcohol or NMP-free stripper wants somewhere between thirty minutes and several hours under a cover. Anything that promises to dissolve paint in minutes on a wall is either not doing it or is aggressive enough to take the surface with it.
Will dish soap or Dawn remove paint from a wall?
Only while it is wet. Hot water and detergent lifts fresh latex splashes easily and is always the first thing to try on a mark rather than a coating. Once the film has cured it is no longer water-soluble and detergent does nothing. It is still worth washing a wall before you decorate, because grease is one of the main reasons the next coat fails.
Can hydrogen peroxide remove paint?
Not usefully. Household-strength hydrogen peroxide is a bleach and a mild oxidizer, so it may lighten a stain in a paint film but it will not release the film from the wall. It is genuinely useful on mold, which is often what people are actually looking at when a painted wall has gone patchy in a corner, but that is a different problem with a different fix.
Can you mix vinegar and dish soap?
Yes, that combination is safe and it is a decent general cleaner for walls before decorating. It will not remove paint. The mix to avoid is vinegar with bleach, which releases chlorine gas, and bleach with any alcohol-based cleaner. If you are washing a wall down, warm water with a little sugar soap or detergent does the job without any chemistry to think about.
How do you remove paint from a wall without damaging the plaster?
Use a chemical poultice and give it time. The damage to plaster nearly always comes from impatience: scraping before the stripper has softened the full thickness, so you dig at the surface, or using heat and dwelling in one spot. Brush the stripper on thickly, cover it with film so it cannot dry out, leave it for hours, then lift the softened paint with a plastic or blunt steel scraper held almost flat. Work in small areas so nothing dries before you reach it.
How do you remove paint from walls without chemicals?
A steam stripper on plaster, or wet abrasive on anything. Steam is effective on solid walls and adds nothing you have to neutralize afterwards, but it soaks the wall, so allow several days of drying before you decorate. Wet sanding keeps dust down and is the only method the lead guidance allows besides chemical stripping, though it is slow over any real area. On drywall, neither is a good idea, and the no-chemicals answer is to fill and skim instead.
Do you need to remove old paint before repainting a wall?
Almost never. Sound paint is a perfectly good substrate for new paint, and removing it creates work and risk for no gain. What you do need to remove is anything loose, anything greasy, and any surface too glossy to key. Wash the wall, sand back any flaking edges until they are flush, spot prime the repairs, and paint. The exceptions are failing paint over a large area, many built-up layers, or a wall going back to bare for re-plastering.
How do you get paint off a wall without taking the paper face off the drywall?
Keep the scraper shallow and stop early. Hold the blade close to flat rather than at an angle that lets a corner dig in, push rather than lever, and accept the boundary where the paint stops lifting instead of forcing past it. No liquid stripper and no heat. If the paper does tear, seal the fuzzed area with a drywall sealer or a coat of oil-based primer before filling, otherwise the joint compound soaks in and the patch never sands flat.
How do I remove dried paint from a wall?
Soften it first, then lift rather than rub. Hold a warm damp cloth on the spot for a minute, then get under the edge with a plastic scraper or an old card kept almost flat to the wall. That works for dried latex paint. Dried gloss needs denatured alcohol, which softens the wall paint underneath just as fast, so on a matte wall the honest answer is usually to touch the spot in with the original paint instead.
What happens if you put primer over paint?
Nothing bad, and often something useful. Primer over sound paint evens out the porosity so the topcoat dries to a consistent sheen, and it blocks stains and strong colors from bleeding through. It is not a substitute for preparation: primer over a greasy, dusty or flaking surface fails exactly like paint would. Where it earns its place is over filler and bare patches, which drink paint at a different rate from the old paintwork around them.
What is the hardest wall color to paint over?
Strong reds, deep oranges and bright yellows. The pigments in them are translucent, so they keep showing through pale coats no matter how many you apply. The fix is a gray-tinted primer rather than more topcoat: one coat of primer tinted towards the new color will bury a red that four coats of white latex paint will not. Deep blues and greens behave similarly but less severely.
What to remember
The question is almost never how to get the paint off. It is what is wrong with the wall, and the answer is usually that a few areas have failed and the rest is fine.
Three things to hold on to. Take off what is loose and stop there. Feather every edge you leave behind, because the step is what shows through the new paint, not the color underneath. And if what you actually want is a flat wall, skim it — that is a Level 5 finish in the trade standard, not a shortcut. The finish levels are set out in the Gypsum Association’s GA-214 guide if you want the full specification.
