Caulk is sold by color, by room and by brand, and none of those three decide whether it works. One number does: movement capability, the percentage of the joint’s own width that the cured bead can stretch and squash without tearing. It runs from 7.5% on the cheapest acrylic tubes to 100% on the best silicones, and the gap between the two ends is why a bead splits open one winter and an identical-looking one next to it does not.
The second thing that decides it is whether you need to paint over the bead. Those two questions — how much does this joint move, and does paint go on top — narrow the shelf to one or two products. Everything below works from there.
The number that decides which tube you need
Movement capability is written on the back of the cartridge as an ASTM C920 class. Class 25 means the bead tolerates the joint opening or closing by 25% of its width. In a 1/2 inch joint that is about 1/8 inch of travel in each direction. Class 50 doubles it. A few high-end silicones carry a 100/50 rating, meaning they stretch to twice the joint width but only compress by half.
Latex and acrylic sealants are tested to a different standard and usually sold with no class printed at all, which in practice puts them at the bottom of the range.
| Type | Movement capability | Paintable | Typical use |
|---|---|---|---|
| Acrylic latex | ±7.5% to ±12.5% | Yes | Interior trim, baseboards, crown molding |
| Butyl rubber | ±7.5% | No | Gutters, flashing, roof joints |
| Siliconized acrylic | ±12.5% to ±25% | Yes | Backsplashes, window and door frames |
| Polyurethane | ±12.5% to ±50% | Usually not | Siding, concrete, masonry |
| MS polymer hybrid | ±25% to ±50% | Yes | Exterior joints that need paint |
| Silicone | ±25% to ±100% | No | Showers, tubs, sinks, glass |
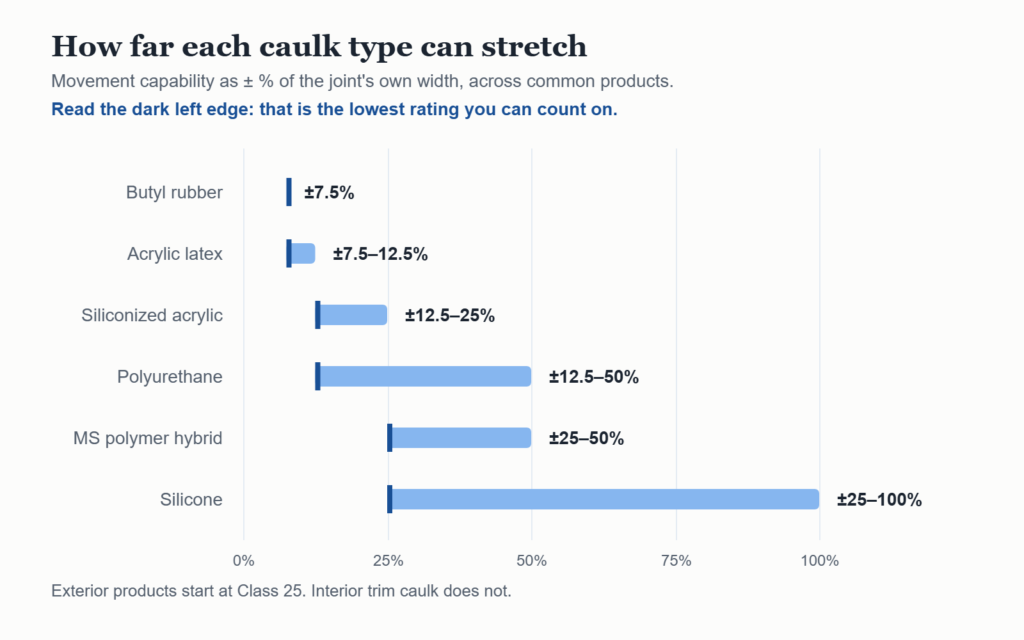
The sevenfold spread between the top and bottom of that table is the whole decision. A bathroom corner barely moves. Interior trim shifts a little with humidity. An exterior joint cycles with every temperature swing, which is why exterior products are rated Class 25 and above and interior trim caulk is not. Put a ±7.5% product in a siding joint and it will fail, whatever it cost.
The six types, and where each one goes
Acrylic latex (painter’s caulk)
Water-based, cheap, rated ±7.5% to ±12.5%, and the only one that takes paint with no fuss. It cleans up with a damp cloth before it skins, sands once cured, and accepts both latex and oil paint. Movement capability is the lowest of the group, so it belongs on joints that barely move: the line where baseboard meets wall, miters in crown molding, nail holes, hairline cracks in drywall.
It is the wrong product in a shower, on exterior siding, or anywhere standing water sits. It also shrinks as the water leaves, so a deep joint may need a second pass once the first has cured. The step-by-step method for laying a bead covers cutting the nozzle and tooling the face.
Siliconized acrylic
Acrylic latex with 2% to 5% silicone blended in. That buys roughly double the movement capability, ±12.5% to ±25%, and real water resistance while keeping the bead paintable, which is the combination most people actually want indoors.
It is the default choice for kitchen backsplashes, around window and door frames, and bathroom joints that are splashed rather than submerged. Tooling it is slightly less forgiving than plain latex because the skin forms faster. There is a separate technique for smoothing a siliconized bead before it skins.
Silicone
The most flexible of the six at ±25% to ±100%, the most waterproof, and the only one that is genuinely permanent in standing water. It resists mold, shrugs off UV, and holds its elasticity through temperature swings that crack everything else.
The catch is that paint will not bond to it. Not primer, not shellac, not an adhesion promoter sold for the purpose — it beads up and peels. If a joint needs paint over it, silicone is off the table before you start. It also will not stick over old silicone, so removing the previous bead completely is part of the job rather than an optional extra. Which silicone to buy depends on the surface, and the shower and tub comparison goes through them. Getting the old bead off completely needs a remover rather than a blade alone.
MS polymer hybrid
The one the buying guides leave out. Silyl-modified polyether carries silicone’s movement capability up to Class 50 while staying paintable, which resolves the tradeoff that the other five types force on you.
It costs two to three times what a latex tube does and the aisle rarely labels it clearly — look for “hybrid”, “MS polymer”, or a Class 50 rating on an exterior-rated cartridge. For a painted exterior joint that moves, it is the only honest answer.
Polyurethane
Built for structural exterior work: siding, concrete, masonry, joints where adhesion matters more than appearance. Movement capability runs ±12.5% to ±50% depending on the formulation, and it bonds aggressively to almost anything.
It is also unpleasant to work with. Cleanup needs solvent rather than water, it skins slowly, and most formulations are not paintable. Where a joint is exposed and needs to look finished, the hybrid above is usually the better pick. Exterior window joints have their own rules, set out in the guide to caulking exterior windows.
Butyl rubber
Non-curing, permanently tacky, rated about ±7.5%, and not structural. It stays soft, which is what you want where two metal surfaces move against each other and nothing is going to be painted: gutter seams, flashing laps, roof joints.
It is messy, stringy out of the gun, stays soft for the life of the joint, and collects dirt on any exposed face. Outside those specific metal applications there is almost always a better option.
Caulk or sealant — does the distinction matter?
In the aisle, no. Manufacturers use both words on products that do the same job, and the shelf label tells you nothing reliable.
In the specification, yes. “Caulk” historically meant a rigid, low-movement filler that shrinks as it cures. “Sealant” meant an elastomeric product that stays flexible and carries a movement class. Elastomeric sealants are tested to ASTM C920, which is where the movement class comes from. Latex caulks are tested to ASTM C834, which tops out at ±12.5% and is rarely printed on the tube at all. That is why a tube marked sealant usually carries a class and a tube marked caulk often carries nothing.
The practical version: ignore the word on the front, read the class on the back. If there is no class printed anywhere, treat it as a low-movement product and use it accordingly. The two most common choices are compared side by side in latex caulk versus silicone caulk.
Why the right caulk still fails
Most failed beads are not product failures. They are joint failures, and three rules fix almost all of them.
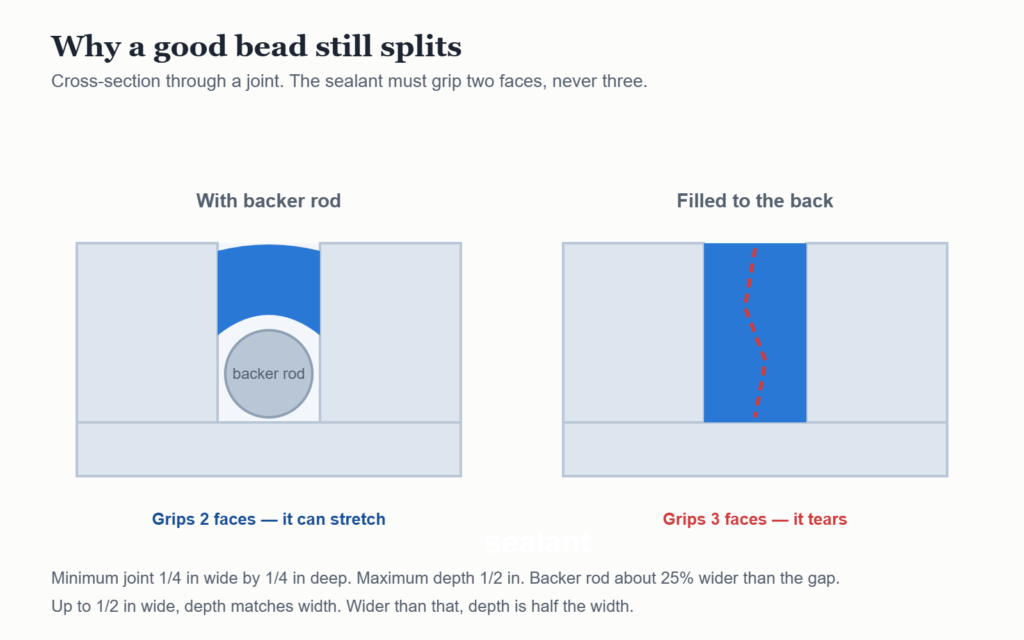
The first is size. The minimum workable joint is 1/4 inch wide by 1/4 inch deep. Below that there is not enough material to stretch, and the bead tears at the first movement. The maximum depth is 1/2 inch no matter how wide the gap is — deeper simply wastes material and cures badly.
The second is shape. Up to 1/2 inch wide, depth should match width 1:1. Above 1/2 inch, depth should be roughly half the width, a 2:1 ratio, so a 1 inch gap takes a 1/2 inch deep bead. An hourglass profile, thin in the middle and thick where it meets each face, stretches far better than a square slug of the same material.
The third is what the bead touches. Sealant should bond to two faces only. If it also grabs the back of the joint, it cannot stretch when the gap opens — it is pinned on three sides and tears itself apart, either down the middle or off one face. A foam backer rod, sized about 25% wider than the gap so it compresses in and stays put, both sets the depth and stops the back from bonding. In a shallow joint where a rod will not fit, bond breaker tape along the back does the same job.
This is also the answer to where not to caulk outside. Weep holes above windows, the bottom edges of lap siding, and the gaps under drip edges are drainage paths, and sealing them traps water inside the wall instead of letting it out. When a gap is too wide or too structural to seal, backer rod with a Class 50 sealant, flashing, or trim is the fix rather than a bigger bead.
Common questions
What type of caulk is best for exterior use?
For joints that move and will be painted, an MS polymer hybrid at Class 50. For unpainted structural joints in siding, concrete or masonry, polyurethane. For gutters and flashing, butyl. Plain acrylic latex at ±7.5% does not belong on an exterior joint of any kind.
Which caulking is best for a shower?
100% silicone. It is the only type that stays waterproof and flexible in permanent wet, and a shower corner never needs paint over it, so silicone’s one drawback does not apply. Which silicone to buy depends on the surface, and the shower and tub comparison goes through them.
What’s the difference between silicone and caulk?
Silicone is a type of caulk, not an alternative to it. The useful comparison is silicone against acrylic latex: silicone is waterproof, flexible to ±50% or more, and cannot be painted; latex is paintable, sandable, and flexible to about ±7.5%. The two most common choices are compared side by side in latex caulk versus silicone caulk.
Where should you not caulk outside?
Weep holes, the bottom edges of lap siding, under drip edges, and anywhere else water is meant to drain out. Sealing a drainage path holds water in the wall.
Is it better to caulk with a tool or a finger?
A tool, for anything that will be seen. A finger drags material out of the joint and leaves an uneven depth, which is the thing that controls how well the bead stretches. A profiled tool sets a consistent concave face in one pass. The finishing tools worth owning each cut a different bead radius, so one tool rarely suits every joint in a room.
What is better than caulking?
For a gap wider than 1/2 inch, backer rod and a Class 50 sealant. For a joint that moves more than the sealant can take, flashing or trim. For a drainage gap, nothing at all.
How long before I can paint over it?
Long enough that the bead has cured rather than skinned, which is hours for latex and up to a week for some high-movement products. Painting a bead that has only skinned traps solvent and cracks the film. Full figures by type are in how long caulk takes to dry.
Does caulk go on before or after painting?
Before, for anything paintable — caulk the trim, let it cure, then paint over it so the bead and the woodwork read as one surface. Silicone is the exception and goes on last, since nothing will cover it.
Two things to take to the shop: how far the joint moves, and whether paint goes over it. Everything else on the label is marketing. If the bead itself is the problem rather than the product, start with how to use a caulk gun. A gun with a decent thrust ratio and a dripless release makes a bigger difference than most people expect.
